Using Angular for Saml Idp Login Page Updated FREE
Using Angular for Saml Idp Login Page
Setup Two-Factor Authentication (2FA) for Windows Logon & RDP
Two-Gene Authentication (2FA/MFA) for Windows logon prevents the Password Based breaches. Enabling Windows 2FA always verify identities before assuasive access, making it more difficult for unauthorized users to gain access to your Microsoft Windows account. miniOrange Credential Provider can be installed on Microsoft Windows Client and Server operating systems to enable the Two-Factor Authentication to Remote Desktop (RDP) and local Windows Login. Windows 2FA solution is as well responsible for your User Management with a Microsoft Active Directory or a LDAP Directory. With this 2FA solution, users volition get easy access to the endpoints they need to access by increasing the identity balls and reducing the risk and exposure. Y'all can also enable offline access accordingly for secure authentication. With miniOrange's avant-garde MFA solution organizations are able to get secure admission to all work applications, for all there users, from anywhere, with any device they choose.
miniOrange 2FA Credential Provider for Windows Logon and Remote Desktop (RDP) access supports following Multi-Cistron Authentication (MFA) Methods:-
| Hallmark Blazon | Method | Supported |
|---|---|---|
| miniOrange Authenticator | Soft Token | |
| miniOrange Push button Notification | ||
| Mobile Token | Google Authenticator | |
| Microsoft Authenticator | ||
| Authy Authenticator | ||
| SMS | OTP Over SMS | |
| SMS with Link | ||
| Electronic mail | OTP Over Email | |
| Email with Link | ||
| Call Verification | OTP Over Call | |
| Hardware Token | Yubikey Hardware Token | |
| Brandish Hardware Token |
System Requirements for miniOrange Two-Factor Authentication (2FA) Credential Provider
miniOrange Credential Provider for Windows Logon and RDP Admission supports both client and server operating systems.
- Windows 7 SP1
- Windows 8.1
- Windows 10
- Windows xi
- Windows Server 2008 R2 SP1
- Windows Server 2012
- Windows Server 2012 R2
- Windows Server 2016
- Windows Server 2019
Supported Microsoft Windows Client versions:
Supported Windows Server versions(GUI and core installs):
miniOrange Two-Cistron Hallmark(2FA/MFA) Credential Provider for Windows Logon also requires .Internet Framework 4.5 or later. If the correct .NET version is not present on your system then miniOrange Credential Provider setup prompts you to install the .NET Framework.
miniOrange 2-Gene Authentication (2FA/MFA) Credential Provider tin too be installed via group policy software publishing and Group policy authoritative templates.
Become Costless Installation Aid - Volume a Slot
miniOrange offers complimentary help through a consultation call with our Organization Engineers to Install or Setup Two-Factor Authentication (2FA) for Windows Logon and RDP solution in your surroundings with 30 days trial.
For this, you need to simply transport u.s. an e-mail at idpsupport@xecurify.com to volume a slot and we'll aid you setting it upwardly in no fourth dimension.
How it Works
Prerequisites
- .Net Framework v4.0
Step by stride guide to setup Two-Factor Hallmark (2FA/MFA) Credential Provider for Windows Logon
1. Download 2FA Module
- Click here to download the Windows MFA module.
2. Configure Two-Factor Authentication(2FA) for Windows Logon in miniOrange
- Login into miniOrange Admin Panel.
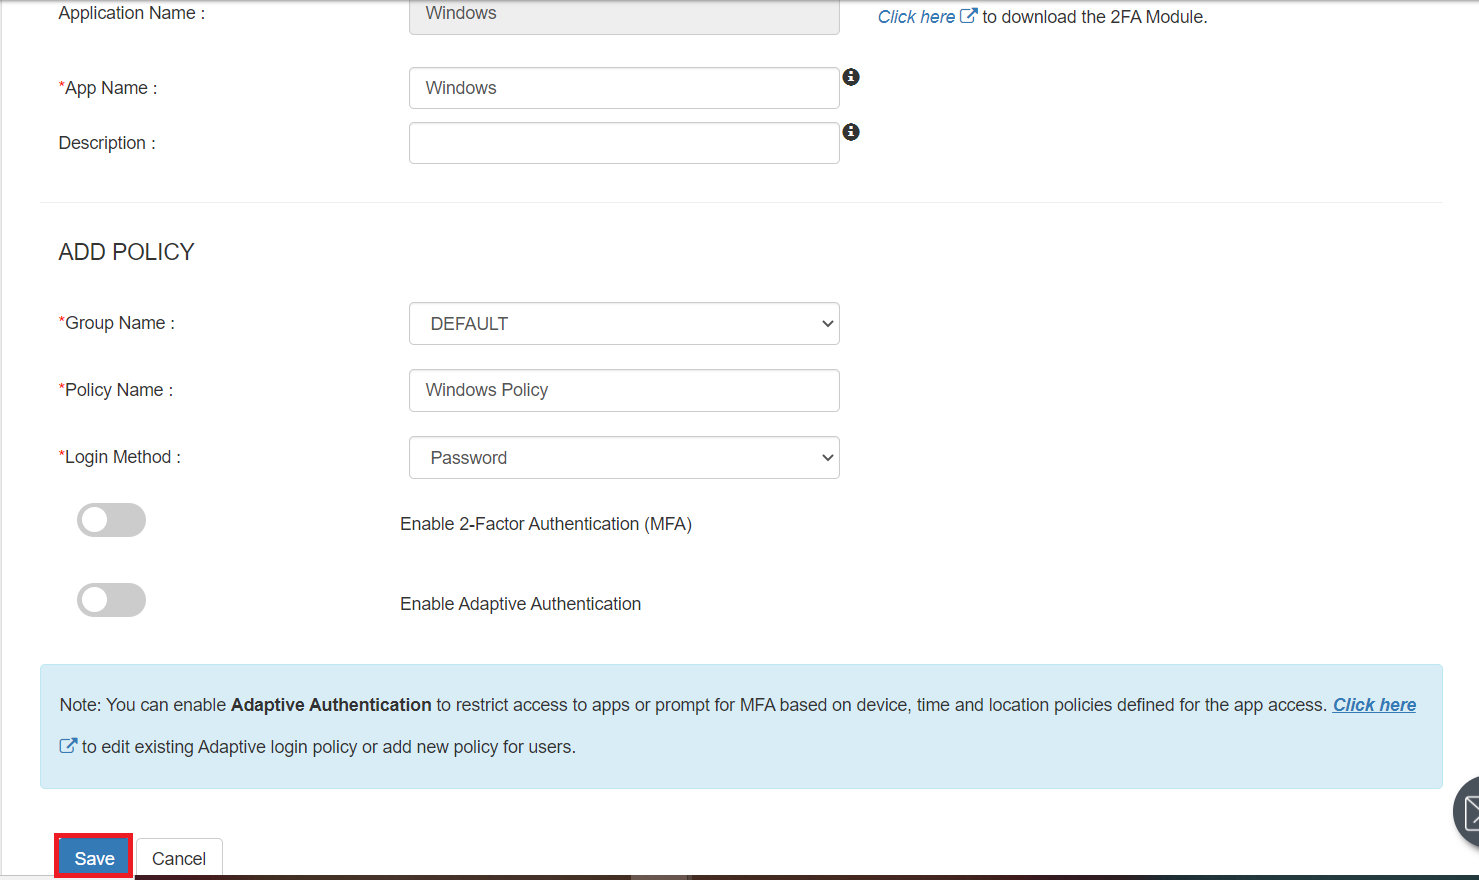
- Go to Apps and click on Add together Applicaton button.
- In Choose Application Type click on Create App button in Desktop awarding type.
- Add together Windows app on miniOrange.
- Add together App Name.
- Select the Login Method from the dropdown
- At present, click on Relieve.
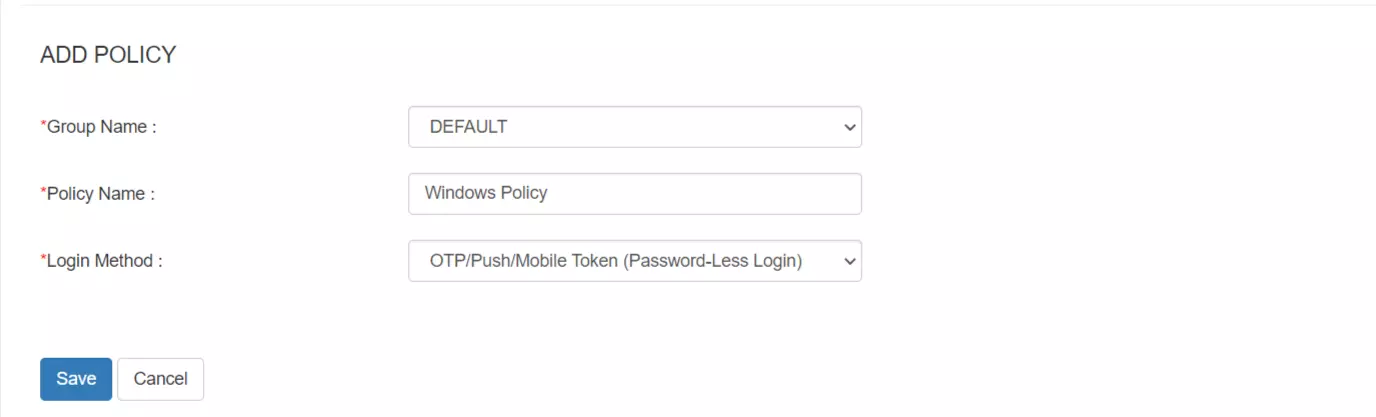
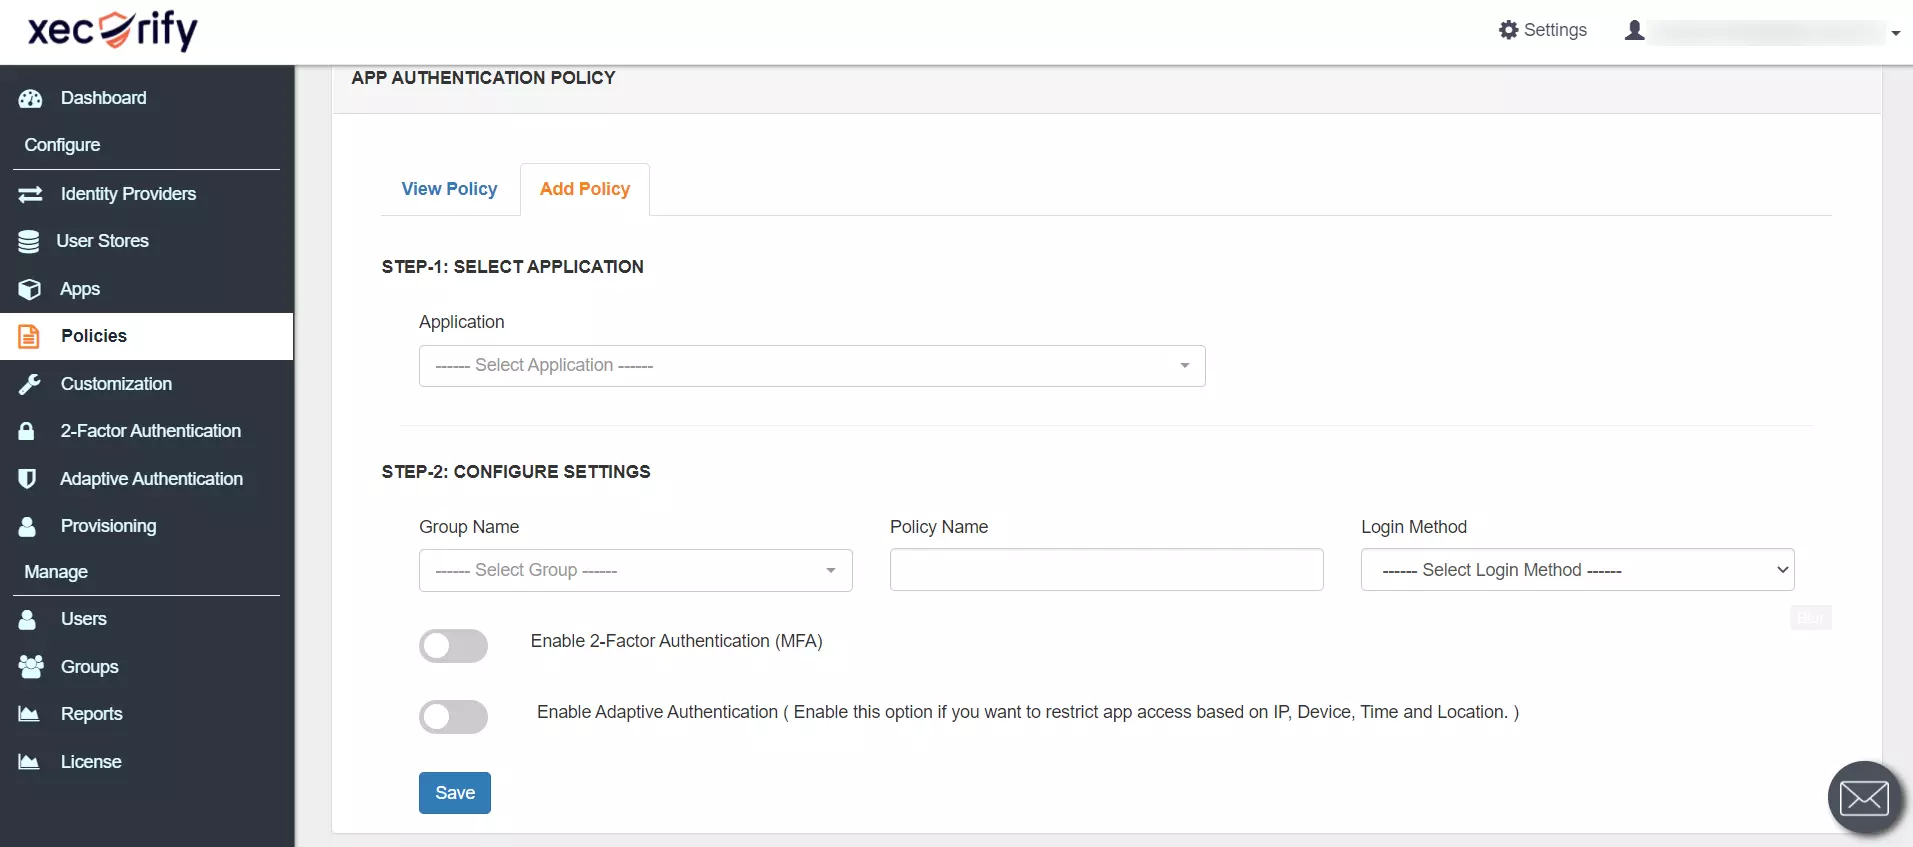
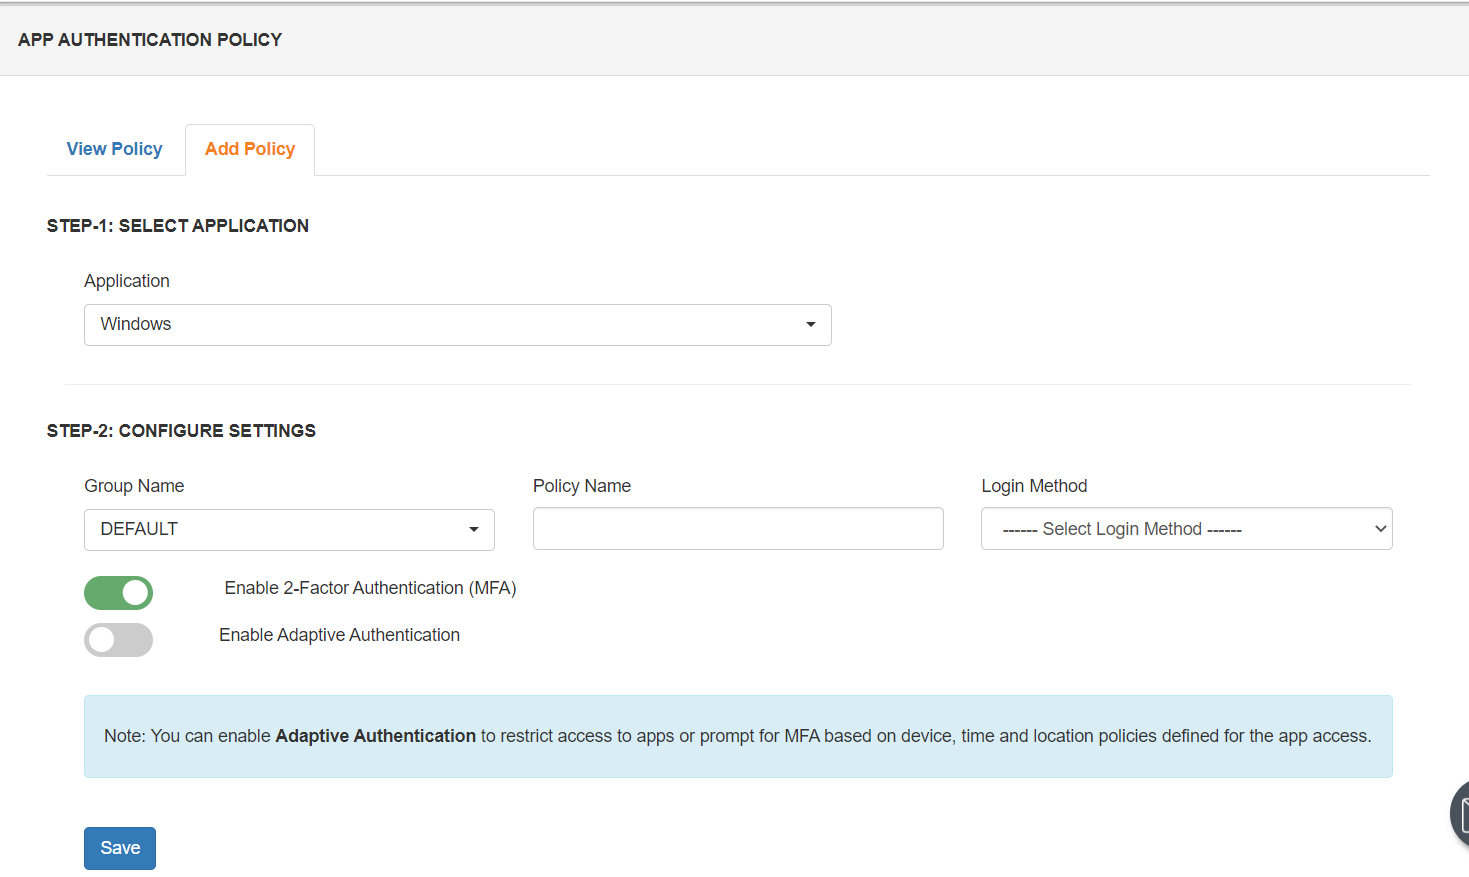
- Upon saving the app, go to Policies >> Add Policy
- elect your Awarding and enable 2-Factor Authentication(MFA).
- Click on Salvage.

3. Setup miniOrange Ii-Factor Authentication(2FA/MFA) Credential Provider for Windows Logon
- Become to the folder where you take "mOCredentialProvider.msi" file downloaded. Double Click and it will take you to the installation window. Click on Next.

- Choose the installation path and click on Next.

- Now the installer is ready to install miniOrange Two-Factor Authentication(2FA/MFA) Credential Provider for Windows Logon. Click on Adjacent button.

- In one case the Installation is completed. Click on Close to exit.

- Become to the installation path of miniOrange Credential Provider awarding and double click on "pGina.Configuration" file.

- Make certain "miniOrange service" status is running and in the "Credential Provider/GINA status" section the "Registered" and "Enabled" are "Yes".

- Copy customer details.
- If you are using our miniOrange Cloud IDP server:
Login into miniOrange console with your customer account and goto "Product settings". Copy the "Client Primal" and "Customer API Key" and keep information technology with you.
- If yous are using on-premise IDP server:
Login into your on-premise IDP server account and goto "Production settings" section. Copy the "Server Base URL", "Customer Key", and "Client API Key" and go on it with you lot.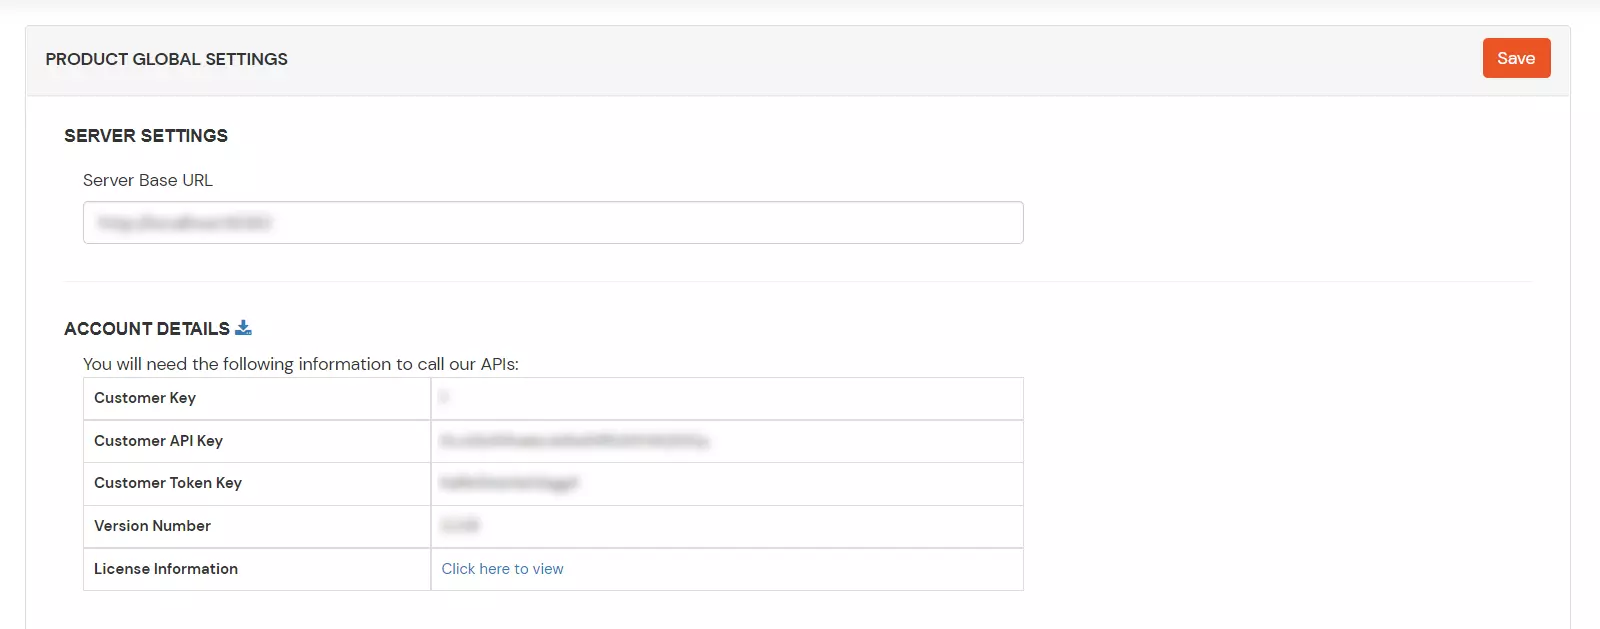
- If you are using our miniOrange Cloud IDP server:
- Double Click on miniOrange machine and add these details:
- Client ID
- API Key
- Name of the application which was created in miniOrange.
- If you lot're using a domain joined auto, Double click on the Domain User plugin. Remove username field value and modify the domain to your LDAP/Azure Advertisement domain name in upper instance and save.
- Enable Gateway checkbox of Domain User Login Plugin.
- Yous can customize the Logo and message to display on the windows login the mode you need.

- Click on the "Employ" button to save the configuration.

- If you are setting up MFA over RDP connection, click on the Credentials Provider Options tab.
- Select the Fix pGina as Default for RDP icon and click Use.


4. Test miniOrange Credential Provider 2FA Setup
- Open the control prompt at the miniOrange Credential Provider installation path.

- Run the "pGina.MFAAuthnPrompt.exe" file by passing the Username.
Note: The Username you are passing must exist and must take the same Username in the AD and in the users list of your miniOrange business relationship in our cloud IDP OR your on-premise IDP.
- The following Two-Cistron Authentication (2FA) prompt will exist displayed. Select your 2FA method and click on "Side by side".

- The OTP will be delivered to the registered user mobile number and enter the received OTP in the "One Time Passcode" input field and Click on Next.

- Effort windows login with miniOrange credential provider as shown in below screenshot.

- Provide your Username and Countersign.

- After successful hallmark with your LDAP server information technology will prompt for Two-Factor Authentication (2FA). Select the 2FA method and click on Next.

- Enter your OTP and click on Next every bit shown in the below screenshot. After successful OTP validation users will be logged into the windows car.

5. Setup Credential Provider Group Policy for Windows
Group Policy provides centralized management and configuration of operating systems, applications, and users settings in an Active Directory environment. A set of Group Policy configurations is chosen a Group Policy Object (GPO).
Network administrators have one identify where they can configure a variety of Windows settings for every calculator on the network.
Nosotros are using GPO to simplify the installation of credential provider software and propagating windows registry settings of this software in one go for each figurer joined to the domain.
Follow the steps to Setup miniOrange Multi-Factor Hallmark (2FA/MFA) Credential Provider Group Policy:
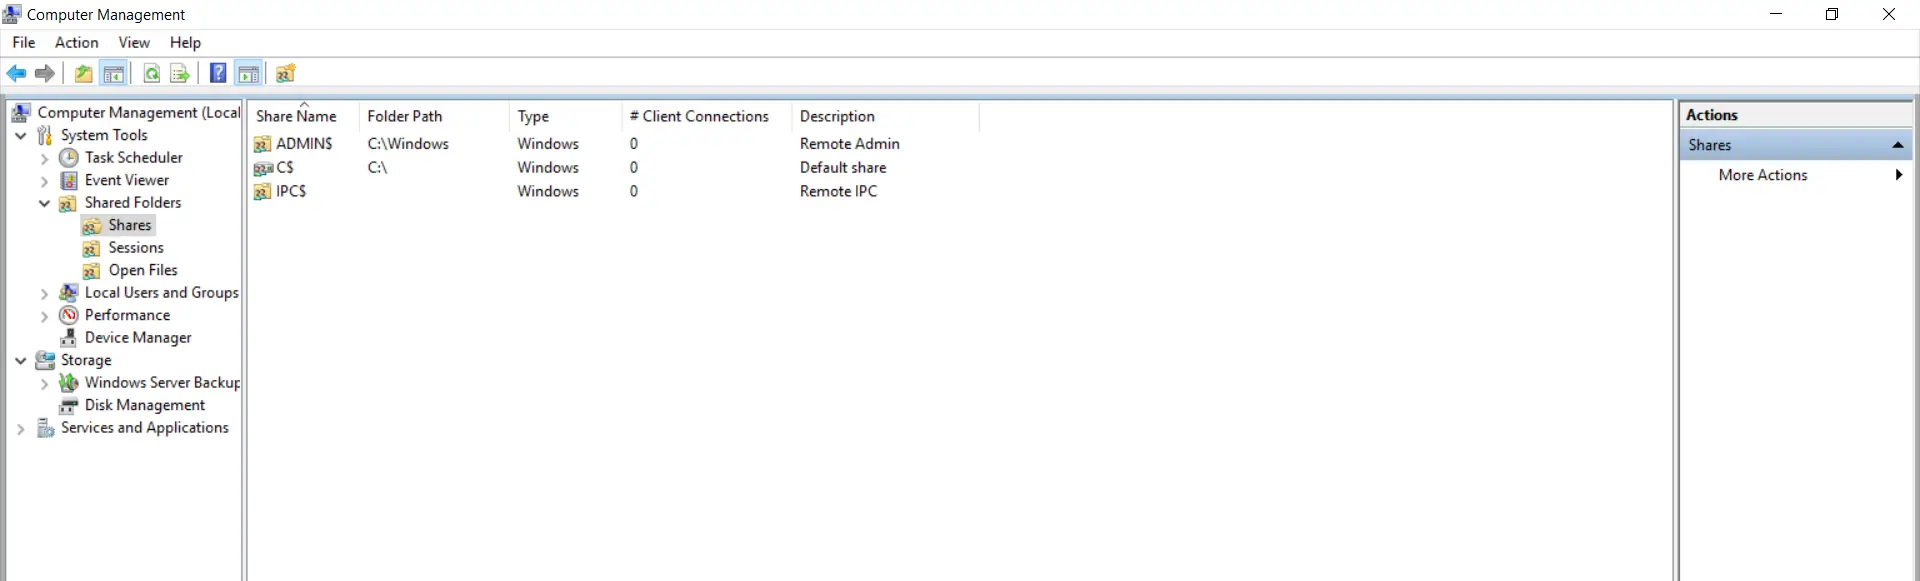
- Search "Computer management" from programs search and open it. Goto "Shared Folders->Shares"
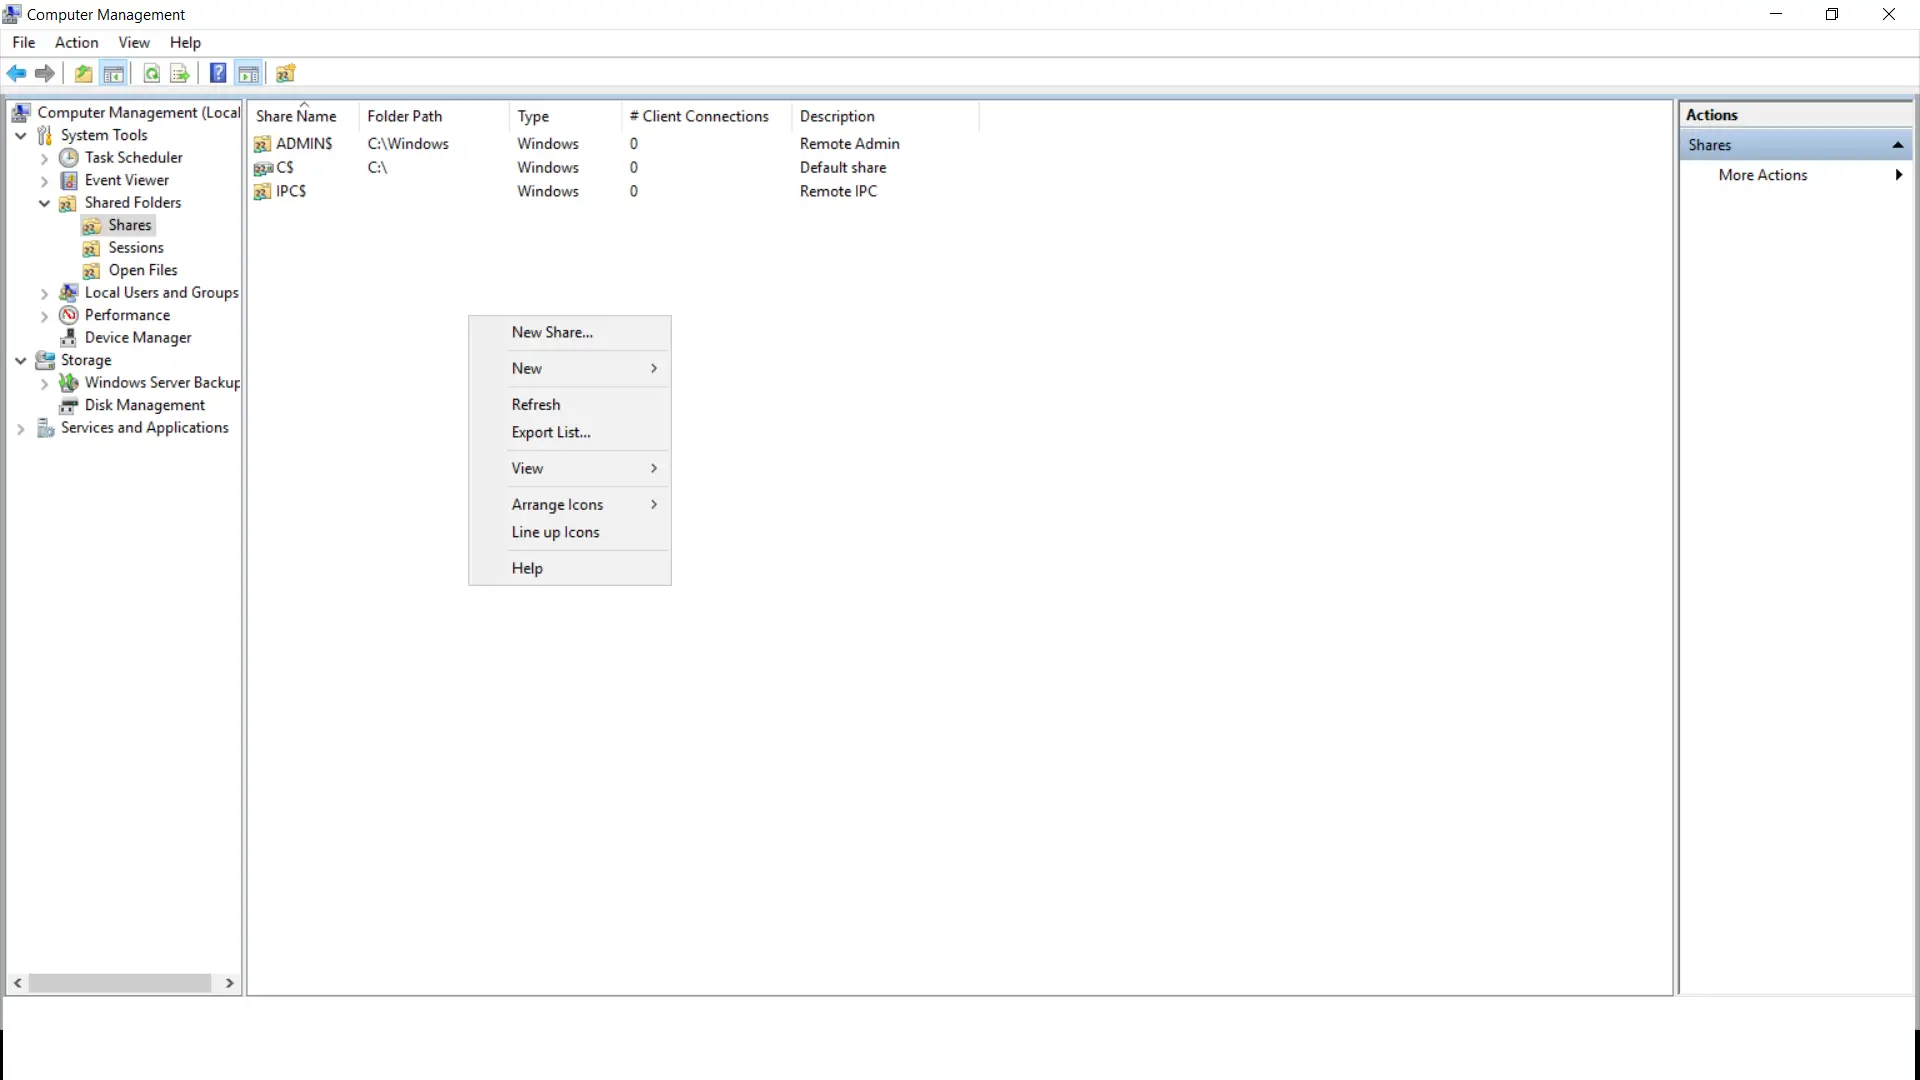
- Right click on the "Shares section expanse" and click on "New" from the list as shown in the below screenshot.
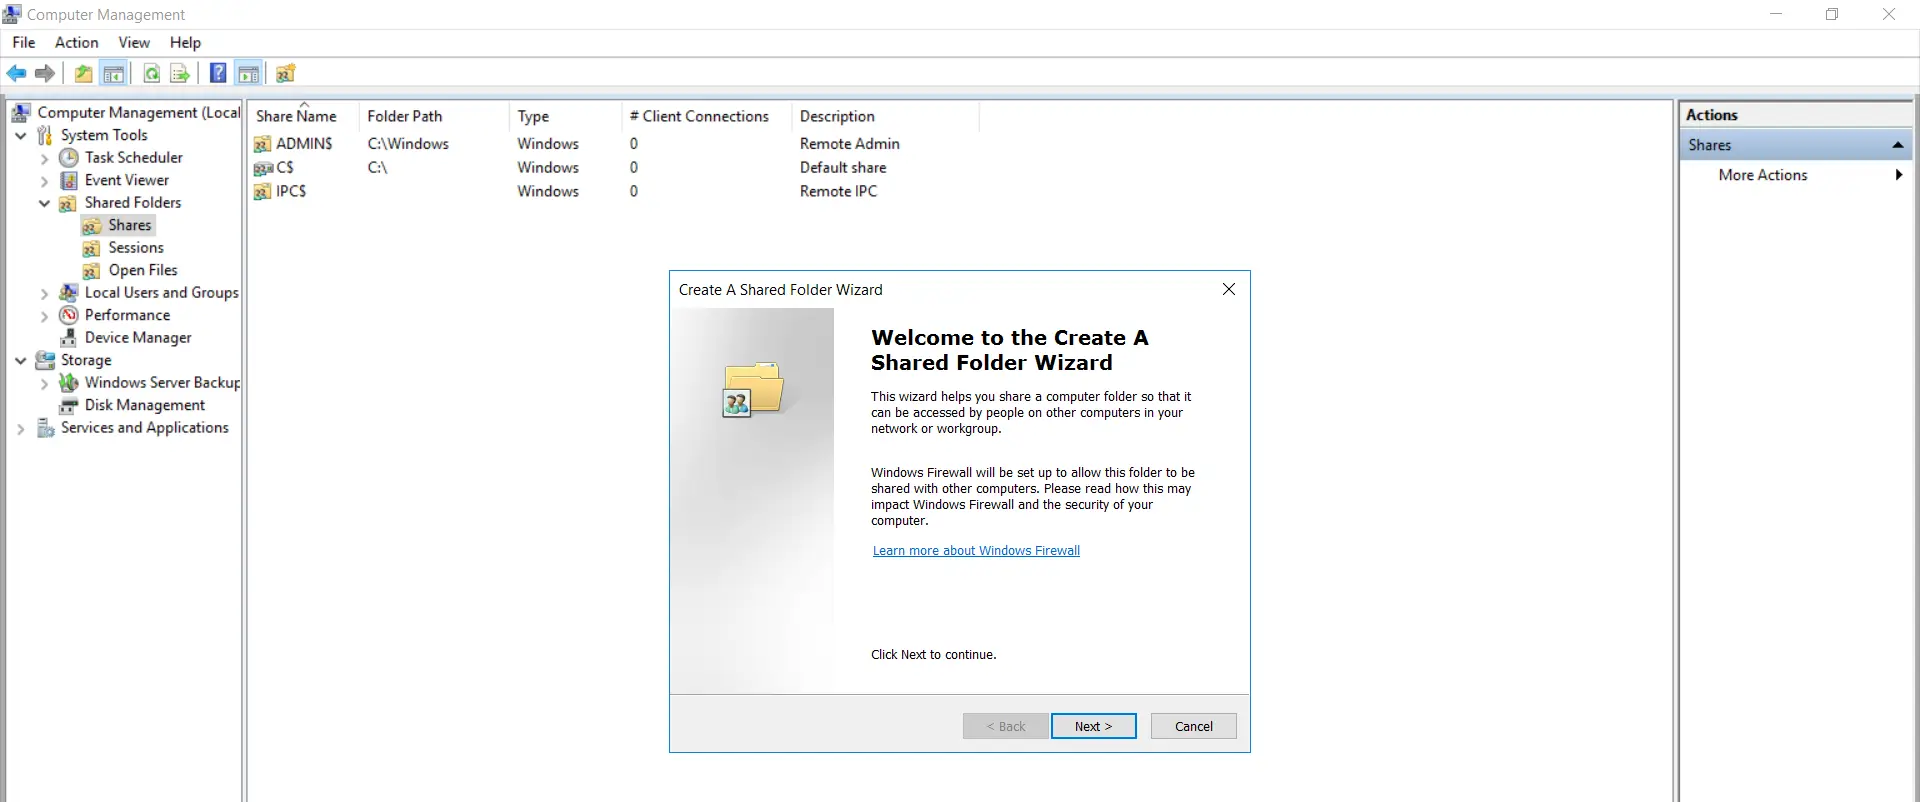
- Click "Next" in the newly opened Shared Folder Wizard.
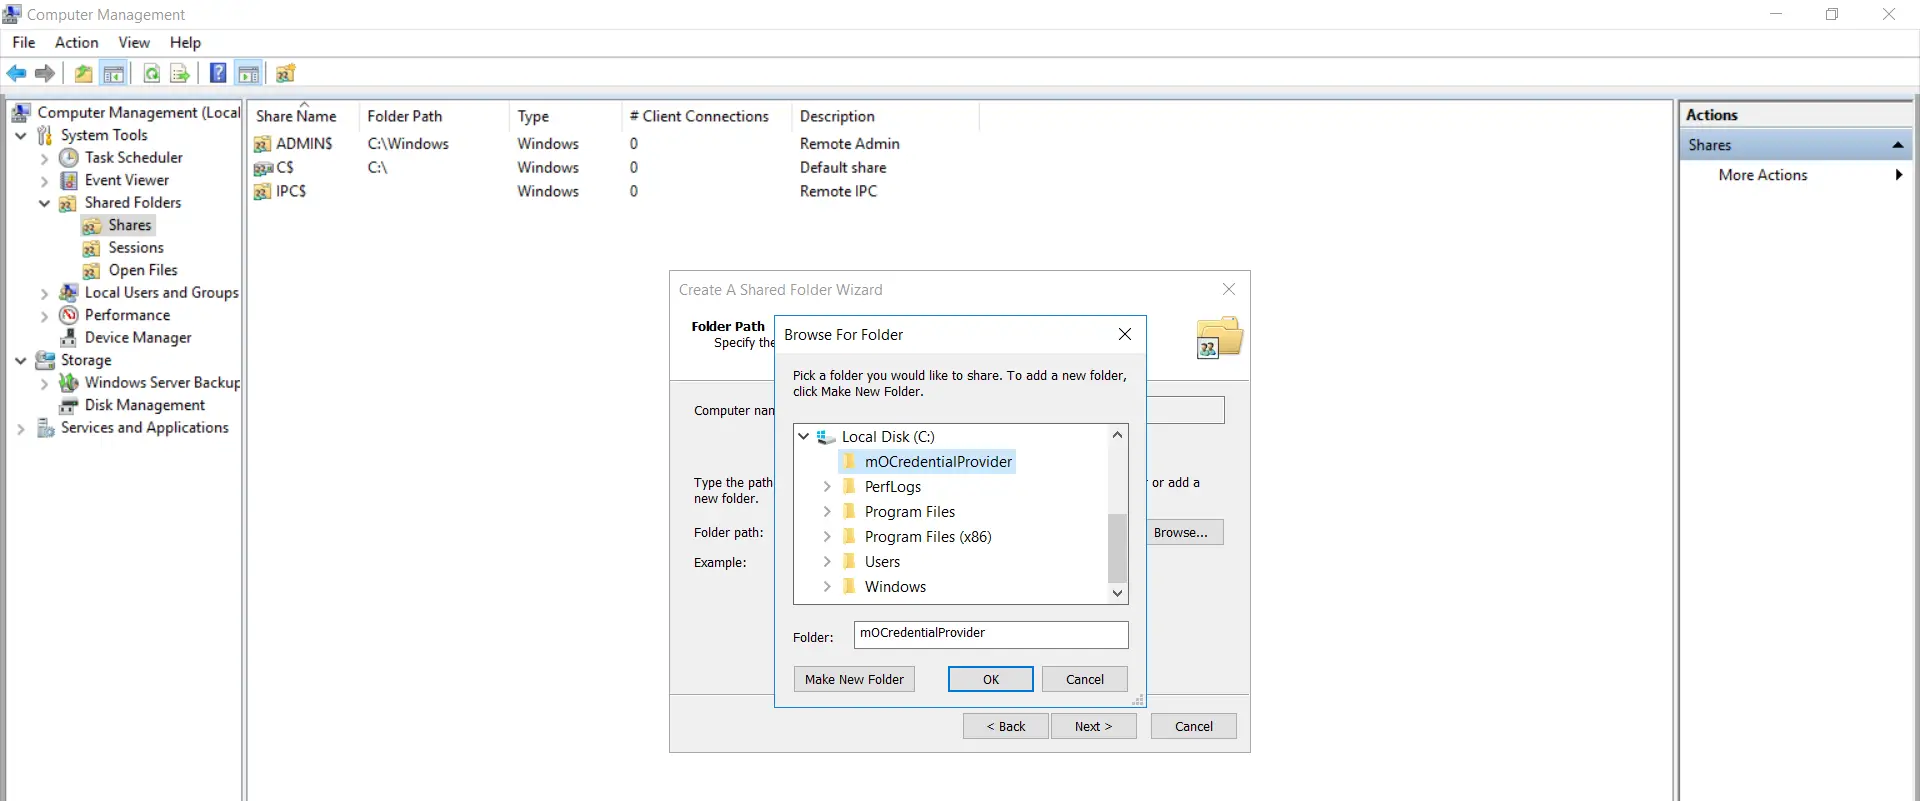
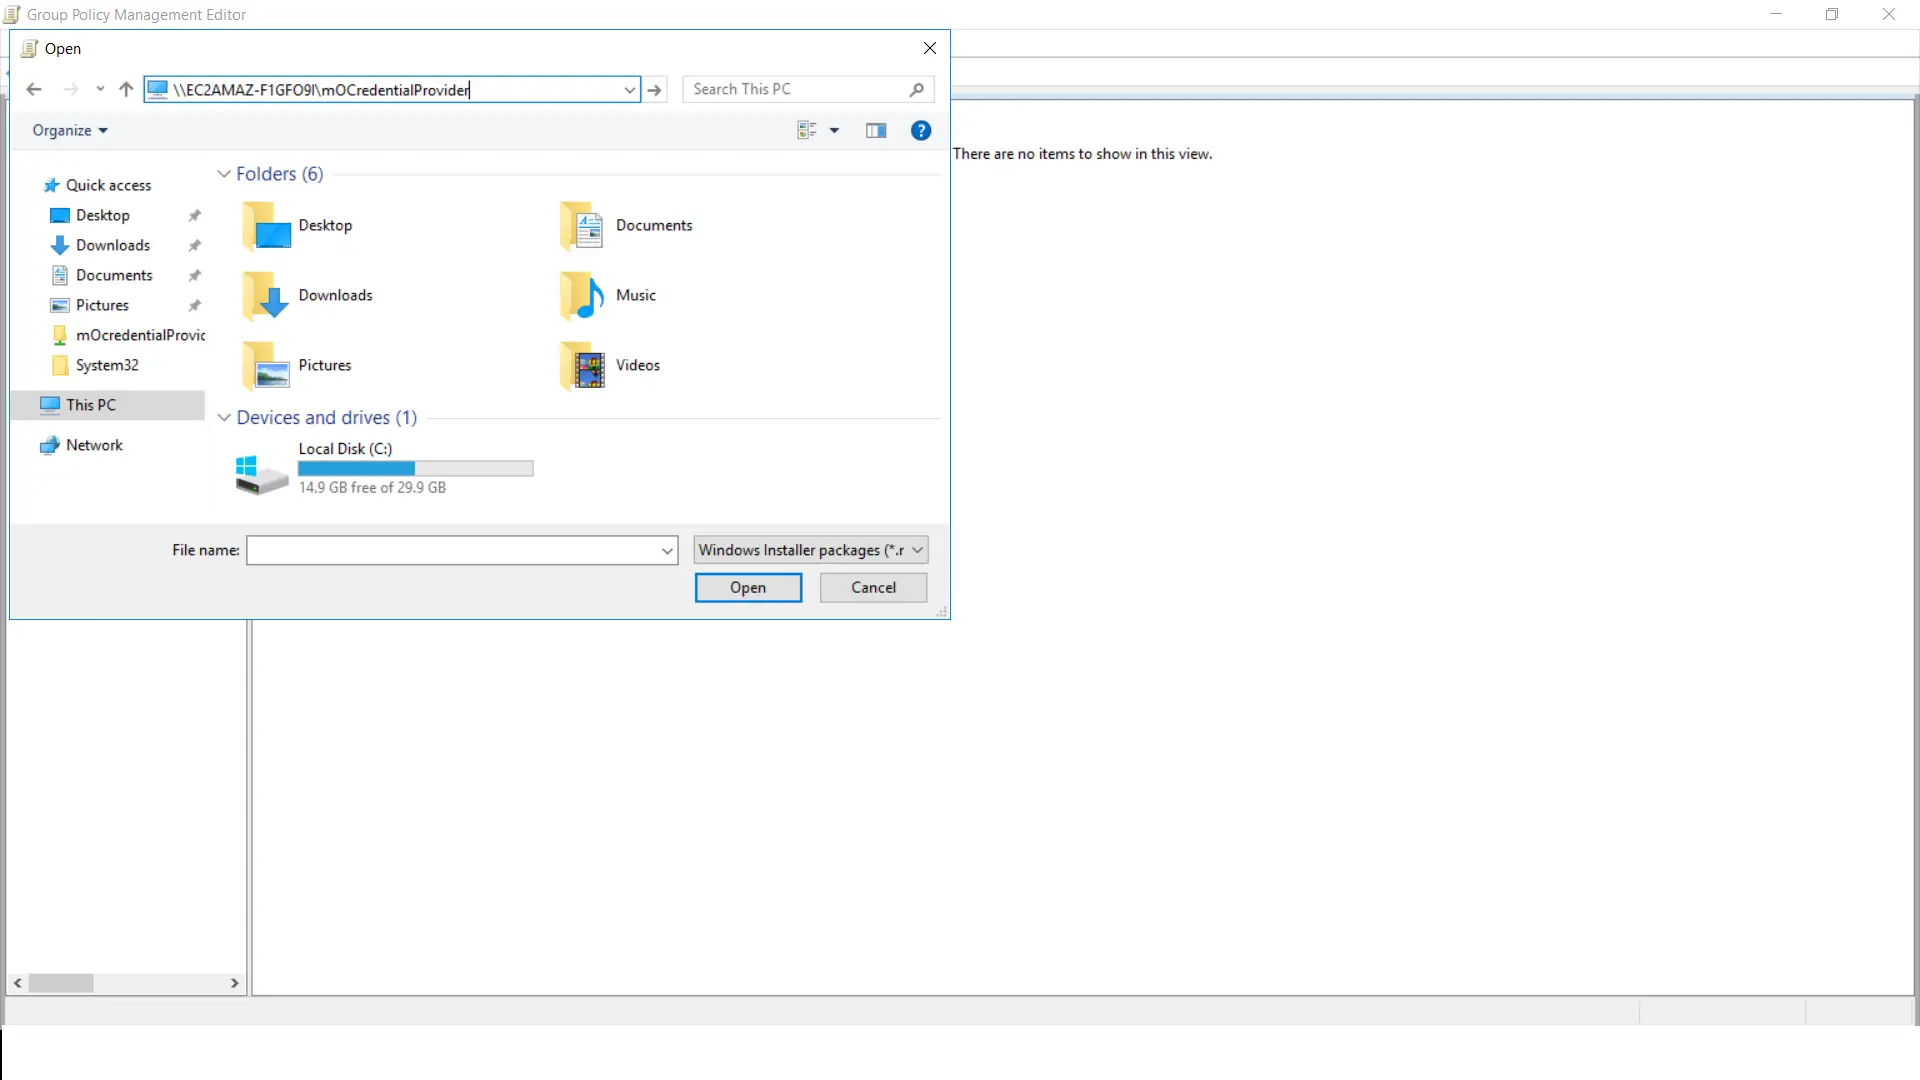
- Click on the "Browse" button.
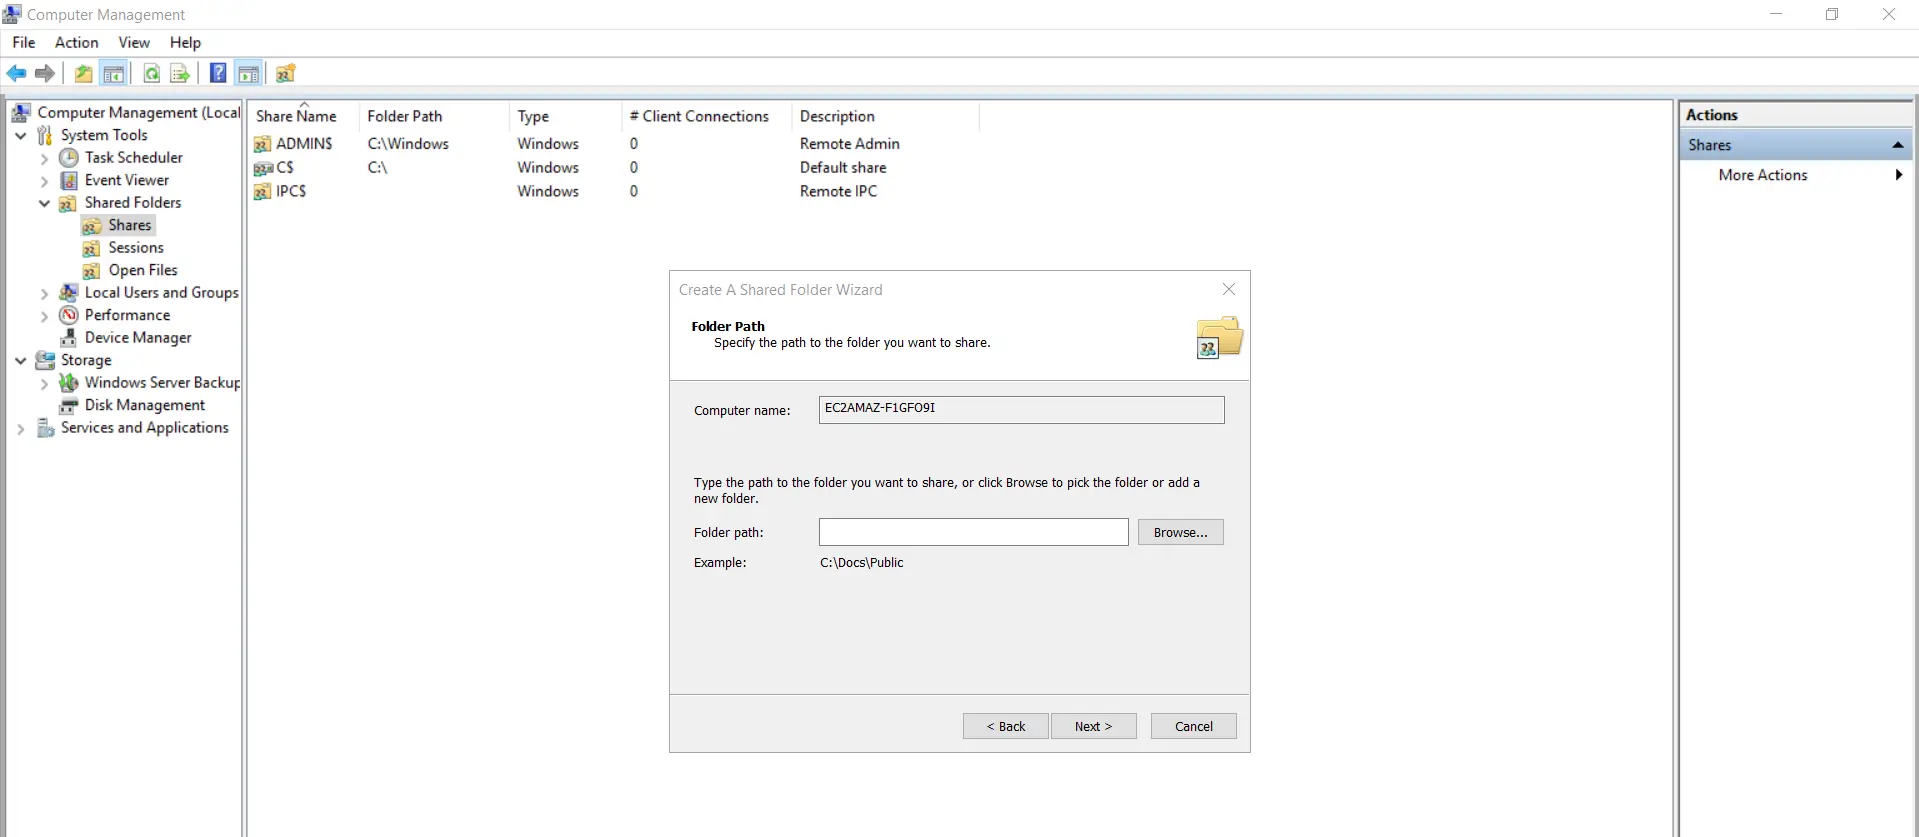
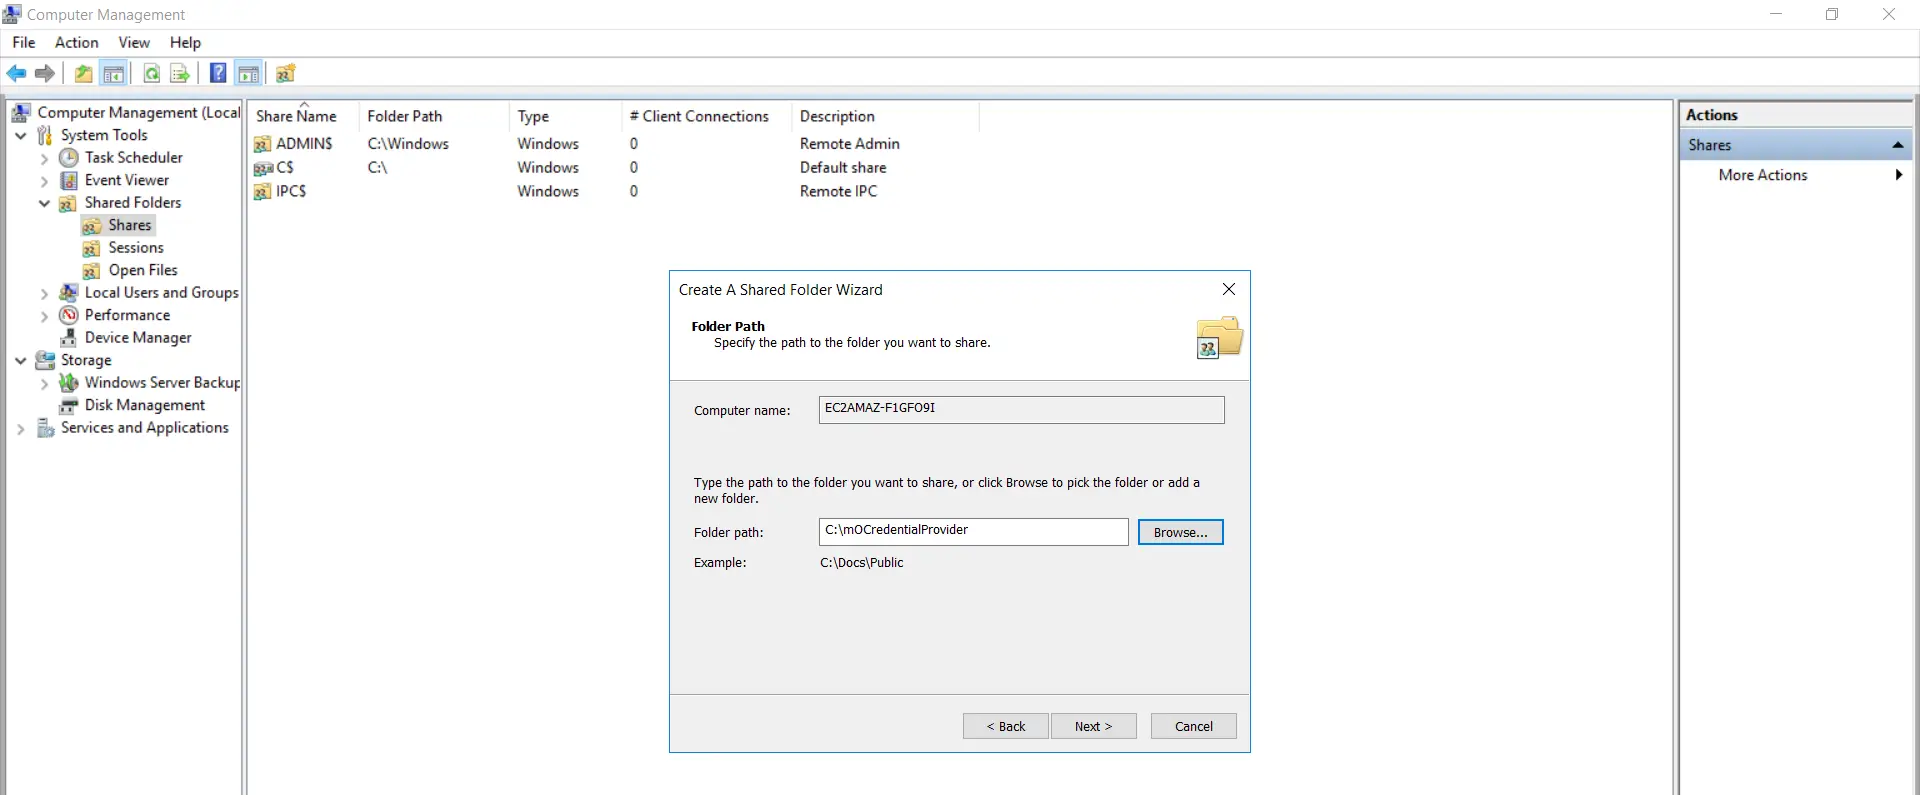
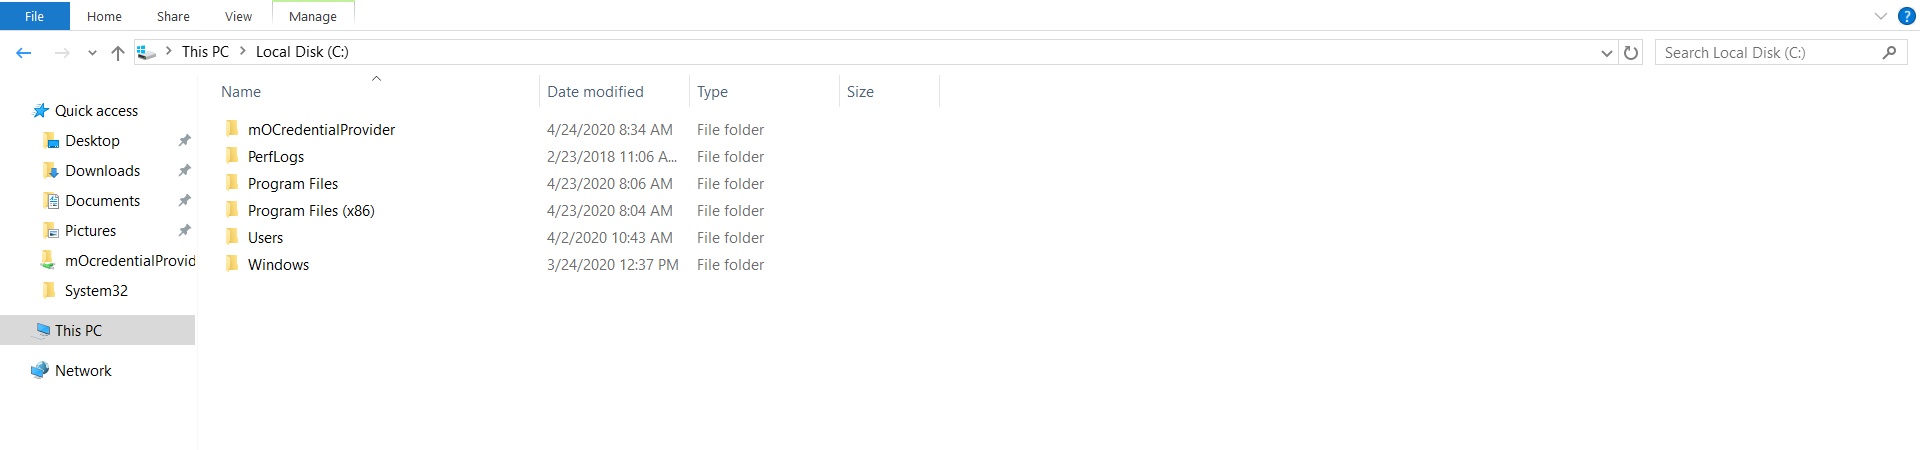
- Scan for the folder path on the system where the "mOCredentialProvider.msi" resides and select that folder.
- Click on "Next".
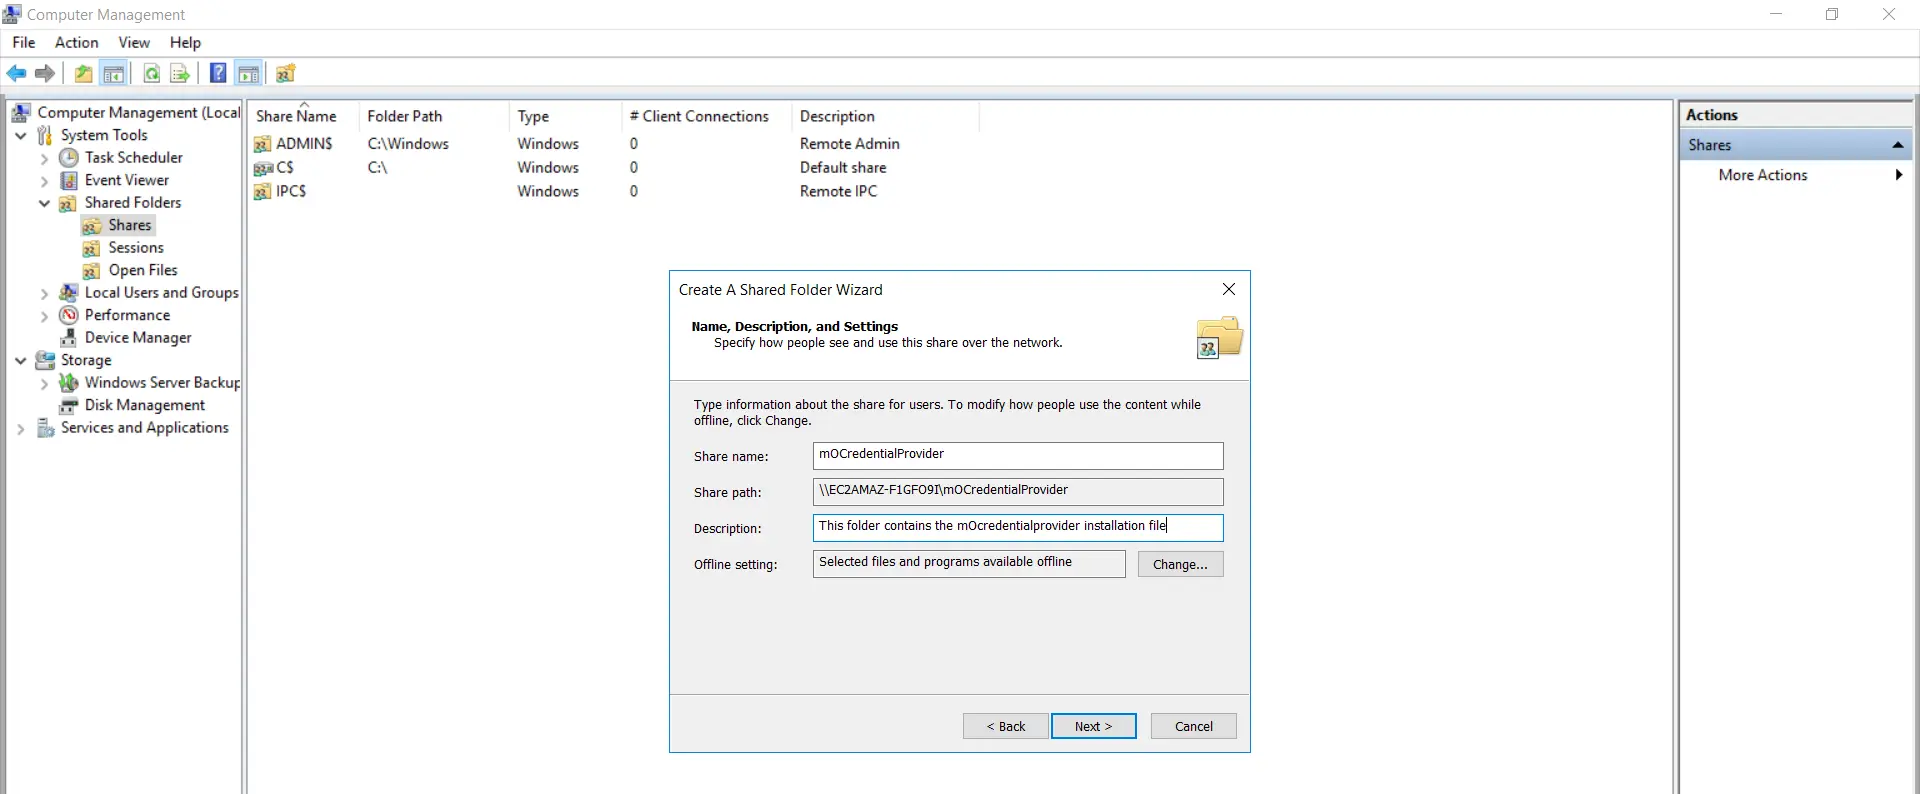
- Provide description of the folder existence shared and Click on "Next".
- Select the permissions of your choice for the binder being shared.
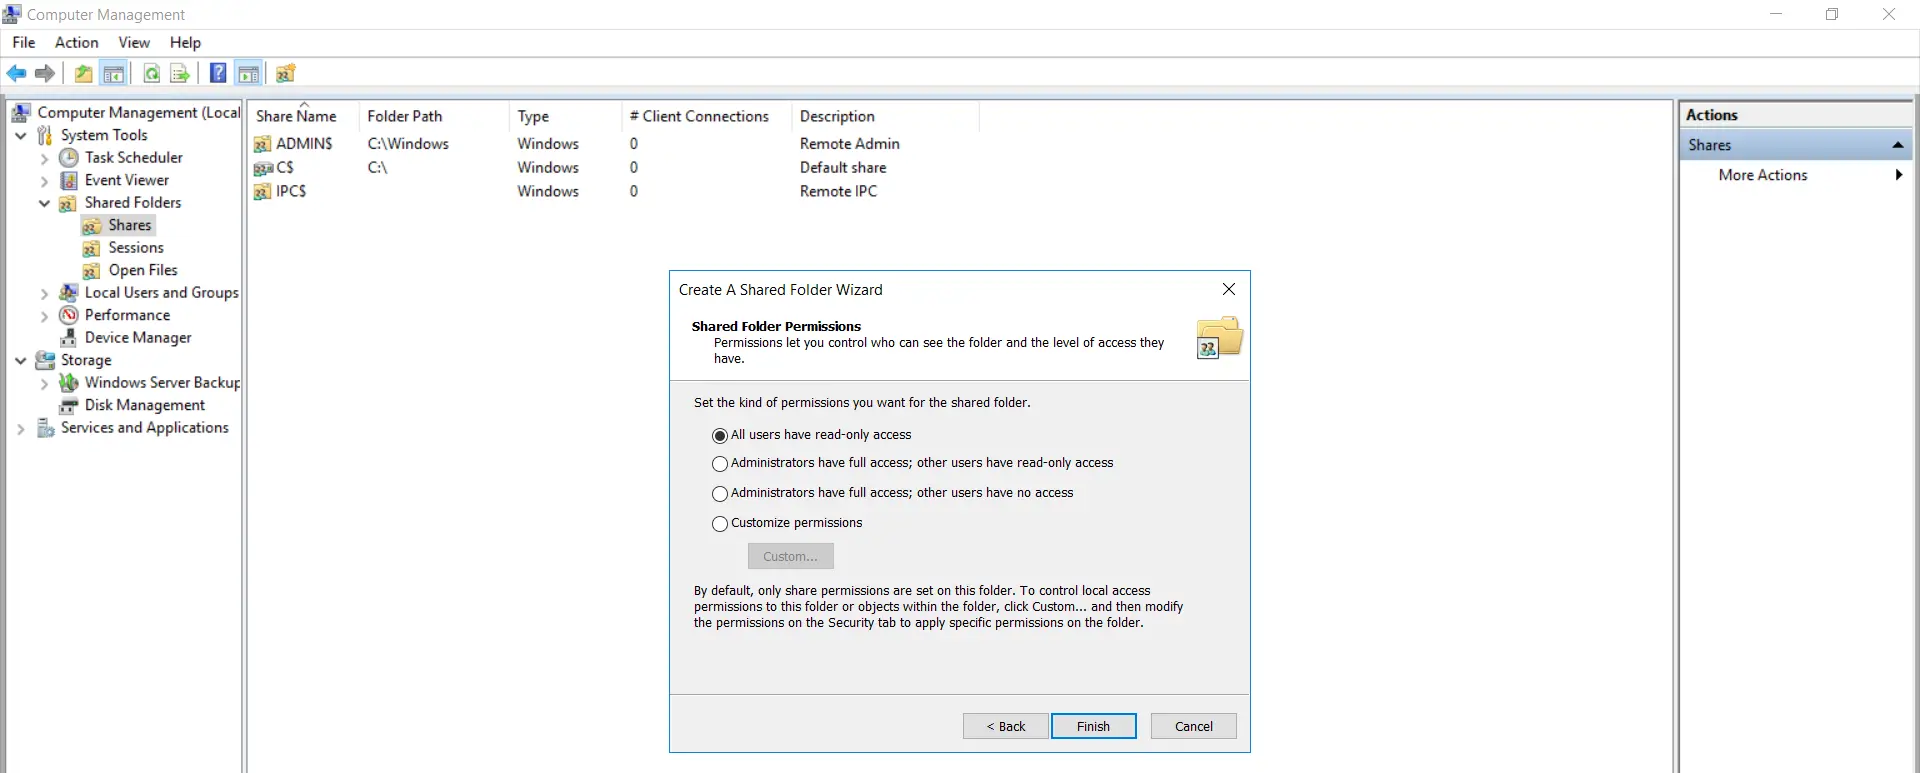
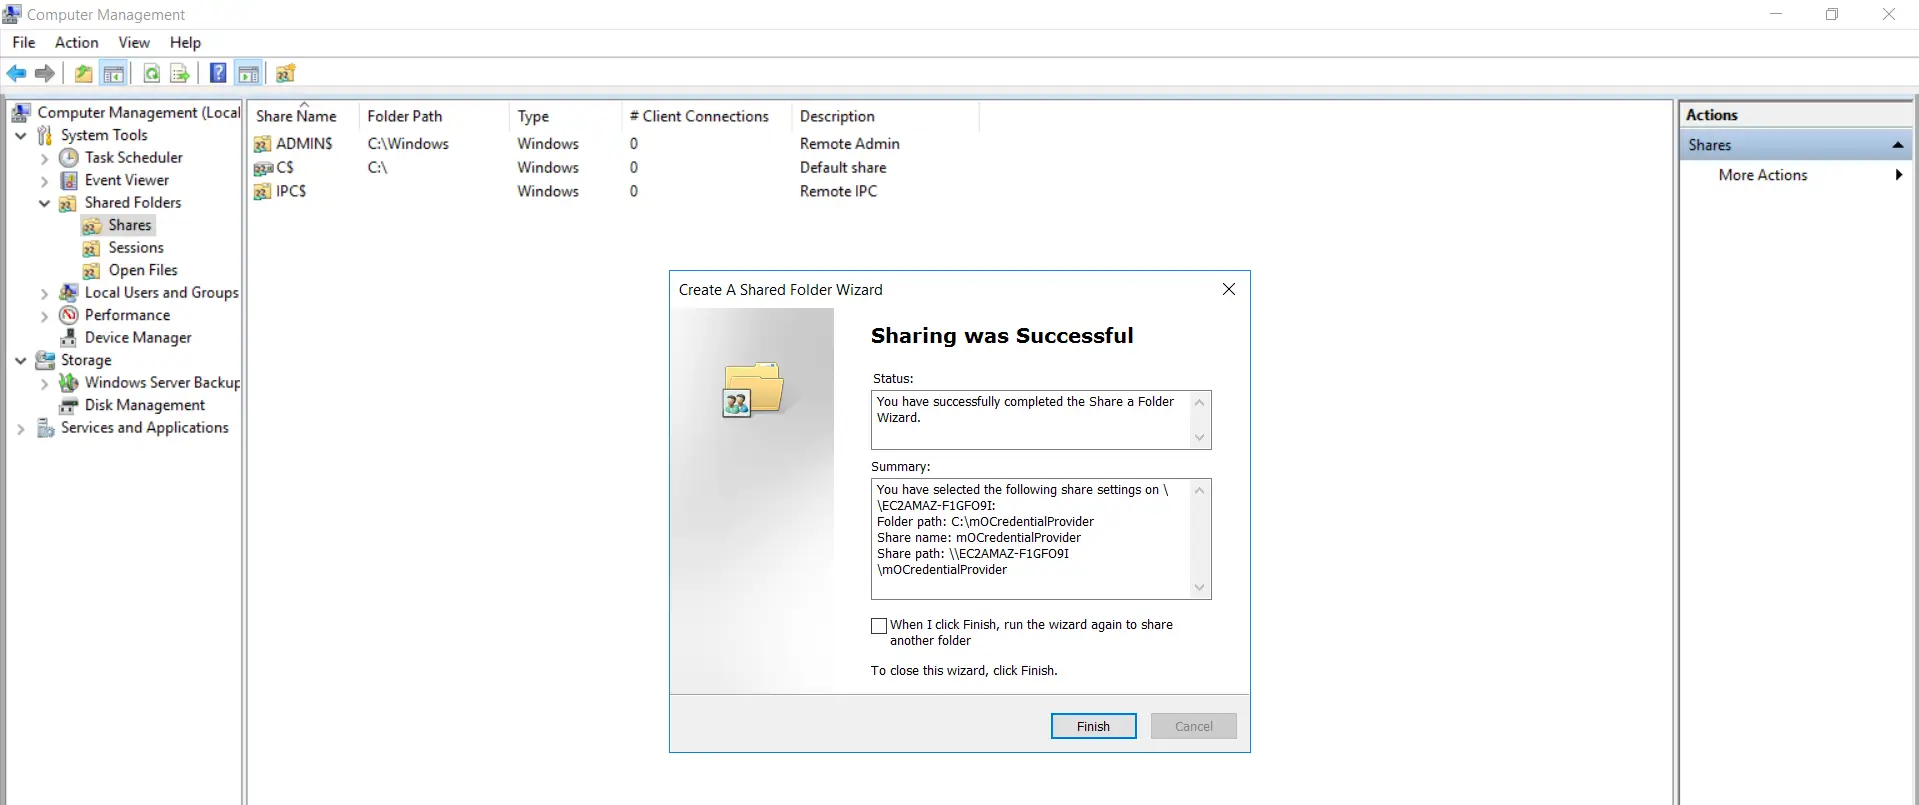
- Sharing of the binder is successful. Click on "Finish".
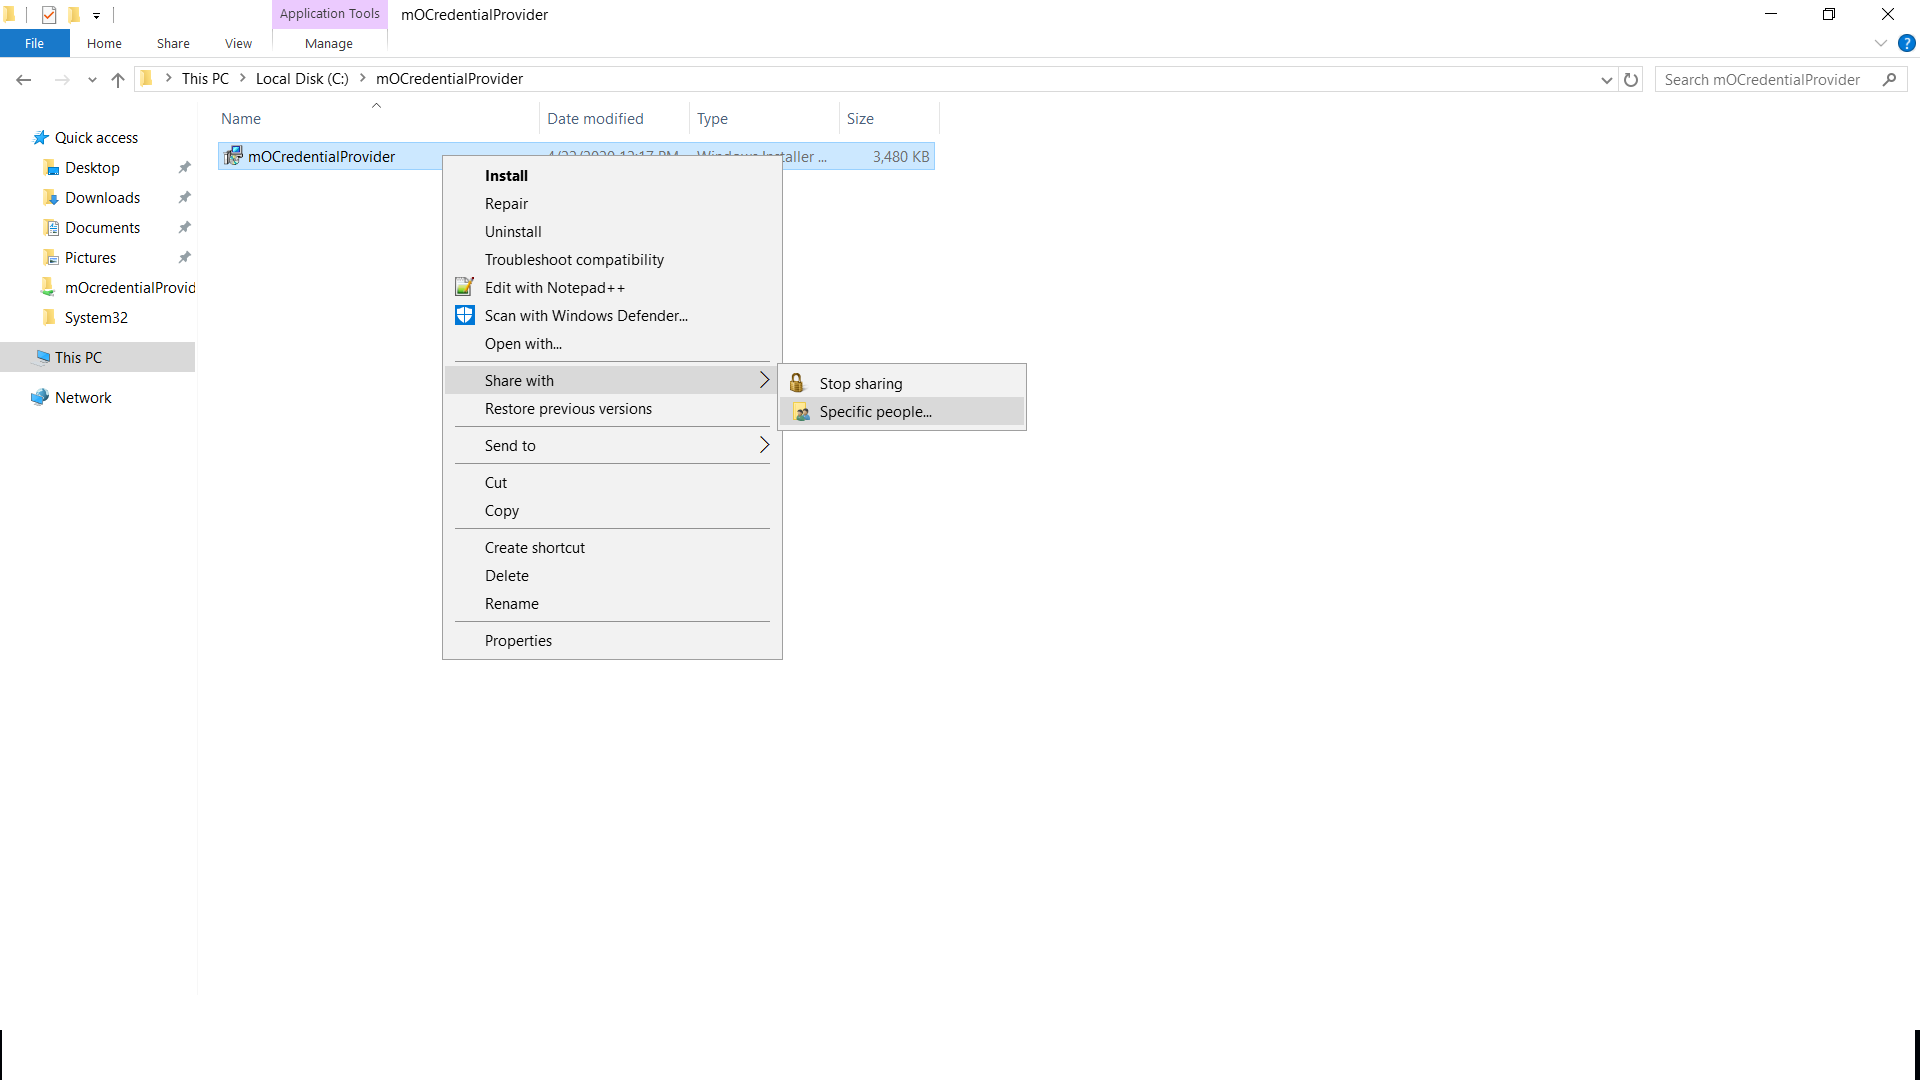
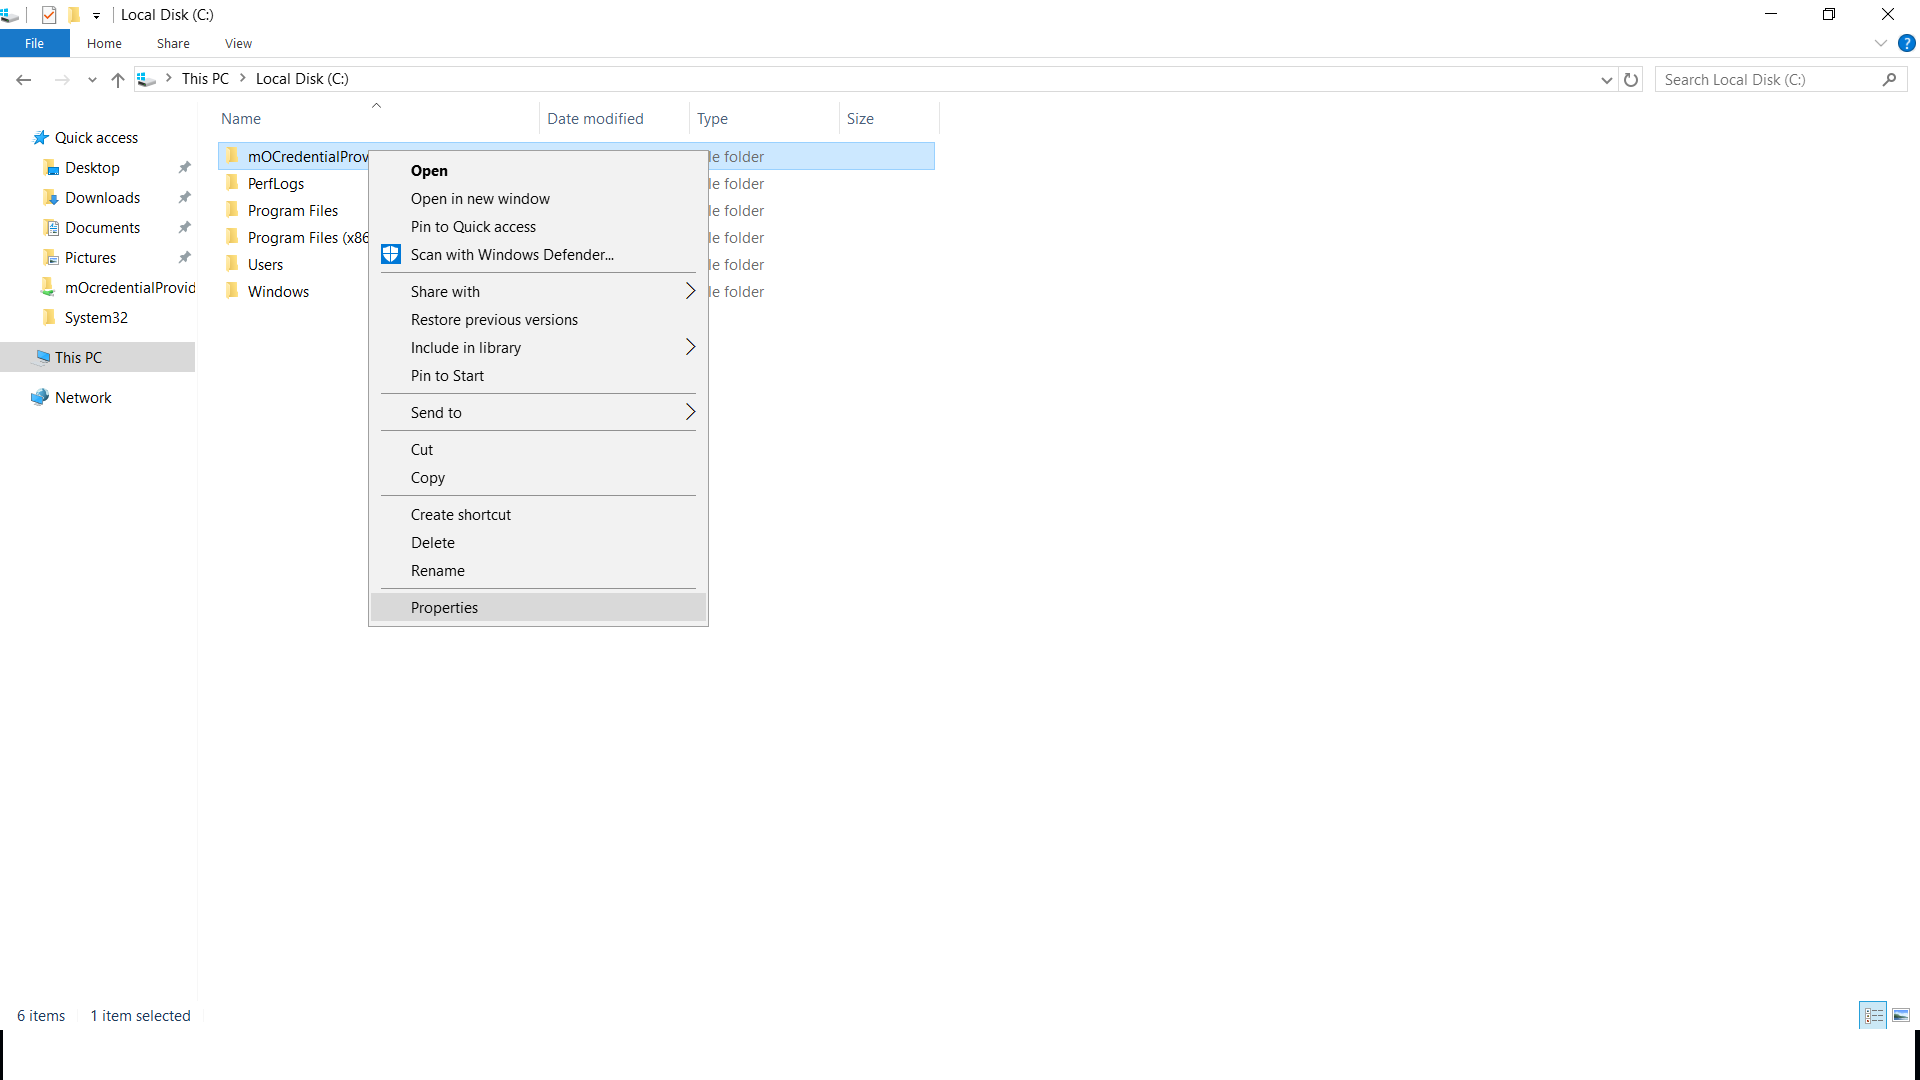
- Goto the shared folder on your organisation and correct click on "mOCredentialProvider.msi" file and select "Share with->Specific people".
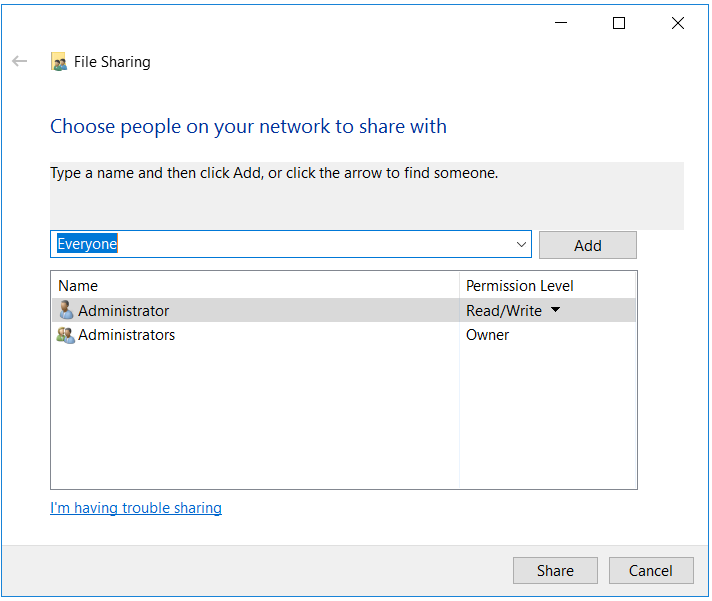
- Make certain the file is shared with "Administrator" users of your domain and as well equally to the user on the windows computer on which y'all are going to create the Group Policy Object.
- Open "Authoritative tools->Group Policy management". Right click on your domain and select "Create a GPO in this domain, and Link here.." pick.
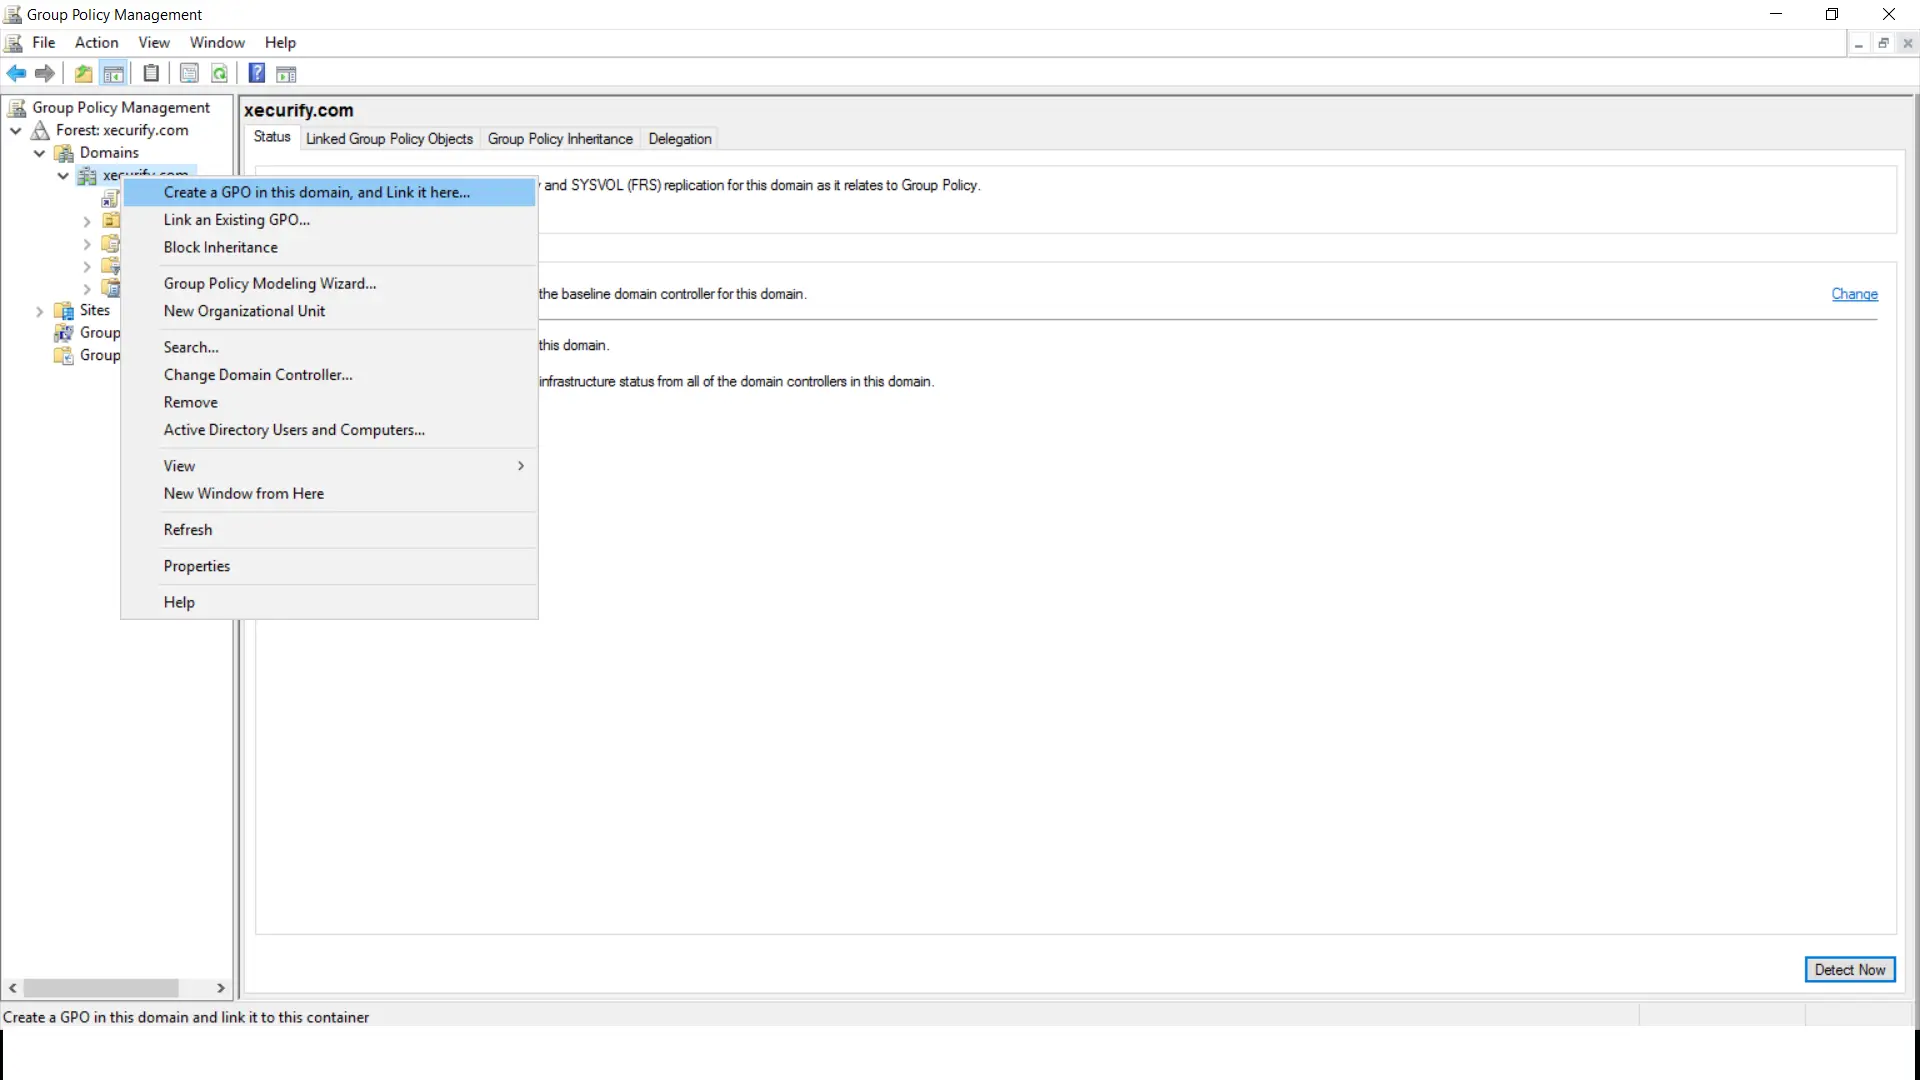
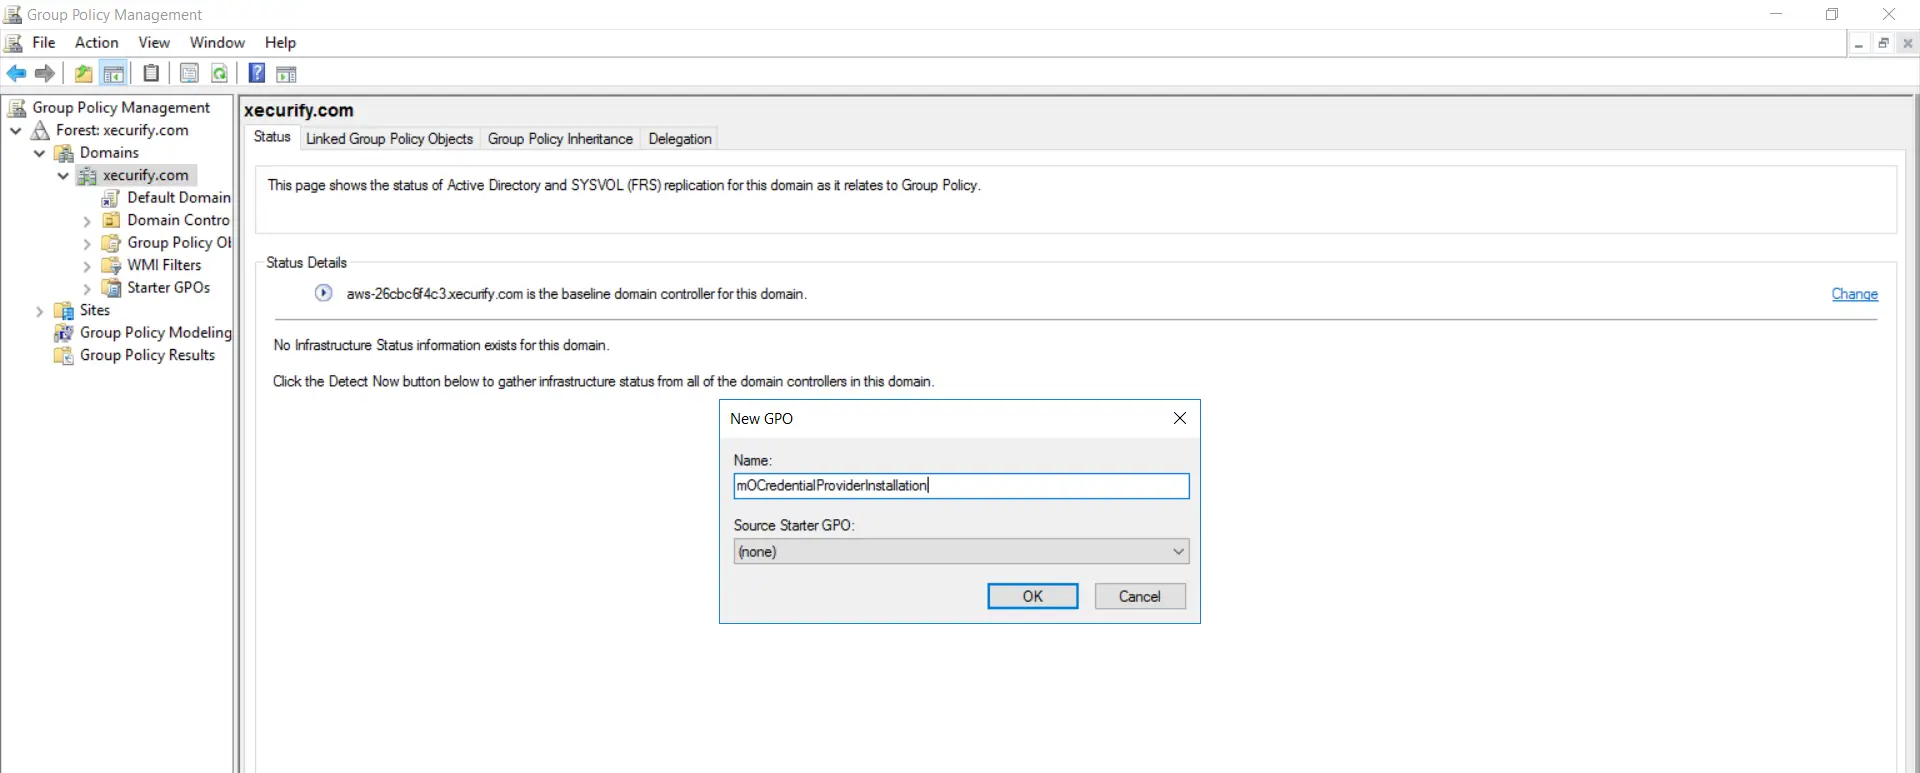
- Provide a Name for the GPO and click on "OK".
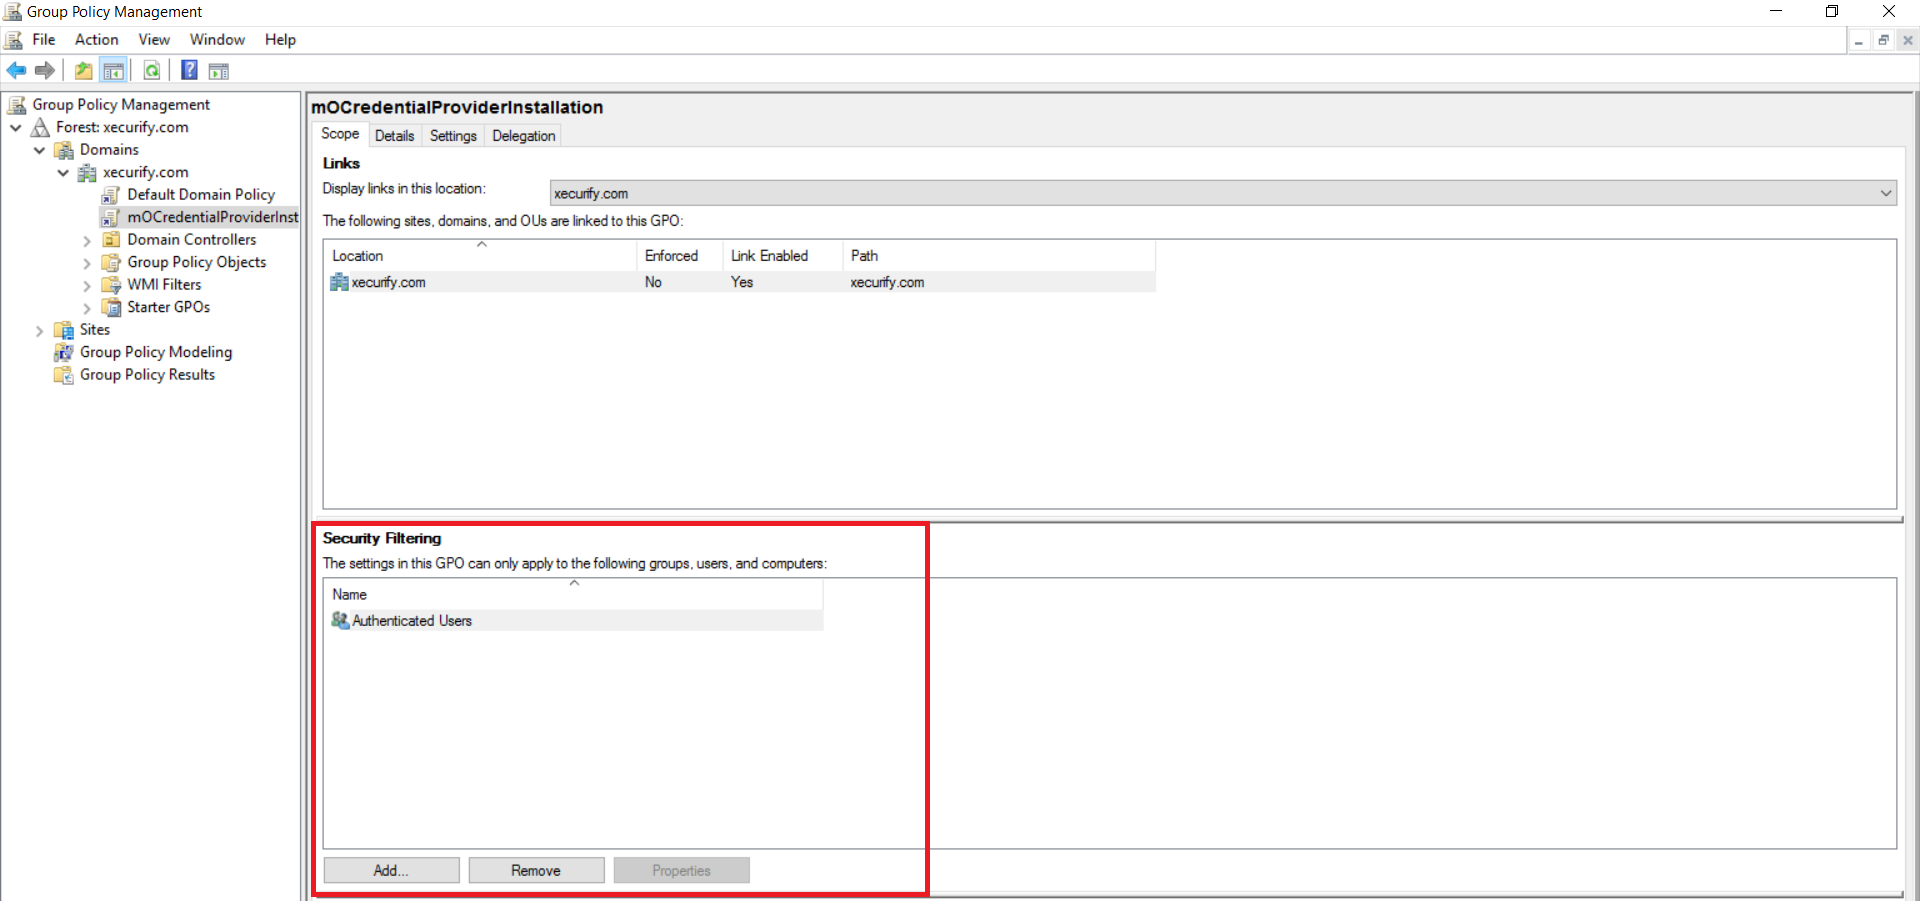
- Yous can Add/Remove specific Users, Groups and Machines of your domain from the highlighted section. This volition help you to execute the Grouping policy for a specific set up of Users, Groups, And Computers.
- Correct click on the newly created GPO and select "Edit" from the list of menu.

- The new window volition be opened for GPO edit it as .
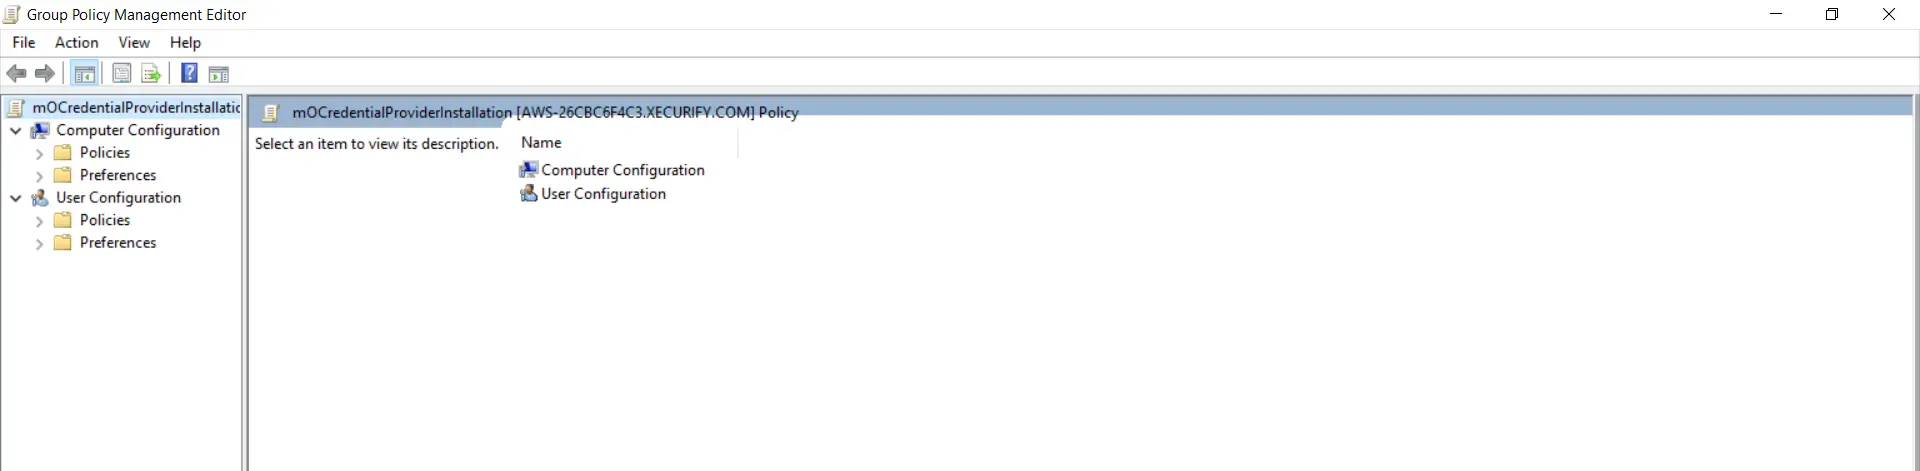
- Expand "Policies->Software Settings" from Computer Configuration.

- Goto Shared folder on your system.
- Correct click the shared folder "mOCredentialProvider" and select properties option from the listing.
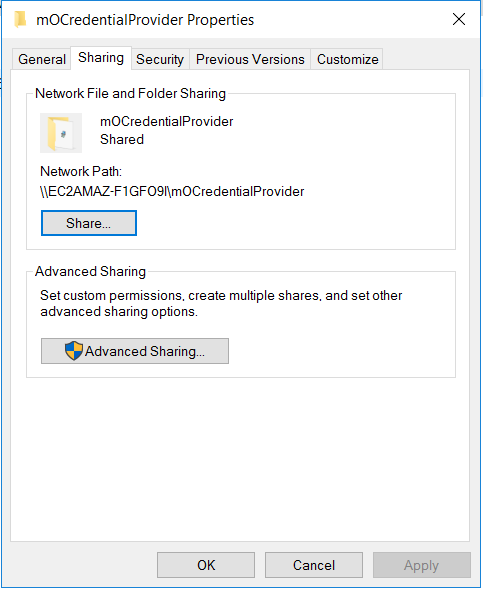
- Goto "Sharing tab" of the properties window and copy "Network path".
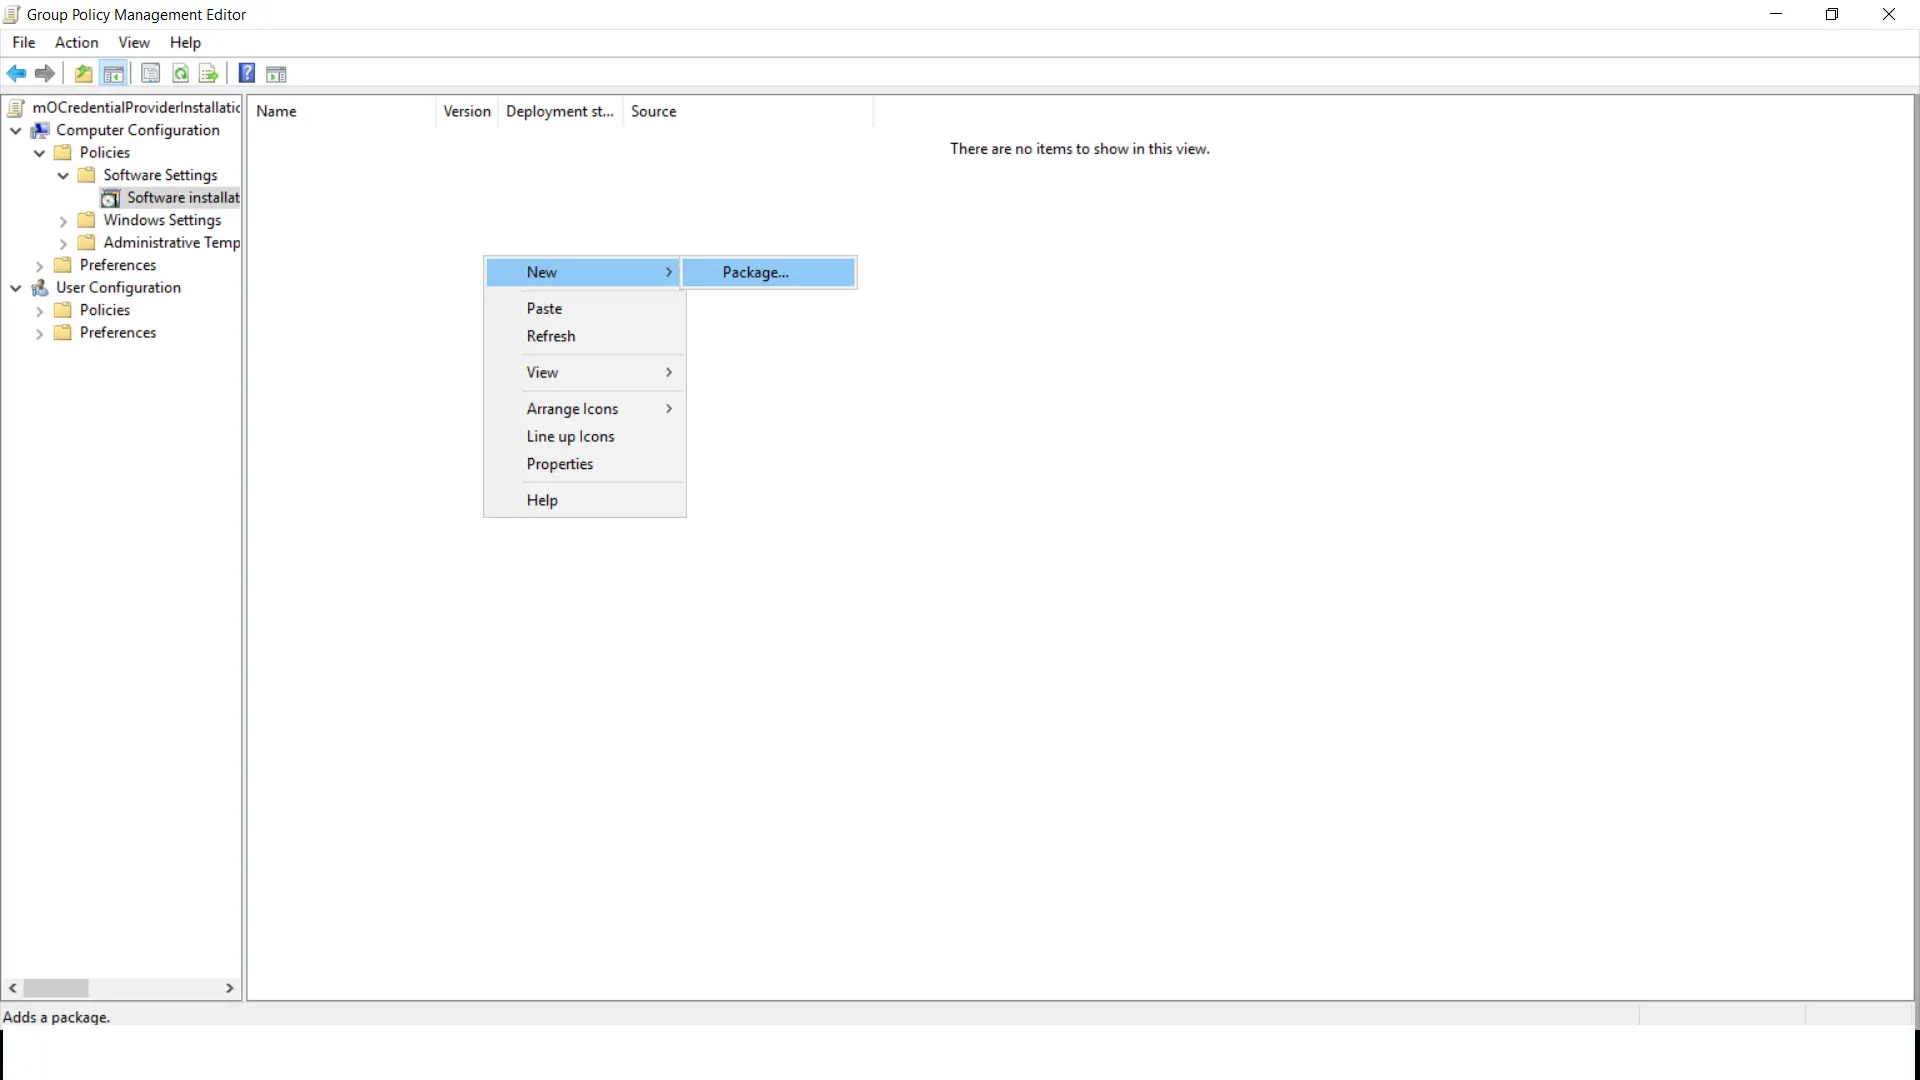
- Correct click on the "Software Installation" section area and select "New->Package" from the listing.
- Provide the copied path from above footstep.
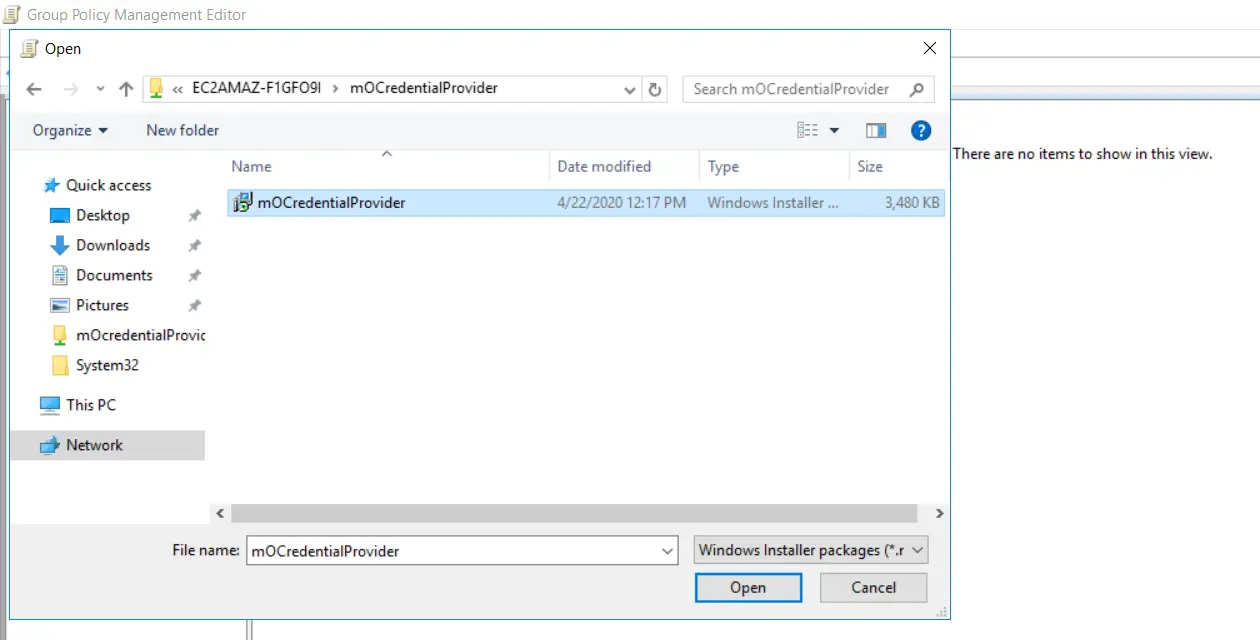
- Select "mOCredentialProvider.msi" file from the shared folder.
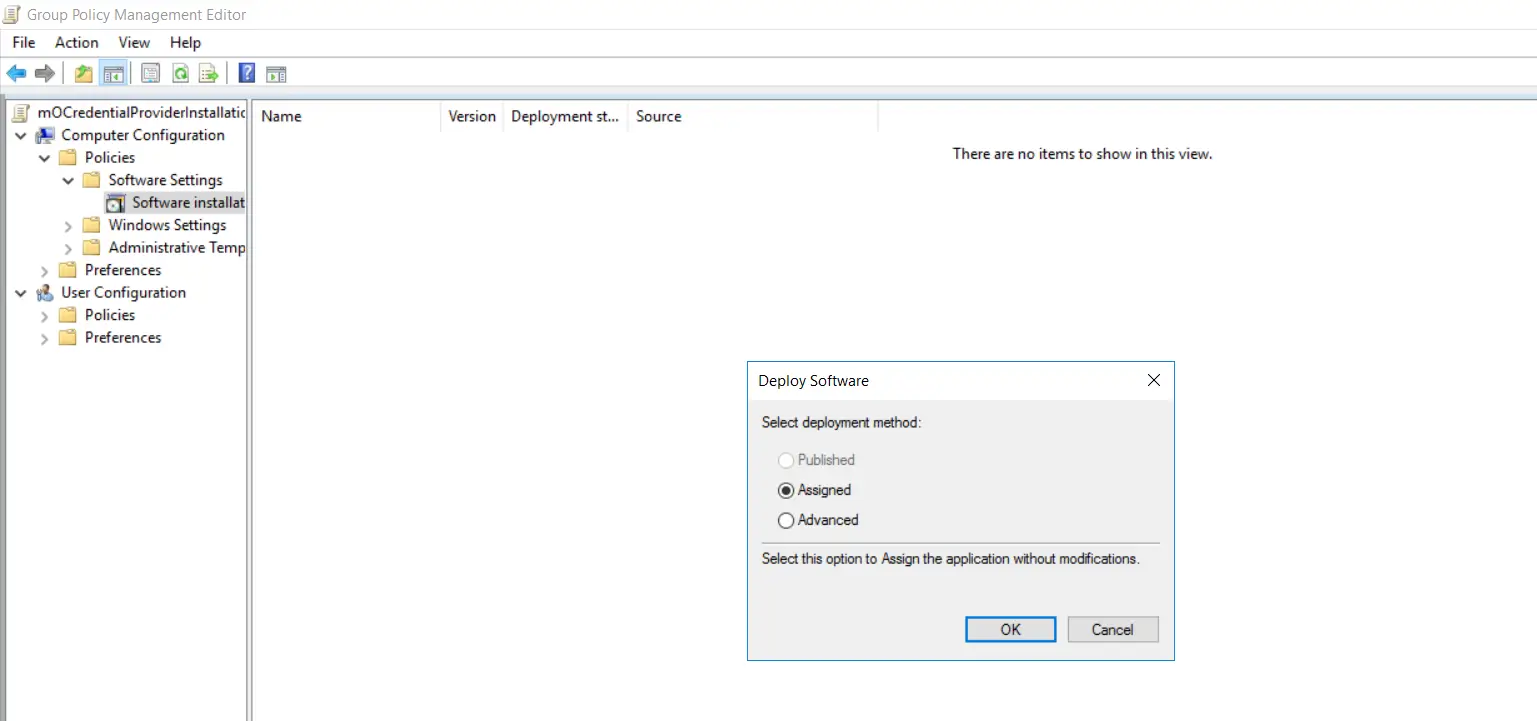
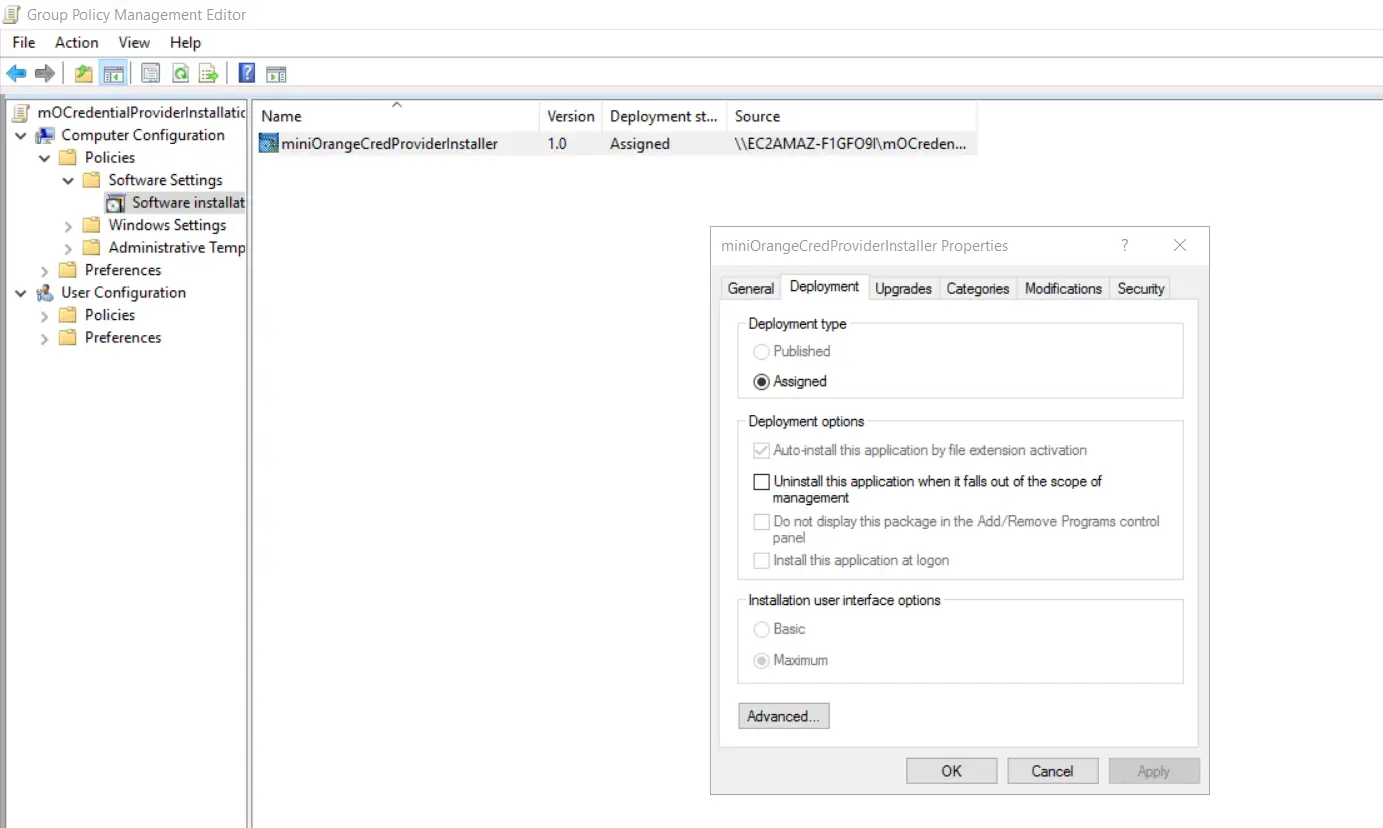
- Select "Assigned" and click on "Ok" in the window.
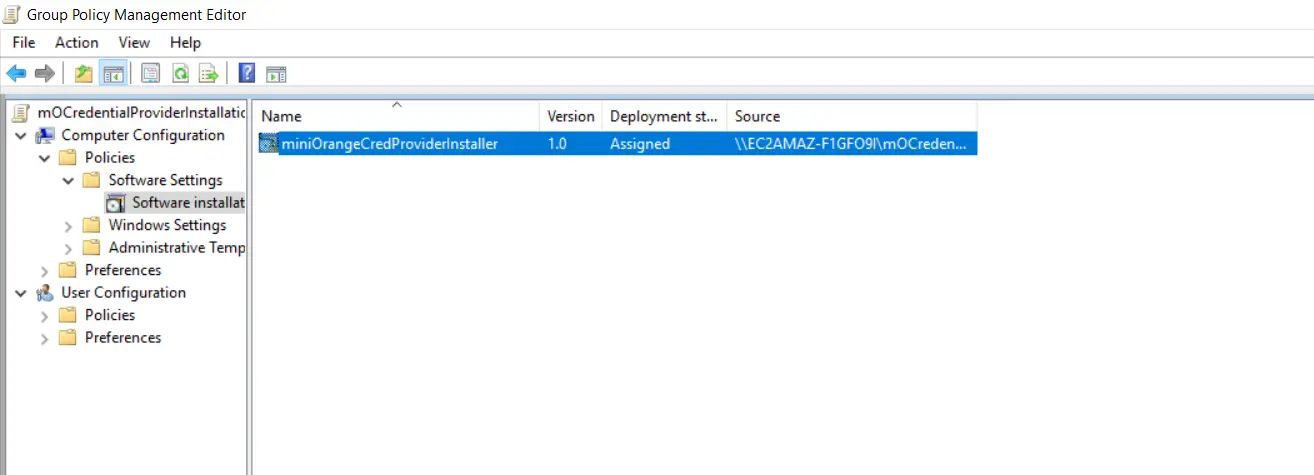
- Double click on the "miniOrangeCredProviderInstaller" bundle.
- Goto "Deployment" tab and click on the "Advanced" button.
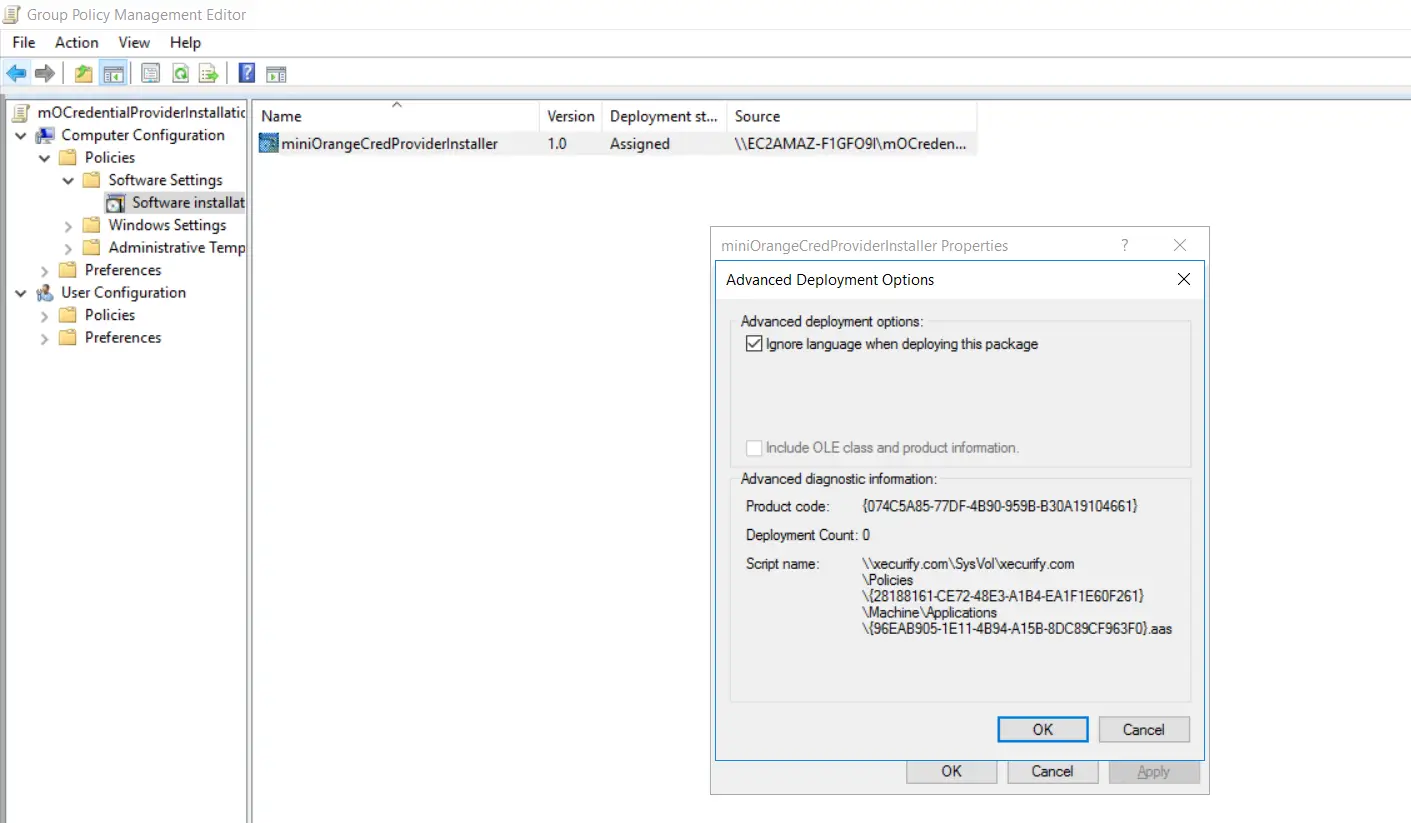
- Enable "Ignore Language when deploying this packet" checkbox from Advanced deployment options section and click on "Ok".
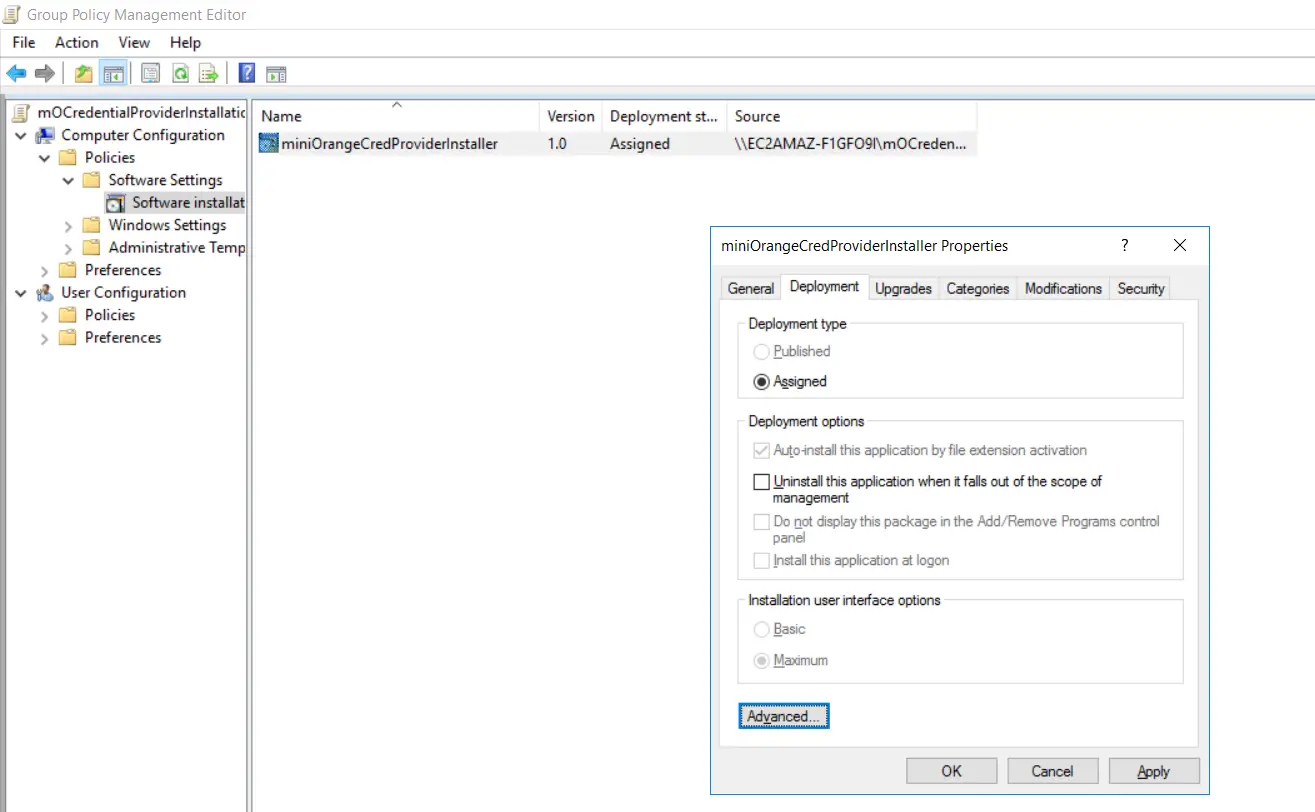
- Click on "Utilise" then "Ok" to close the backdrop windows.
- Expand "Preferences->Registry" from Computer Configuration.
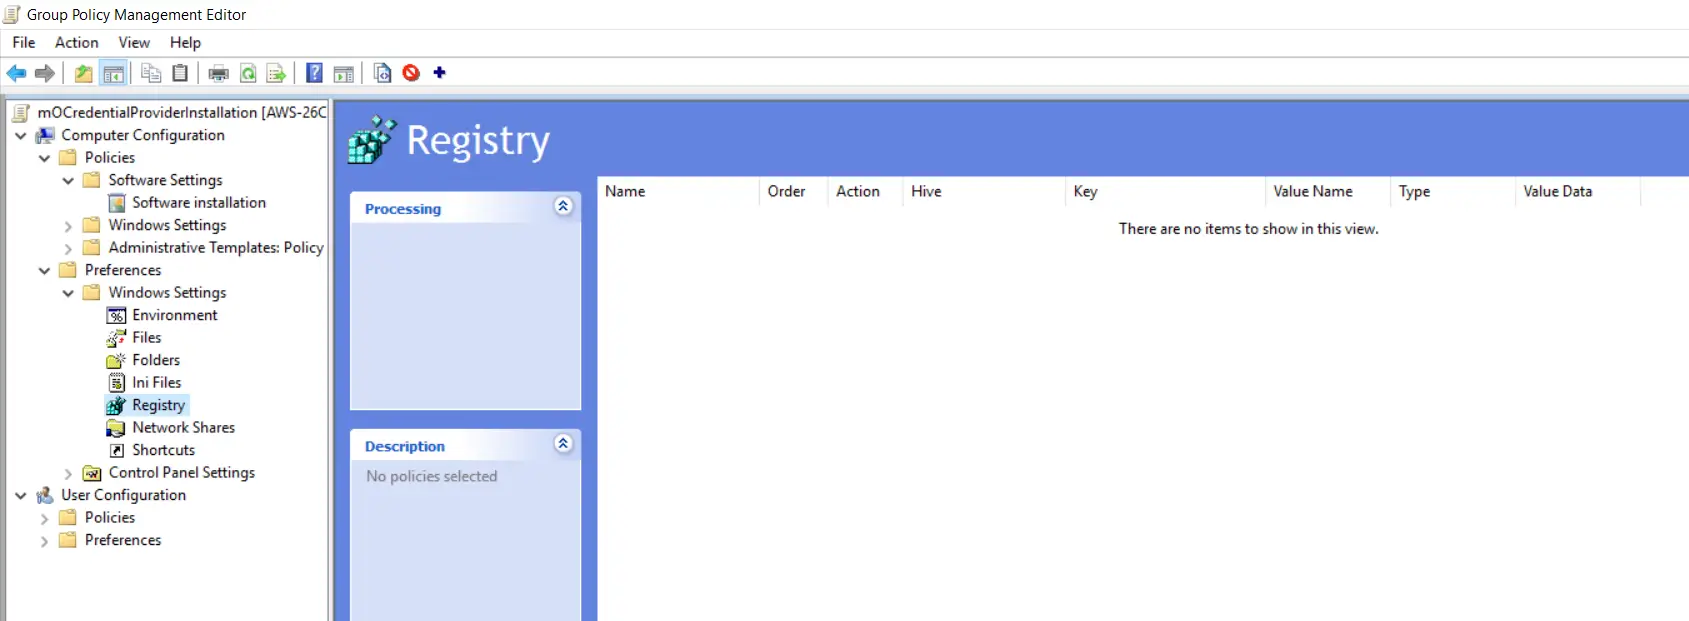
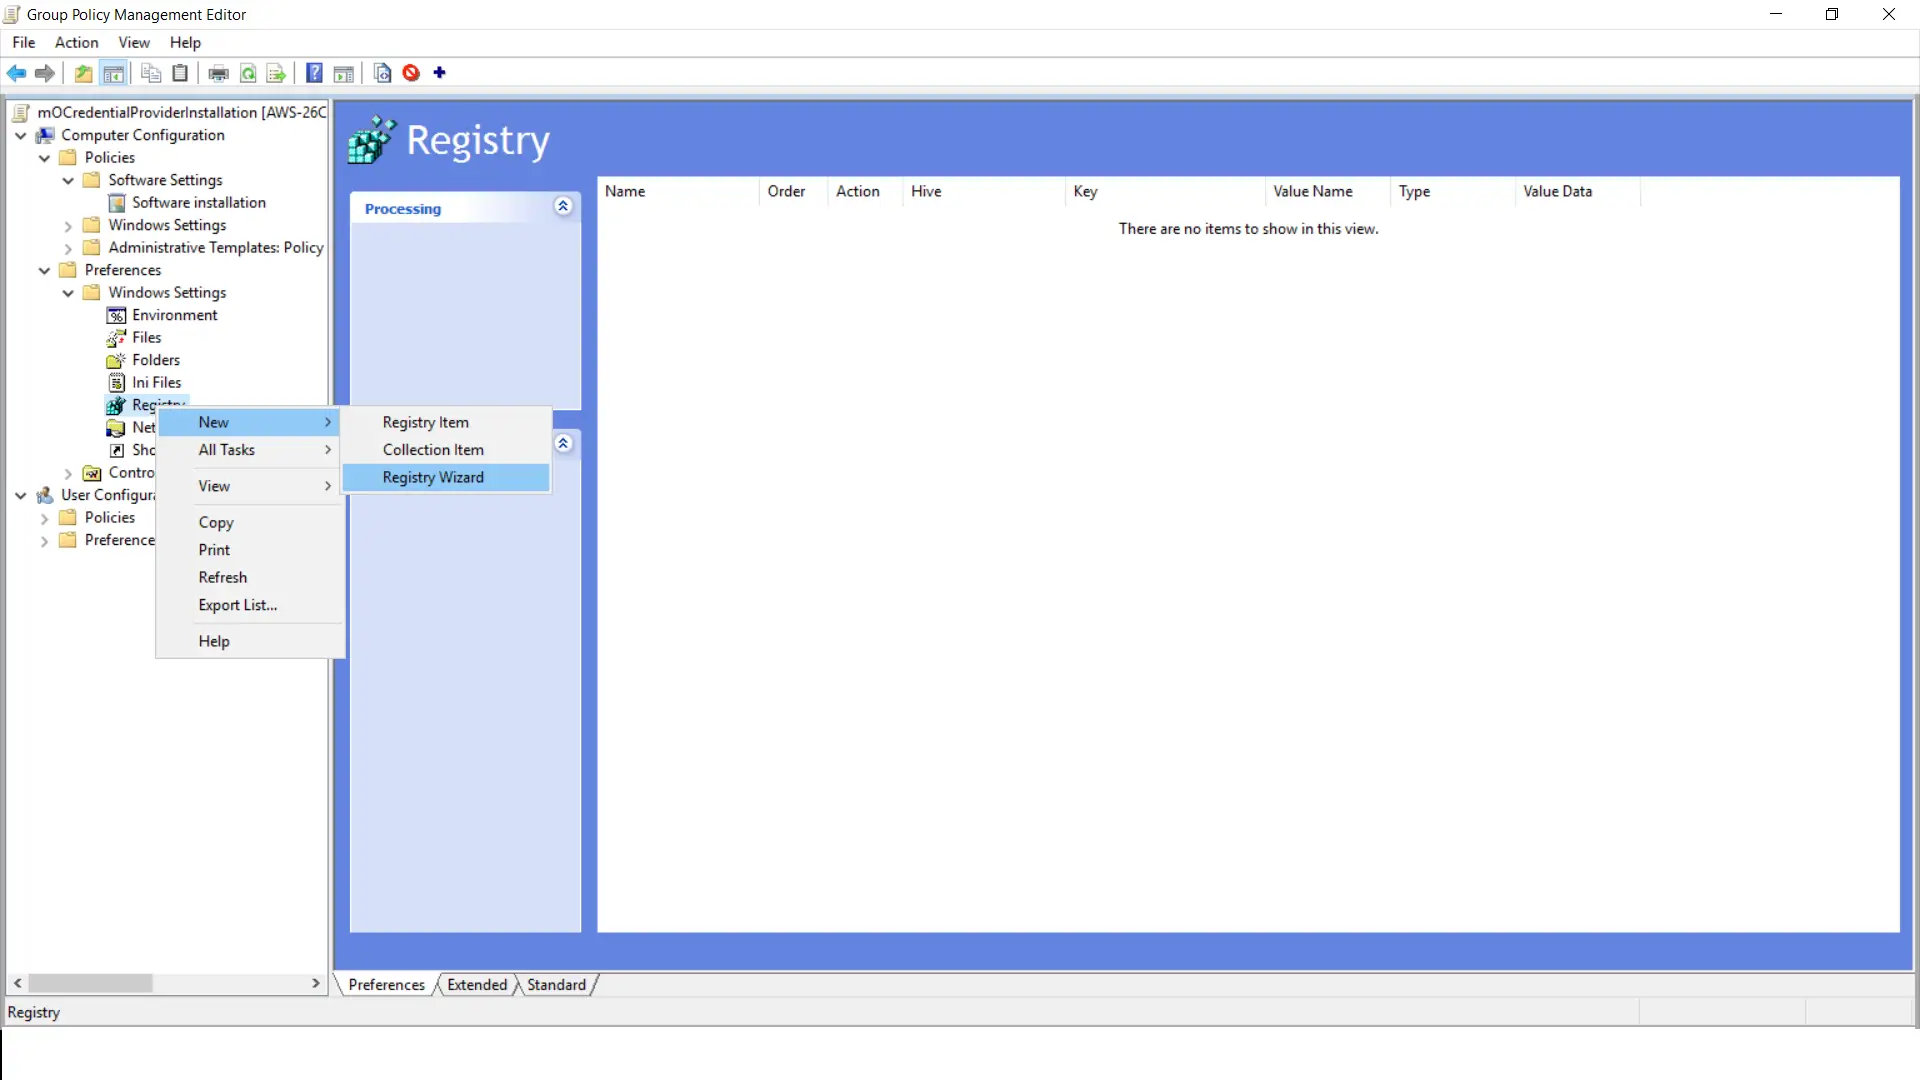
- Right click on "Registry" and select "New->Registry Wizard" from the list.
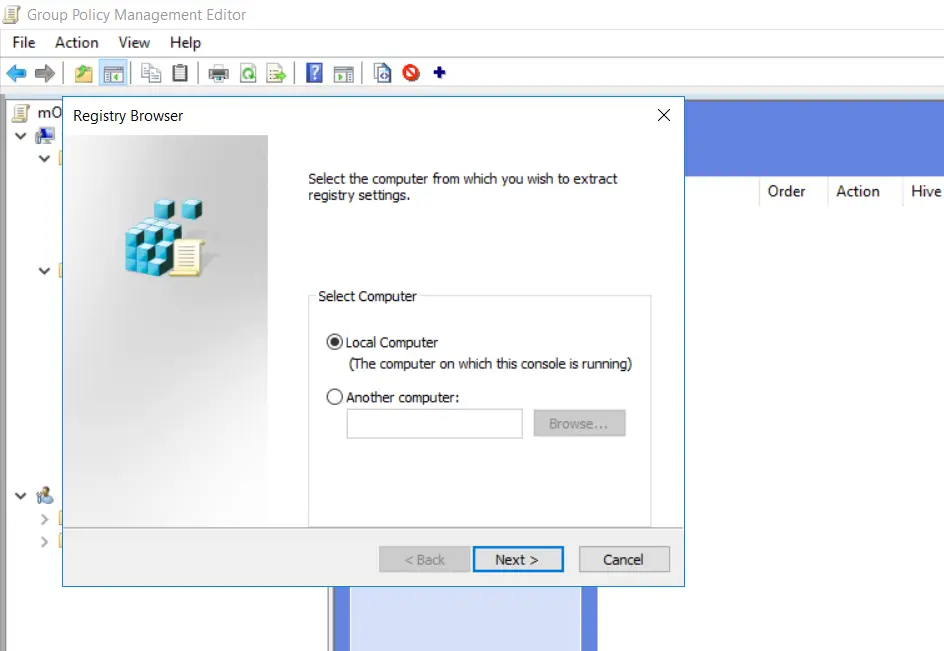
- Select "Local Computer" every bit we have installed the miniOrangeCredentialProiver package on this windows machine. Click on "Side by side".
- Expand the "HKEY_LOCAL_MACHINE" folder.
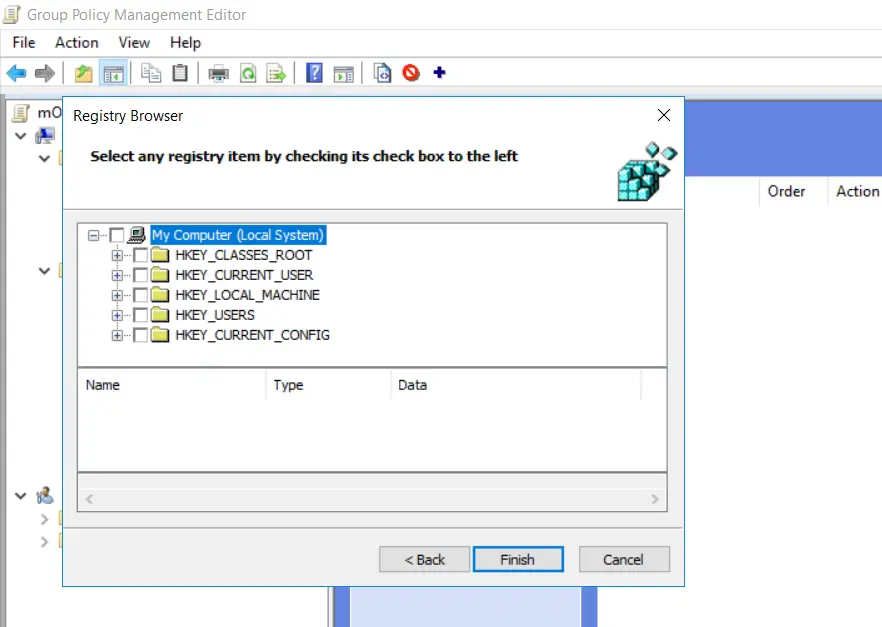
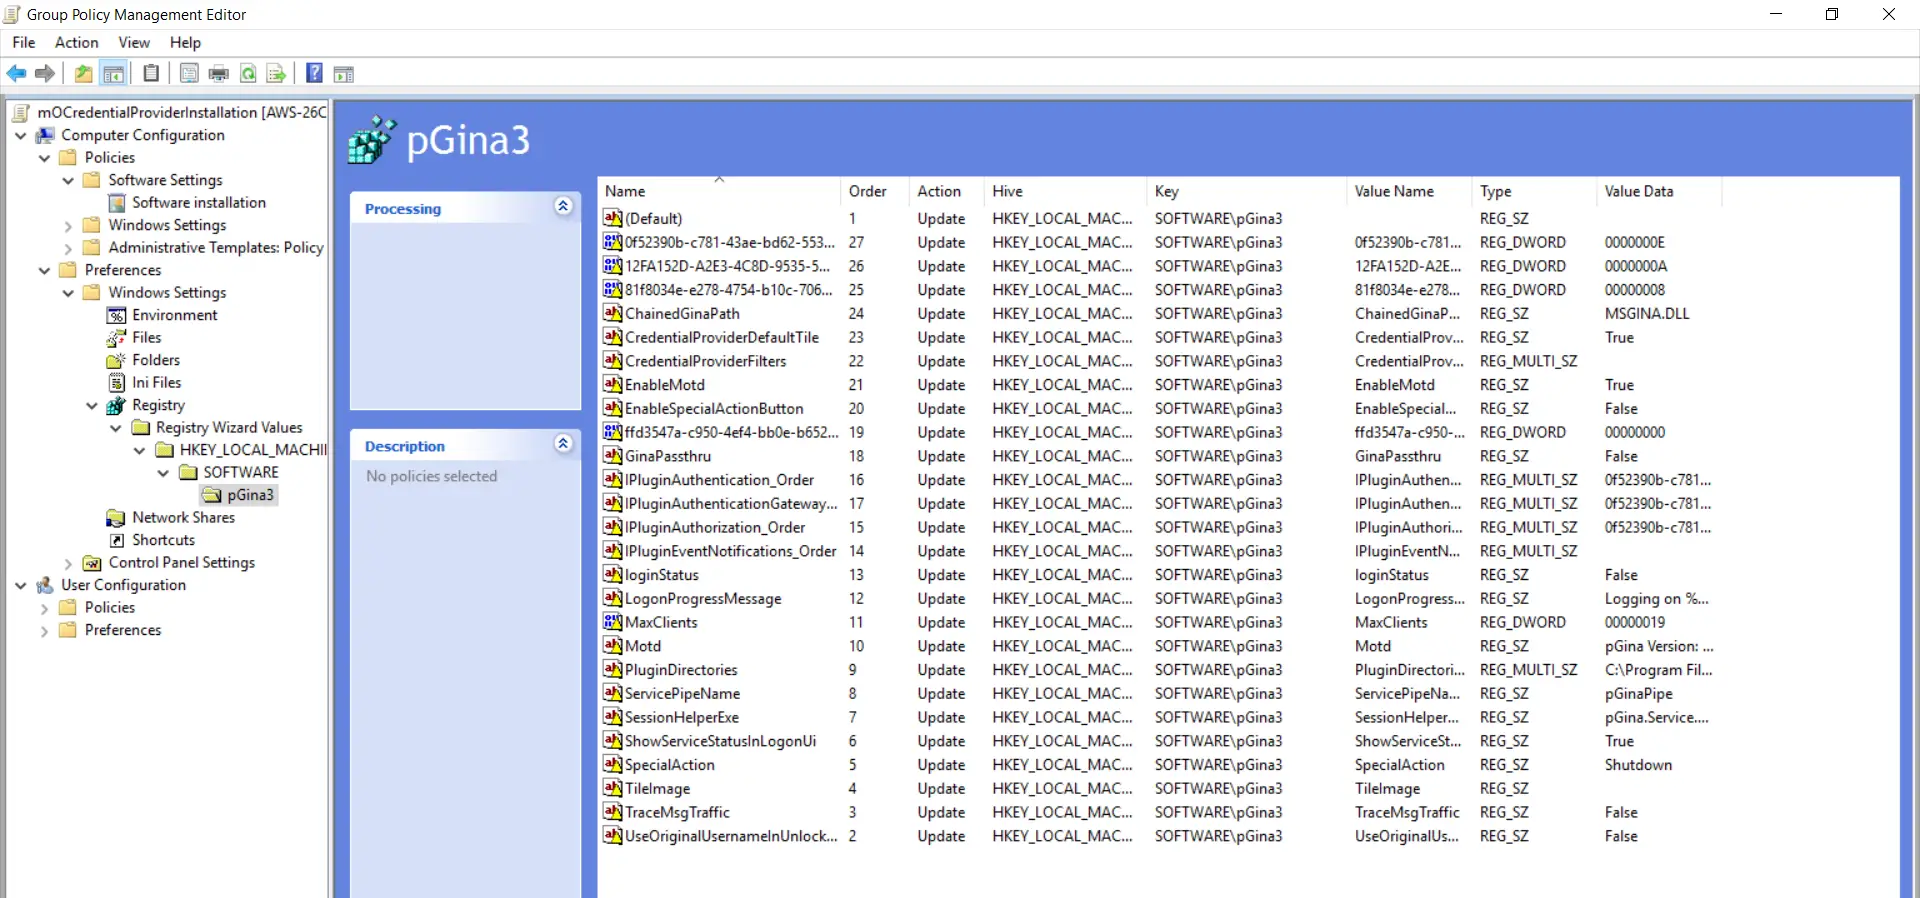
- Goto "SOFTWARE->pGina3" in "HKEY_LOCAL_MACHINE".
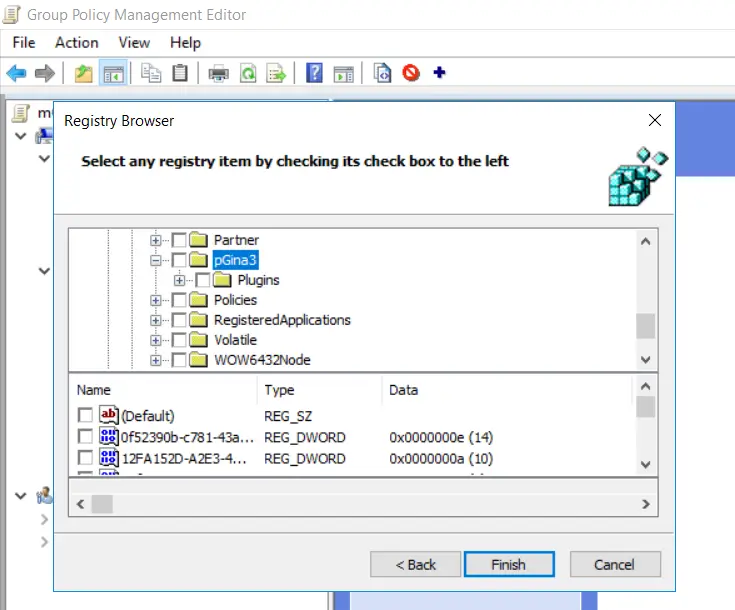
- Enable checkboxes for all the options present in "pGina3" folder and click "Stop".
- Expand the "First Registry Wizard Values" binder and goto "HKEY_LOCAL_MACHINE->SOFTWARE->pGina3" and brand sure all selected options are present.
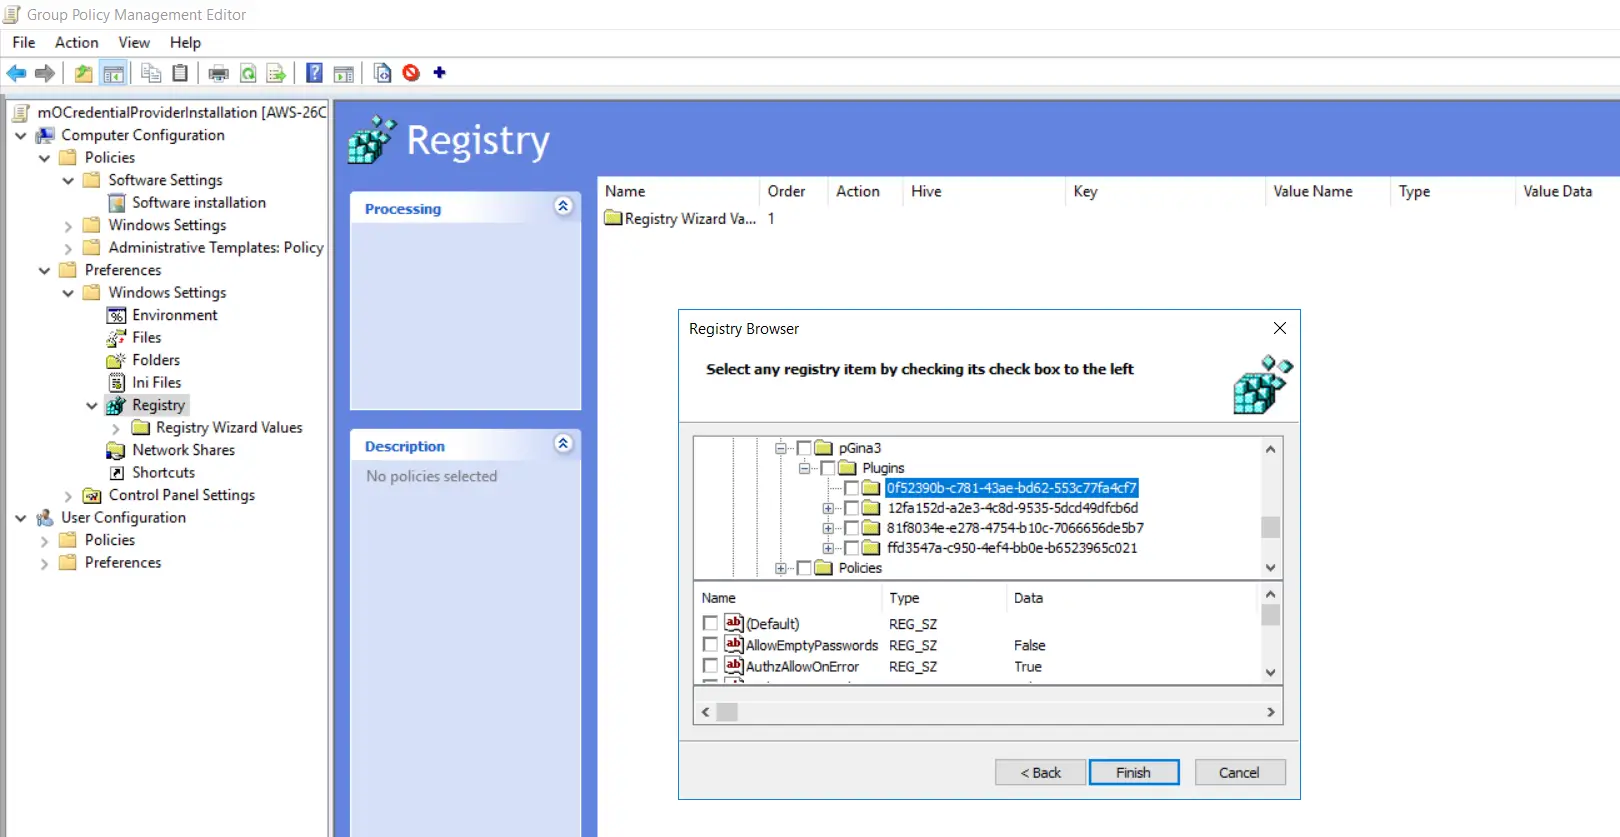
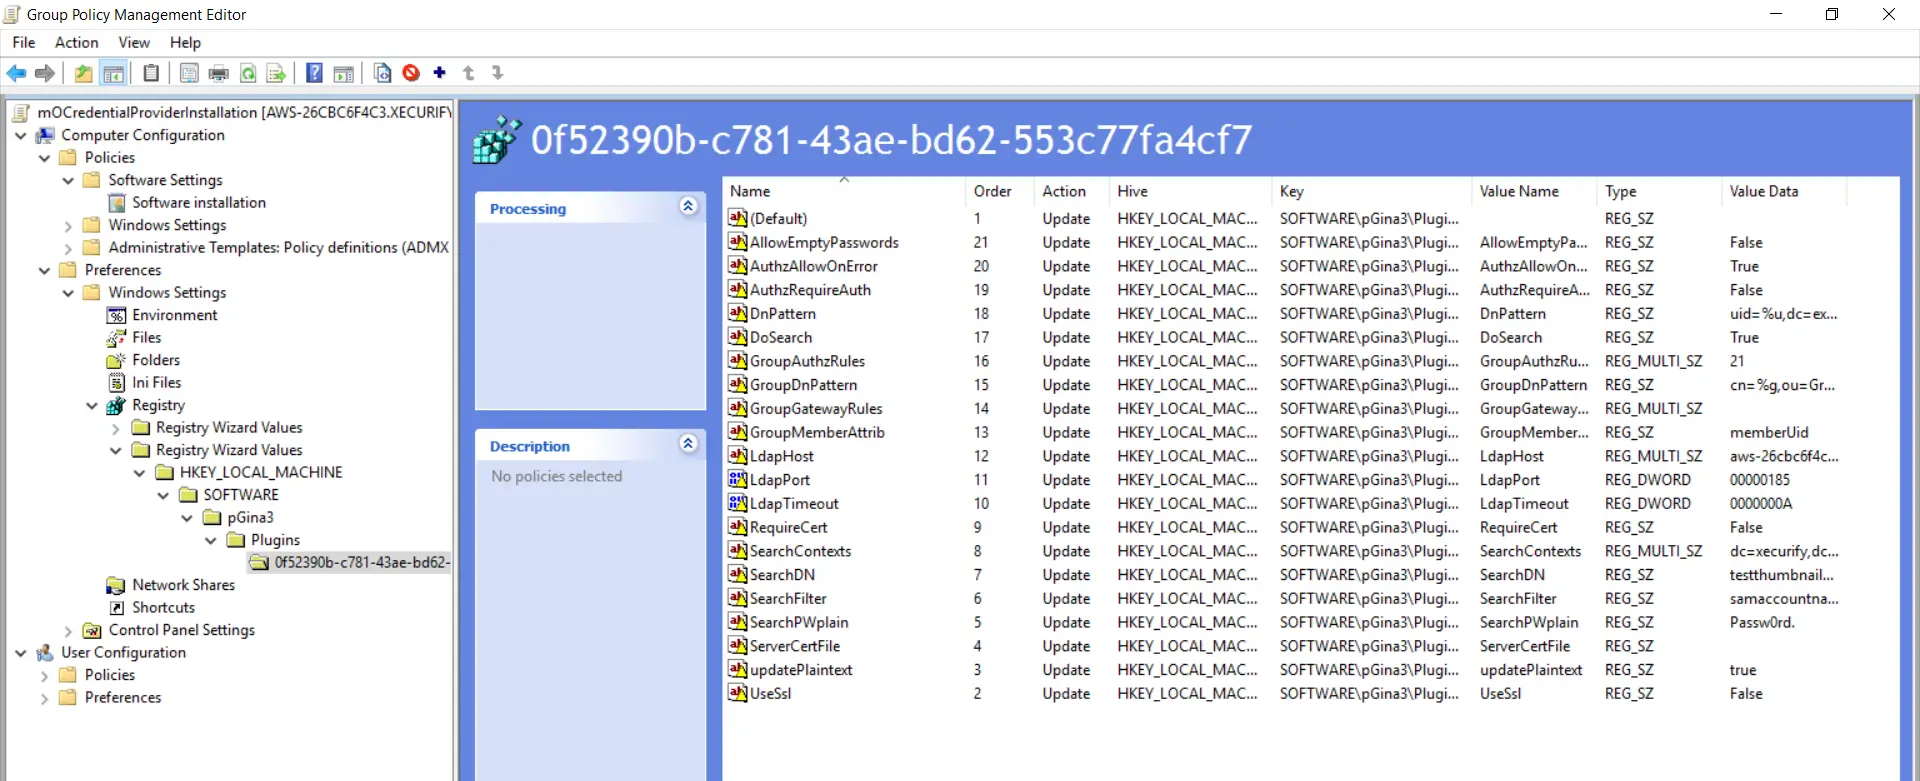
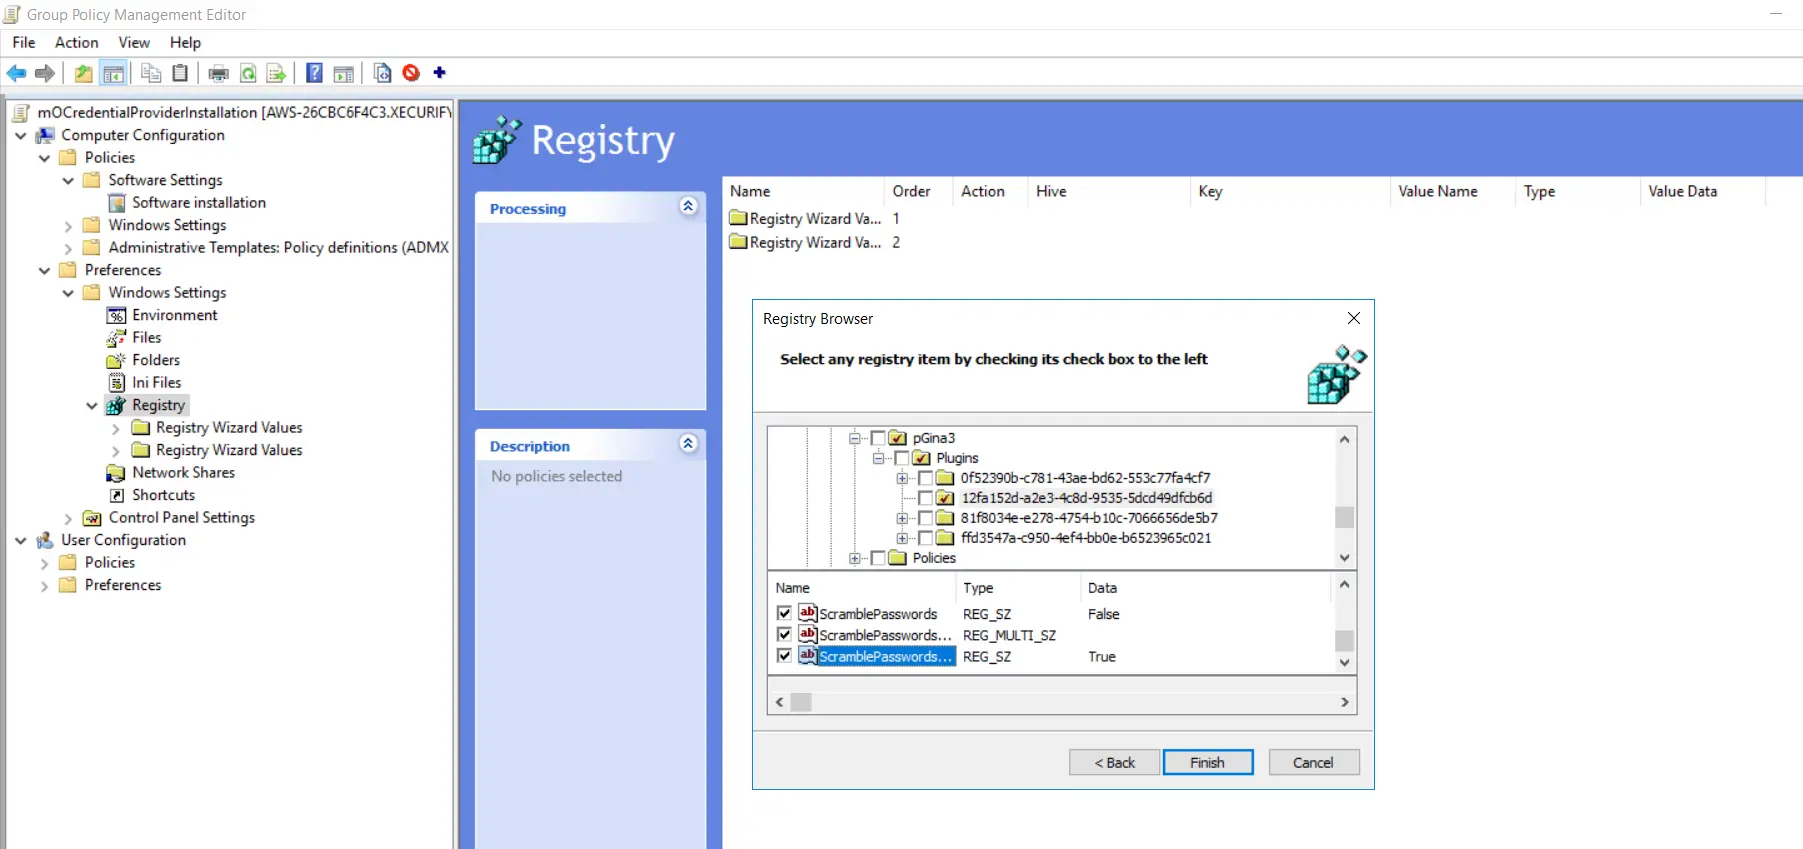
- Follow these 3 steps once again. Goto "SOFTWARE->pGina3->Plugins->0f52390b-c781-43ae-bd62-553c77fa4cf7" binder.
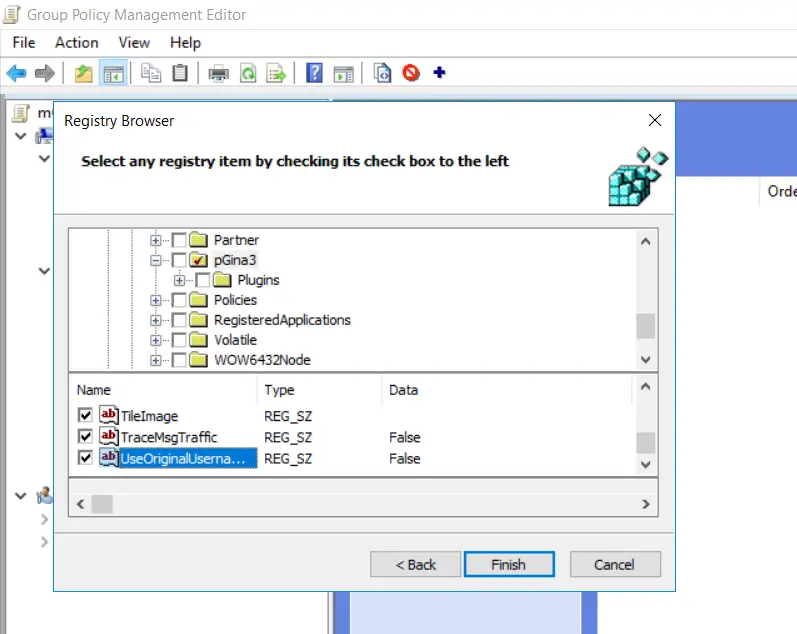
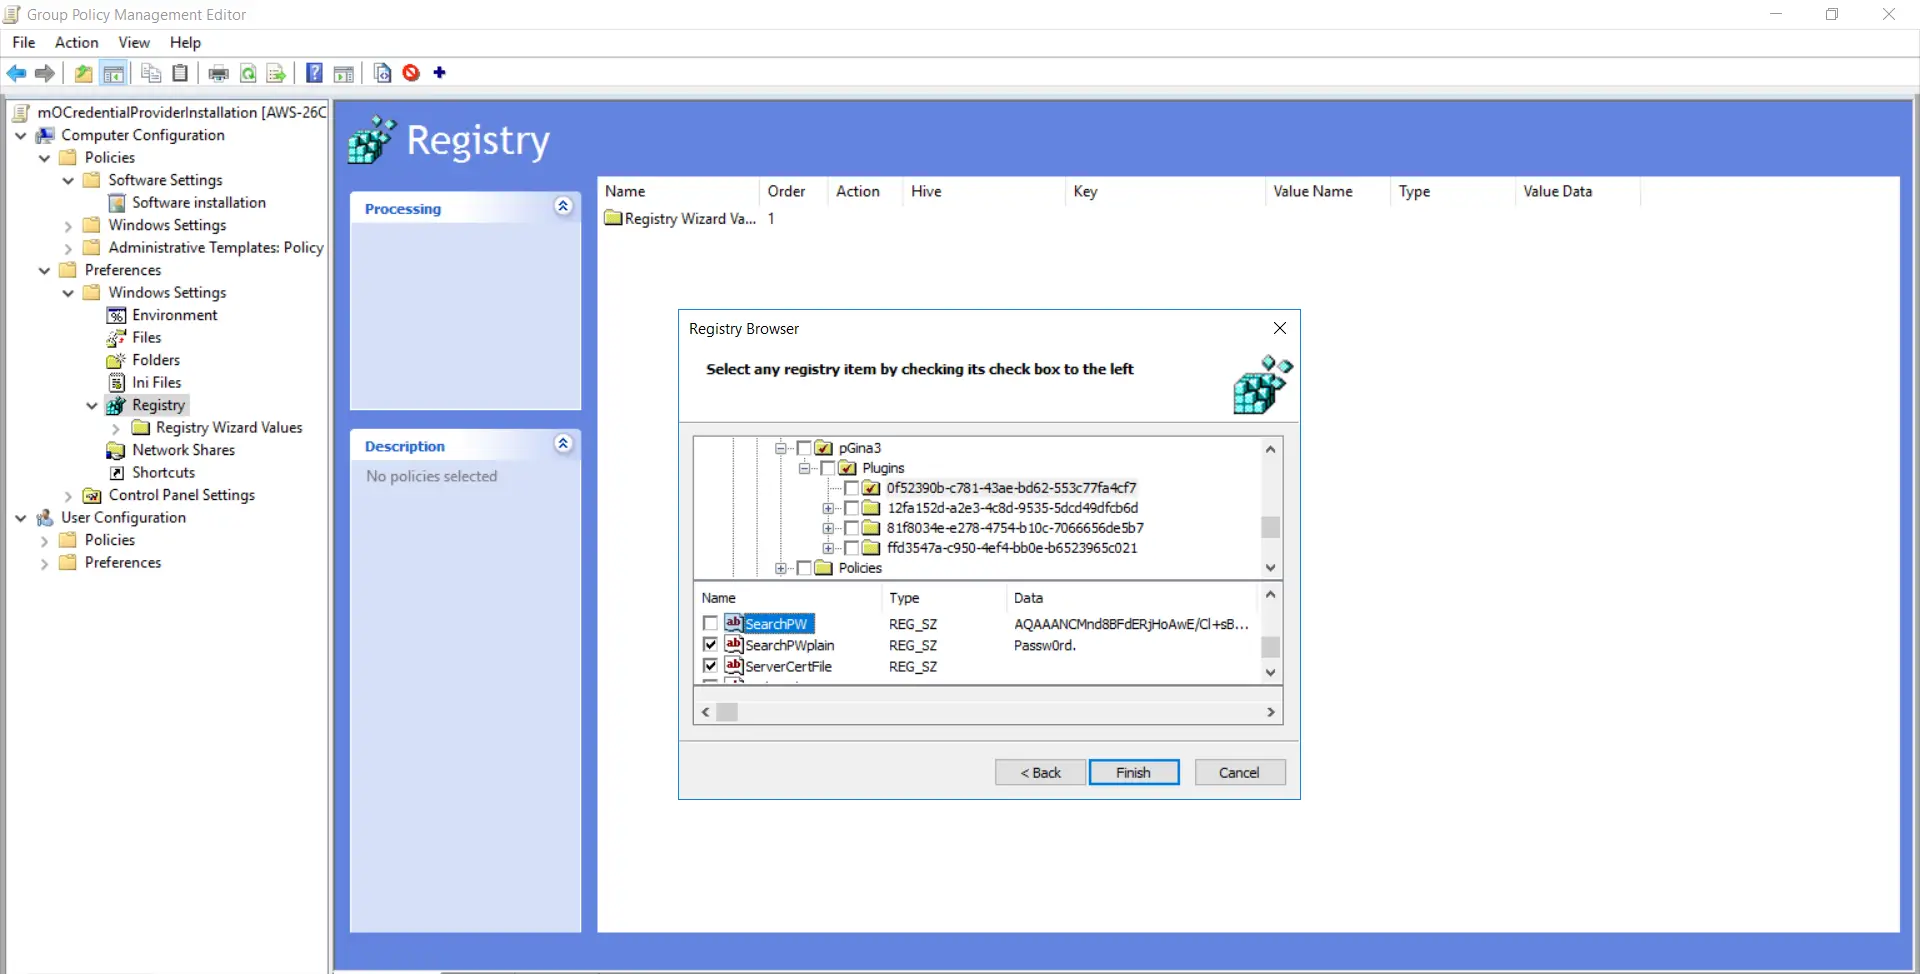
- Enable checkboxes for all options except "SearchPW" option and click on "Finish".
- Expand the "Second Registry Wizard Values" folder and goto "HKEY_LOCAL_MACHINE->SOFTWARE->pGina3->Plugins->0f52390b-c781-43ae-bd62-553c77fa4cf7" and make certain all selected options except "SearchPW" pick are present.
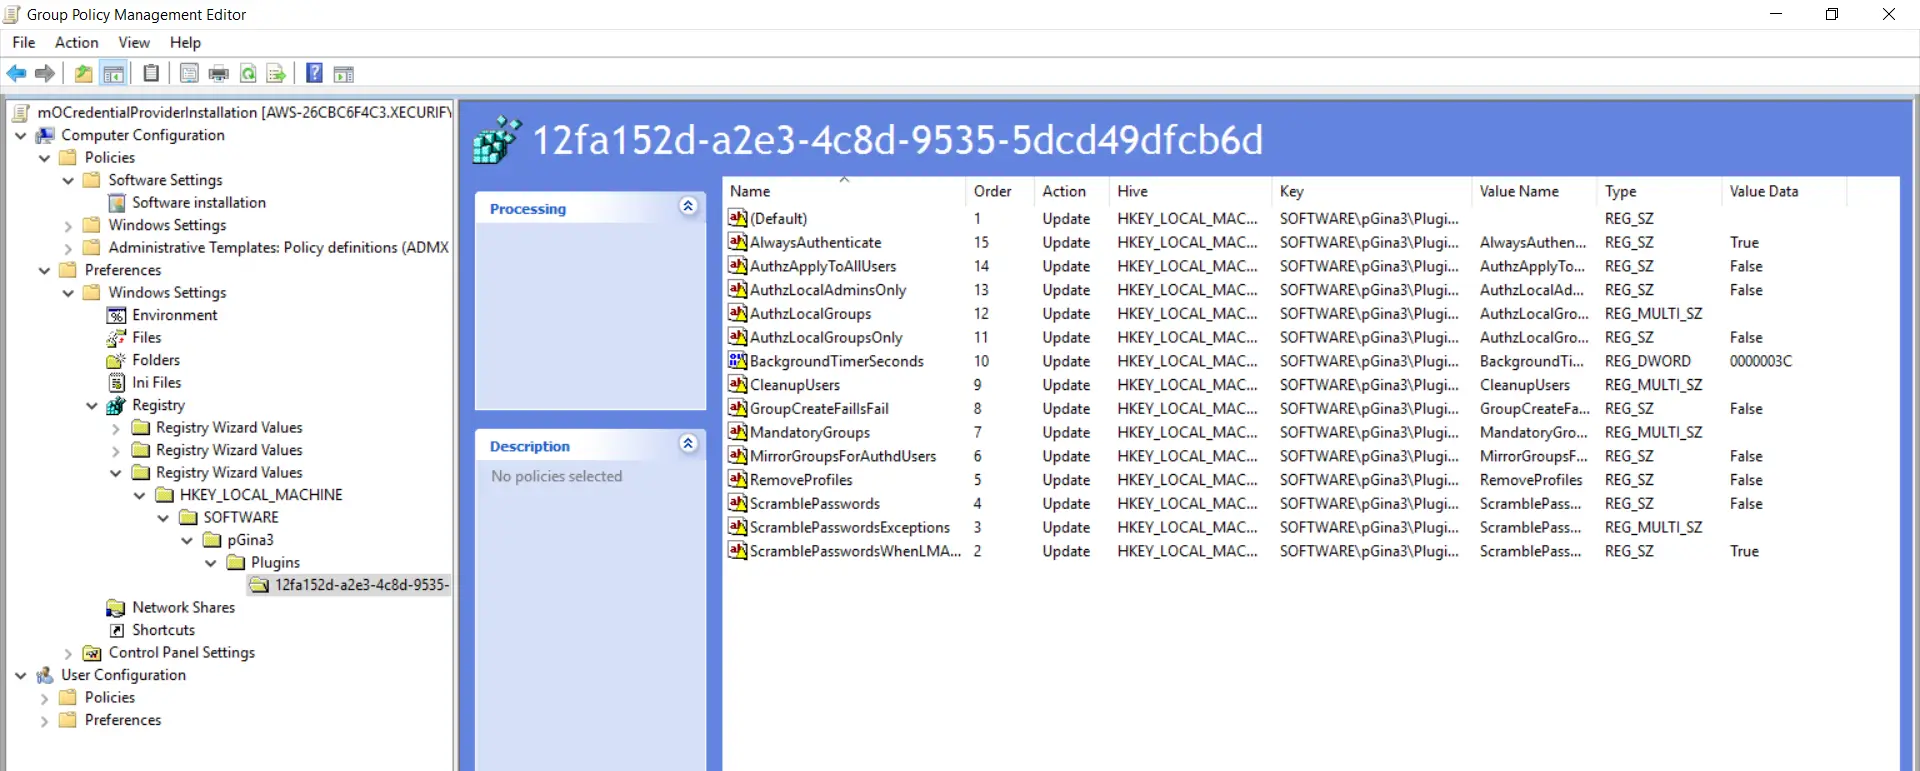
- Follow these iii steps again. Goto "SOFTWARE->pGina3->Plugins->12fa152d-a2e3-4c8d-9535-5dcd49dfcb6d" folder as shown in the below screenshot. Enable checkboxes for all options and click on the "Finish" button.
- Expand the "Third Registry Wizard Values" folder and goto "HKEY_LOCAL_MACHINE->SOFTWARE->pGina3->Plugins->12fa152d-a2e3-4c8d-9535-5dcd49dfcb6d" and make sure all selected options are present.
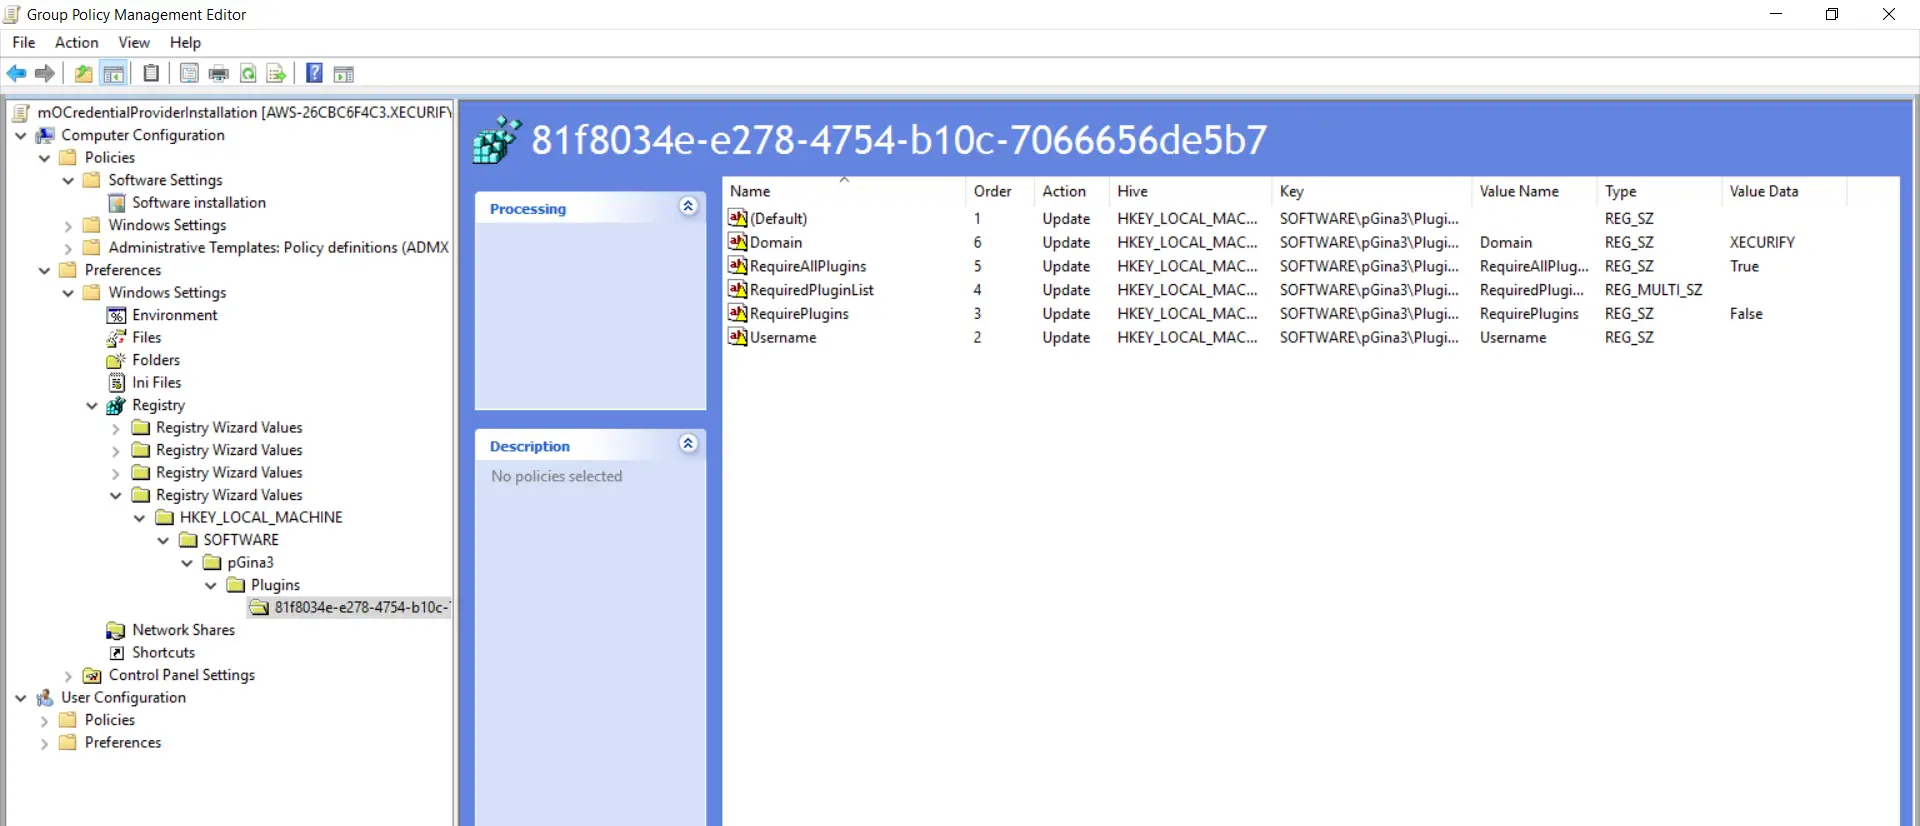
- Follow these iii steps over again. Goto "SOFTWARE->pGina3->Plugins->81f8034e-e278-4754-b10c-7066656de5b7" folder as shown in the below screenshot. Enable checkboxes for all options except the "Password" option and click on the "Finish" button.
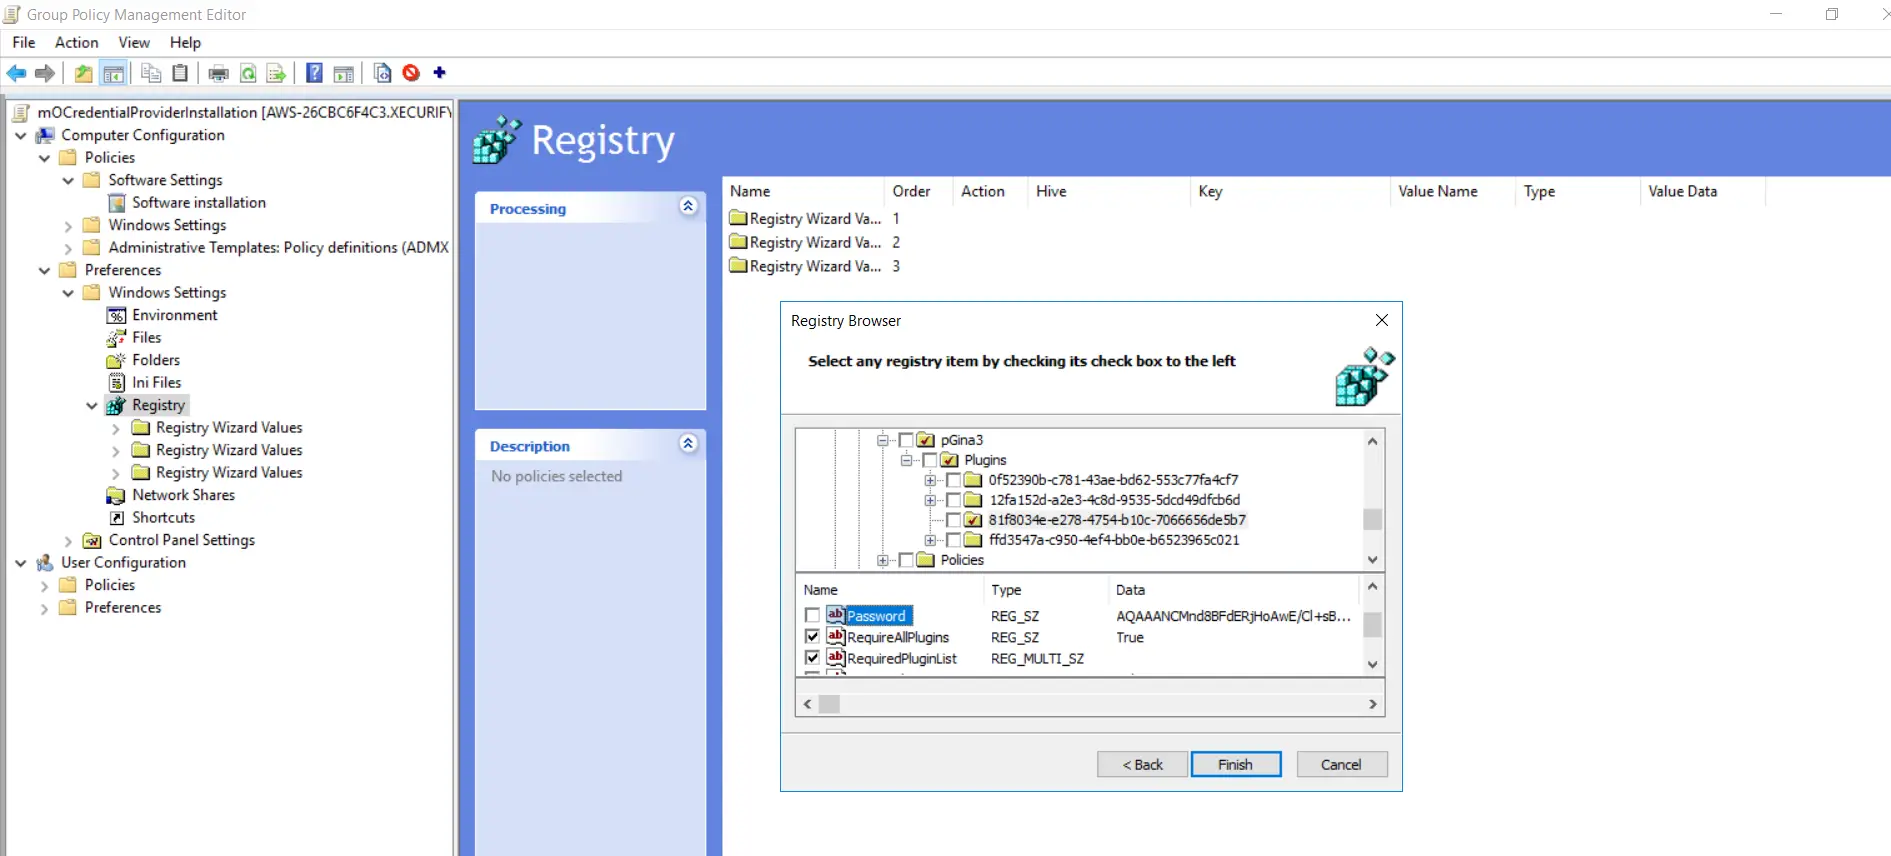
- Expand the "Quaternary Registry Wizard Values" folder and goto "HKEY_LOCAL_MACHINE->SOFTWARE->pGina3->Plugins->81f8034e-e278-4754-b10c-7066656de5b7" and make sure all selected options except "Password" pick are present.
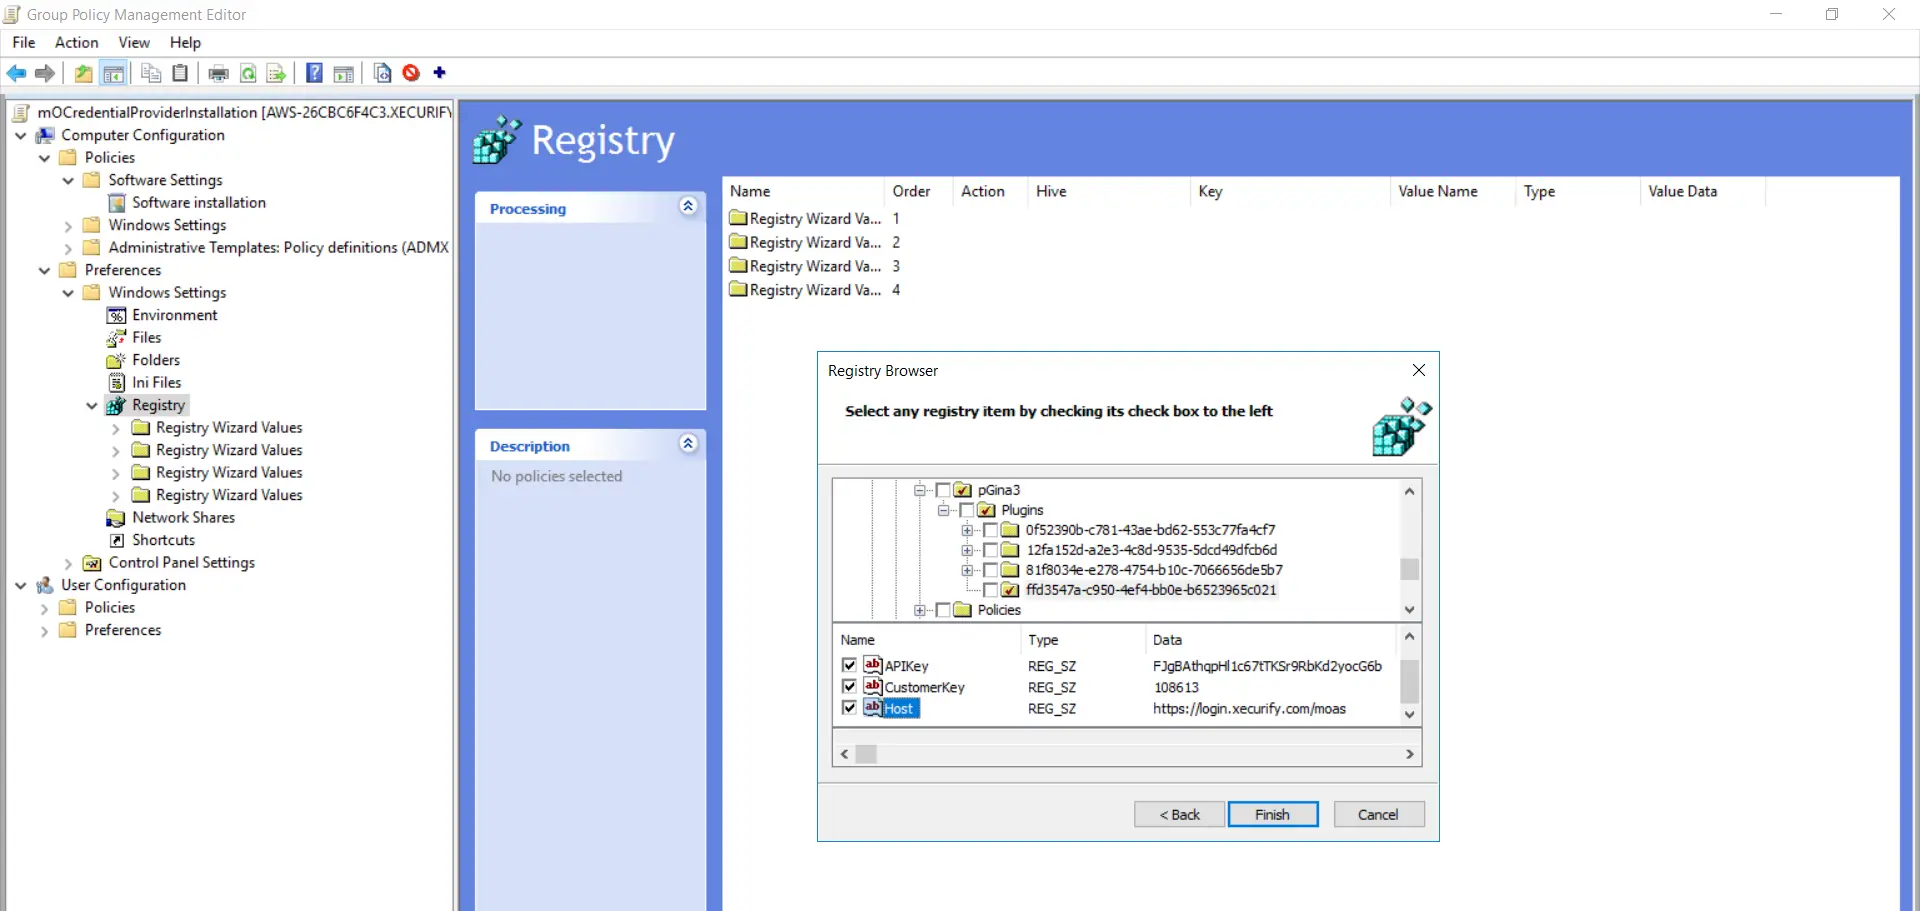
- Follow these 3 steps again. Goto "SOFTWARE->pGina3->Plugins->ffd3547a-c950-4ef4-bb0e-b6523965c021" binder every bit shown in the below screenshot. Enable checkboxes for all options and click on the "Terminate" push.
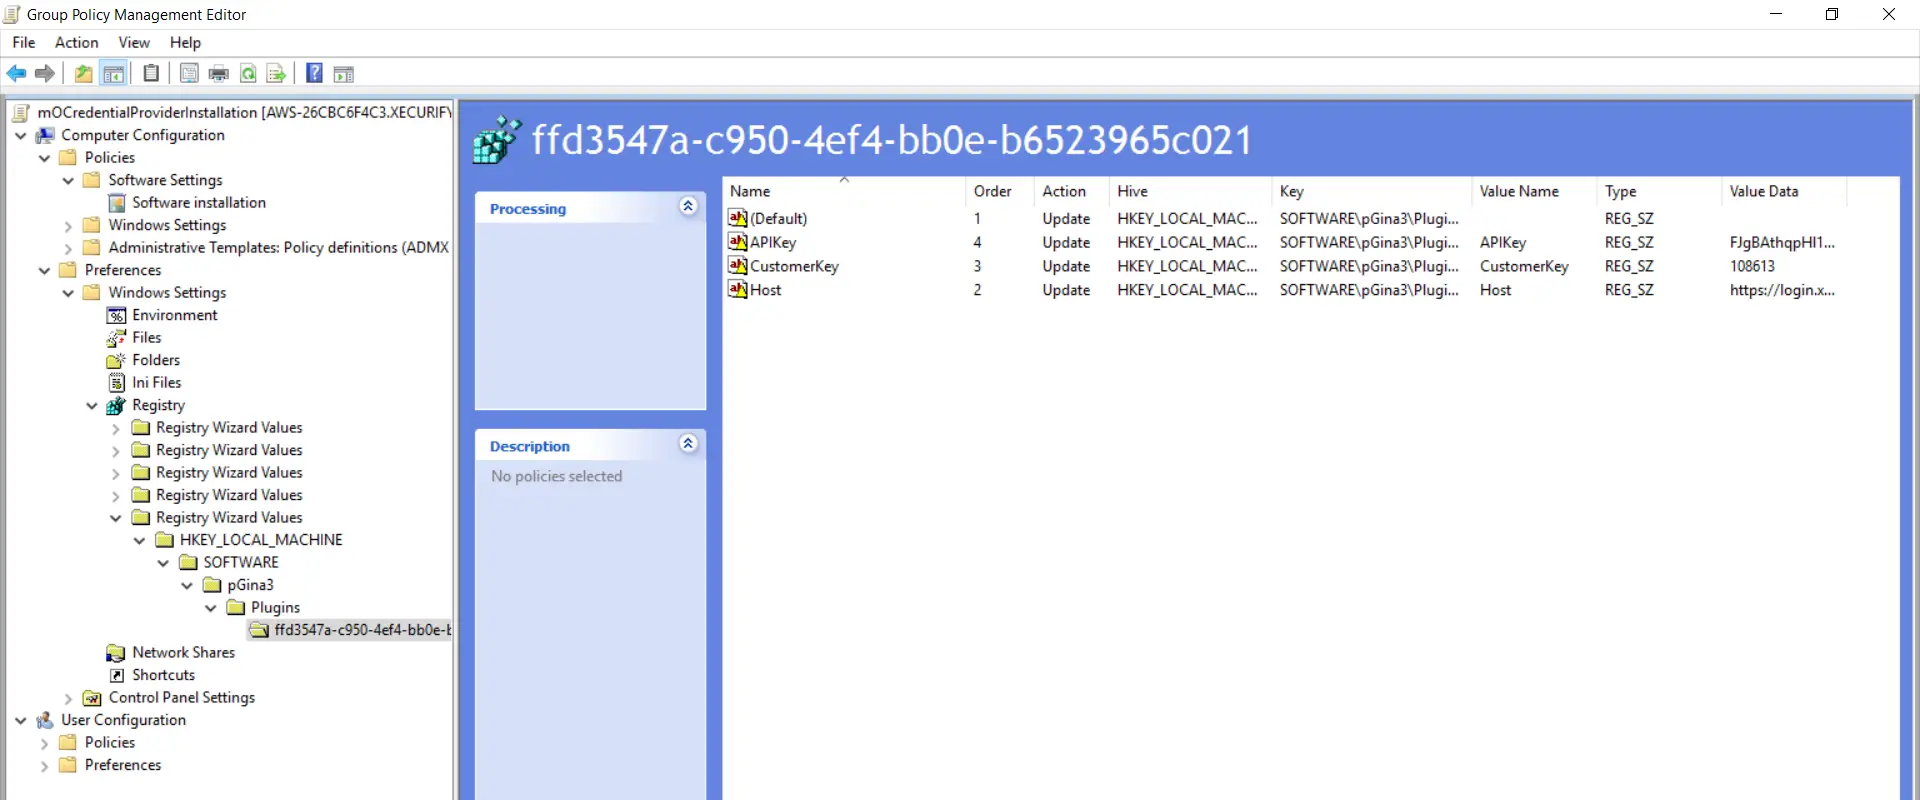
- Expand the "Fifth Registry Magician Values" folder and goto "HKEY_LOCAL_MACHINE->SOFTWARE->pGina3->Plugins->ffd3547a-c950-4ef4-bb0e-b6523965c021" and brand certain all selected options are present.
- The Group policy settings will be applied on the computers once they are restarted. You can also perform force grouping policy push by executing control from the command prompt window.
Note: Login into the other domain-joined windows figurer on which you want to apply these group policy settings.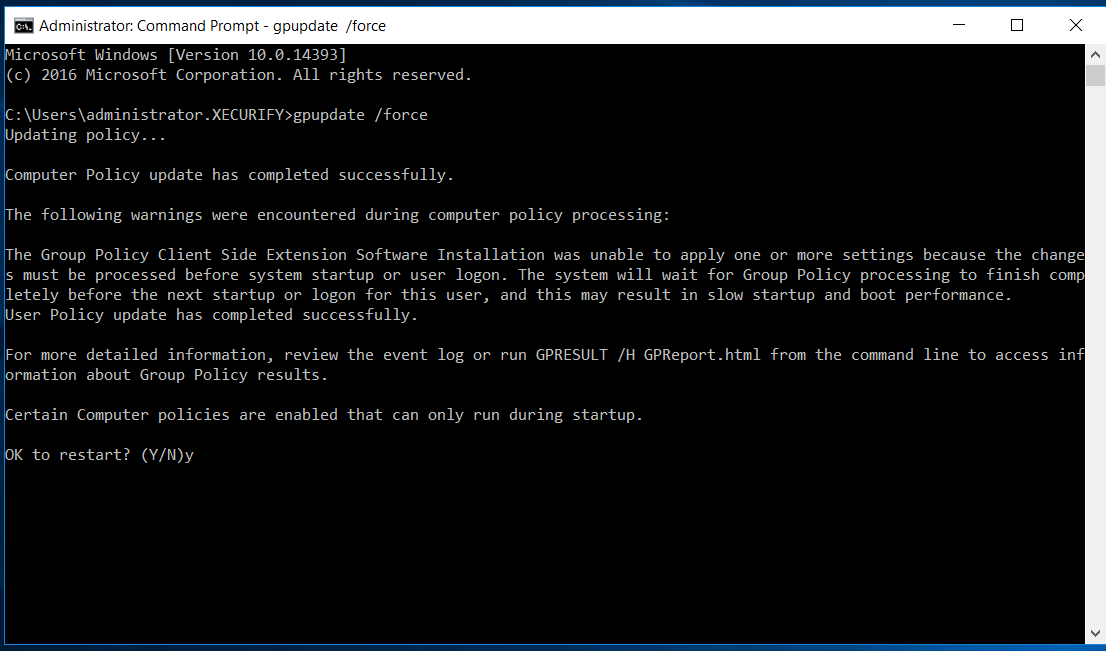
vi. Configure Your User Directory (Optional)
miniOrange provides user hallmark from various external sources, which can be Directories (like ADFS, Microsoft Active Directory, Azure Advertizing, OpenLDAP, Google, AWS Cognito etc), Identity Providers (similar Okta, Shibboleth, Ping, OneLogin, KeyCloak), Databases (similar MySQL, Maria DB, PostgreSQL) and many more than. You can configure your existing directory/user store or add users in miniOrange.
- Setup miniOrange as IDP
- Setup Advert equally User Directory
- Setup External IDP
- To add your users in miniOrange there are 2 ways:
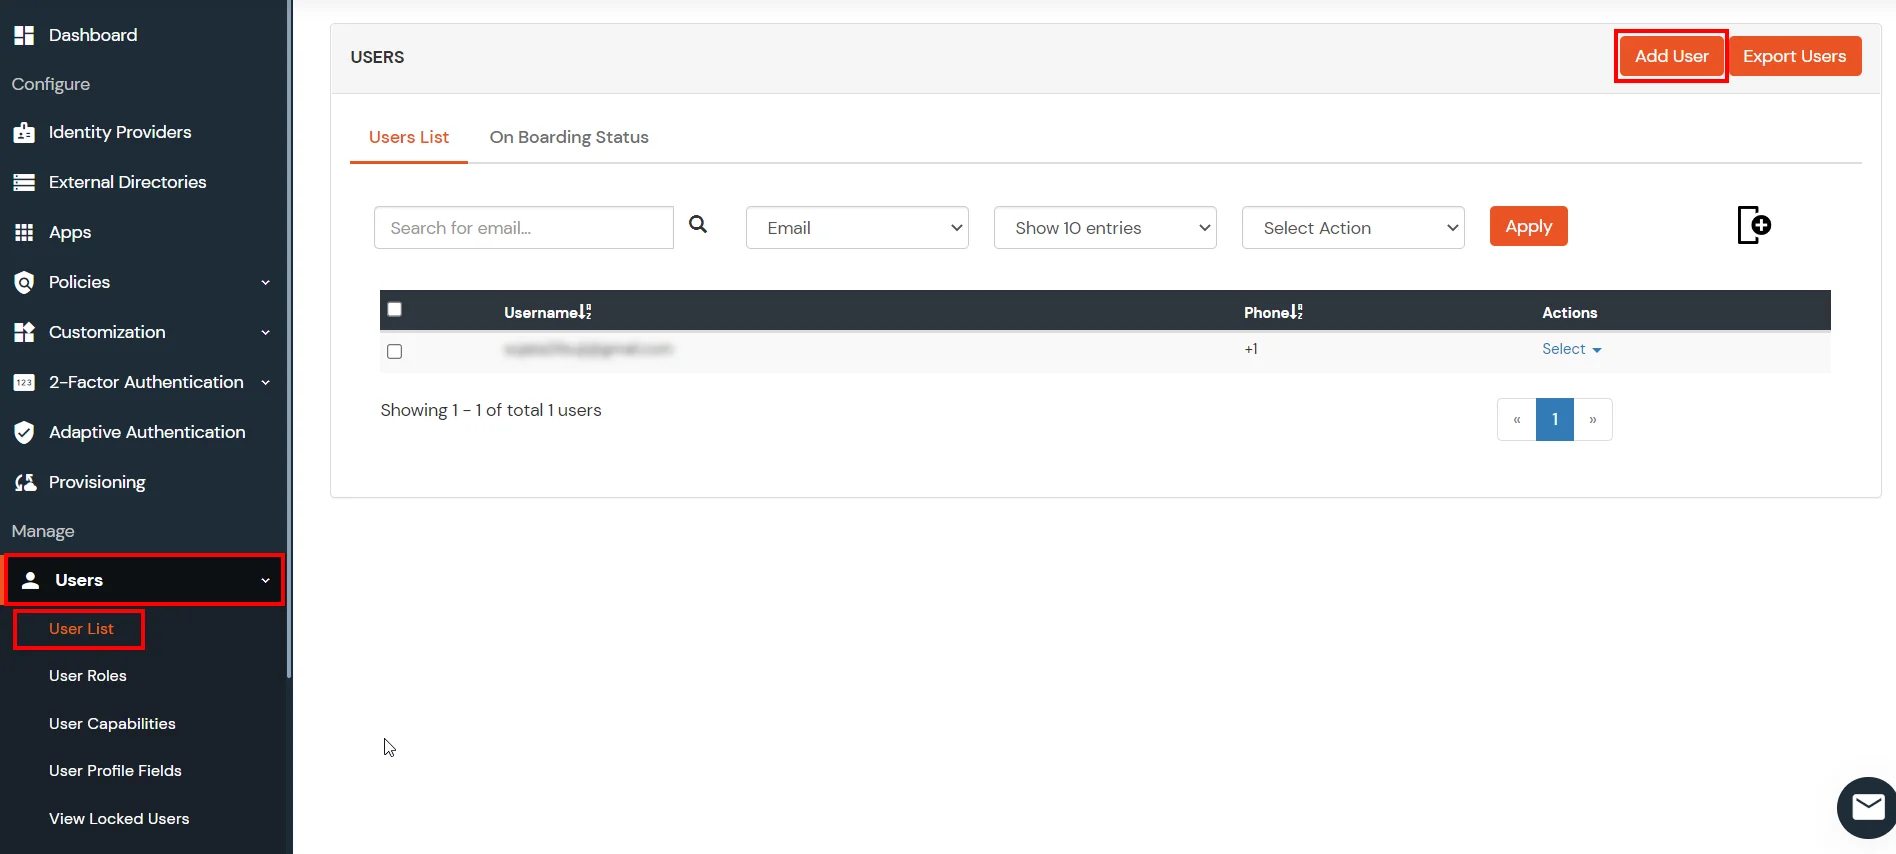
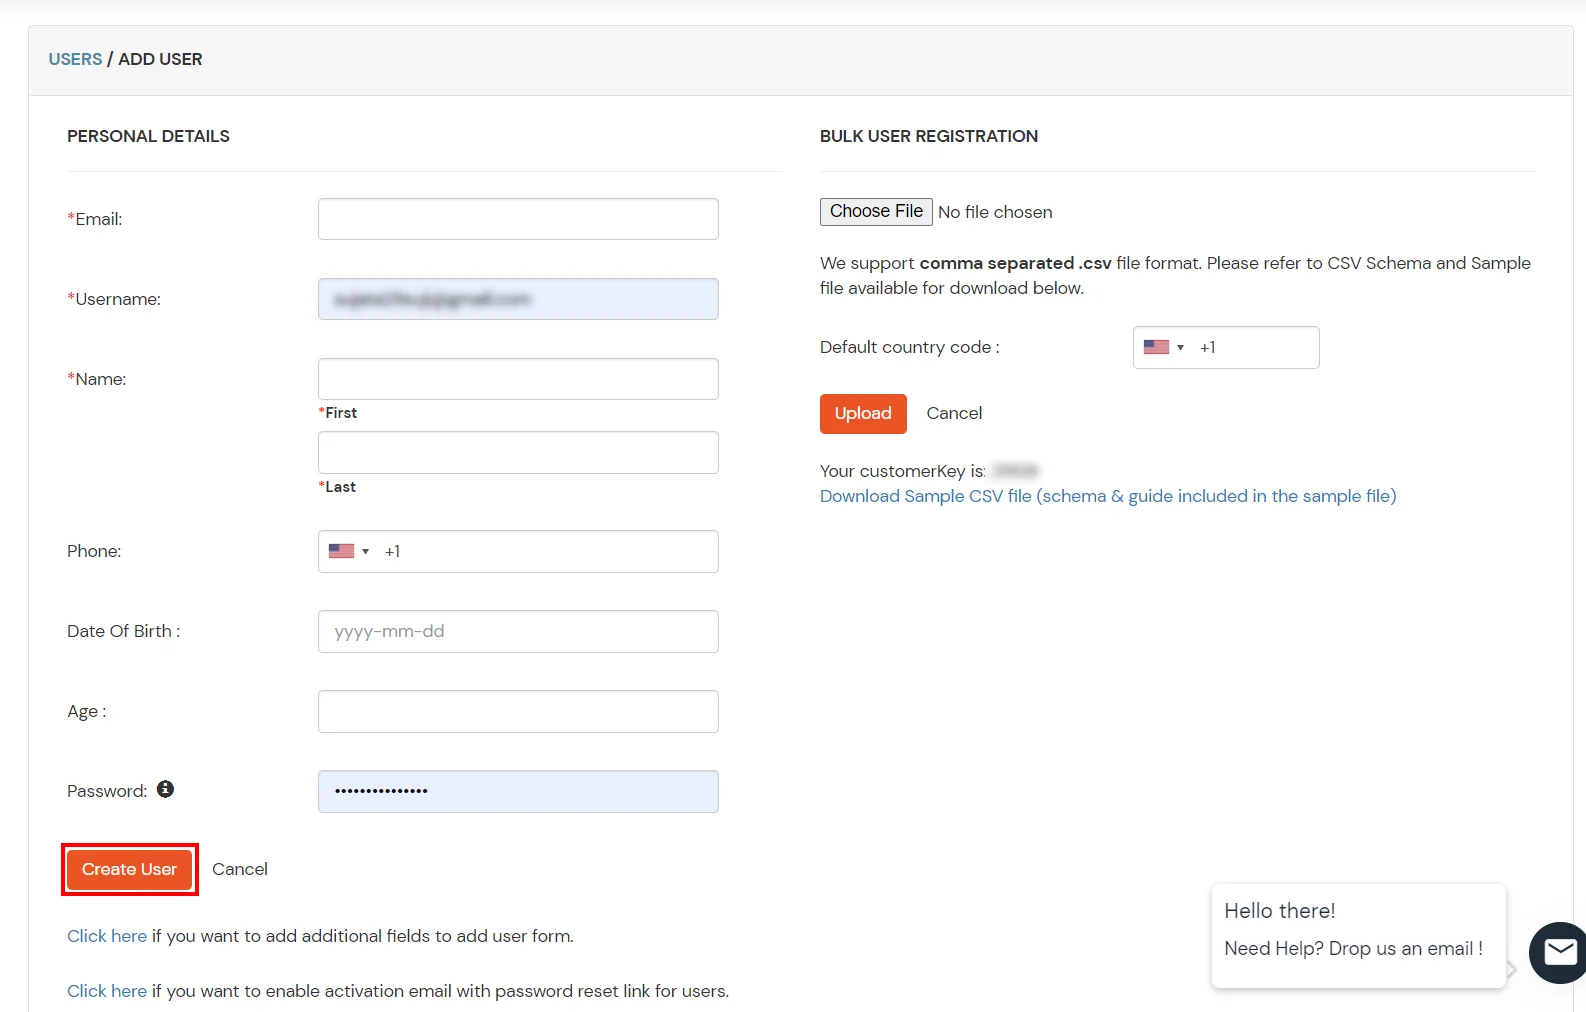
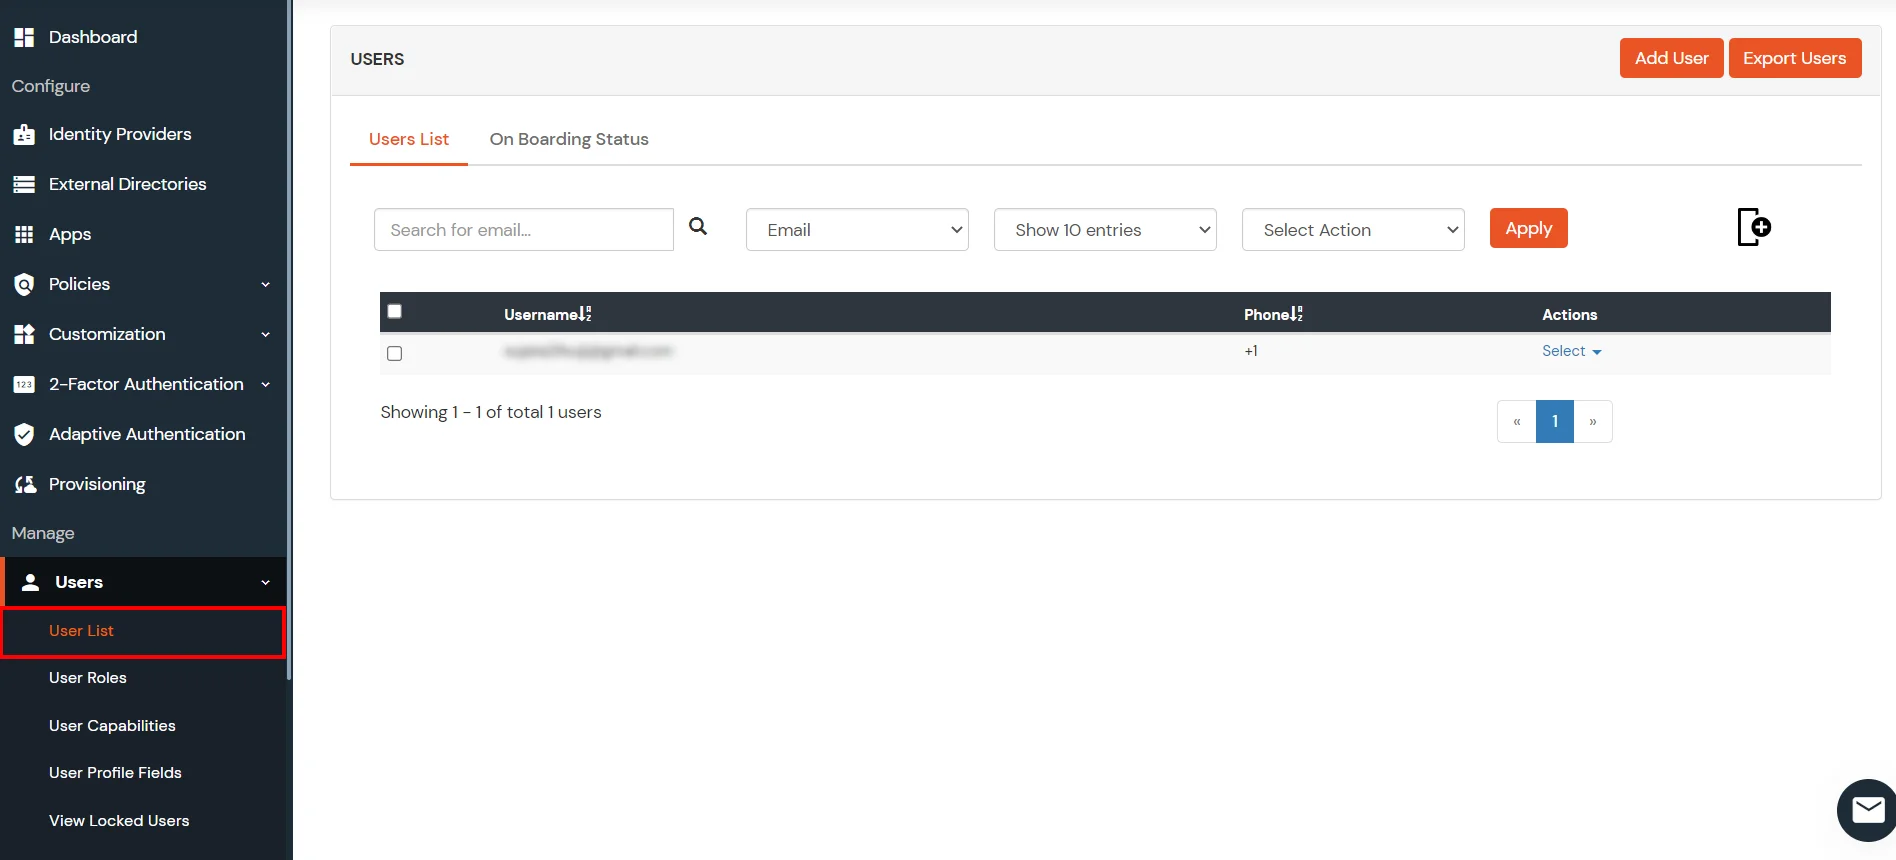
- Click on Users >> Add User.
- Hither, fill the user details without the password and and so click on the Create User button.
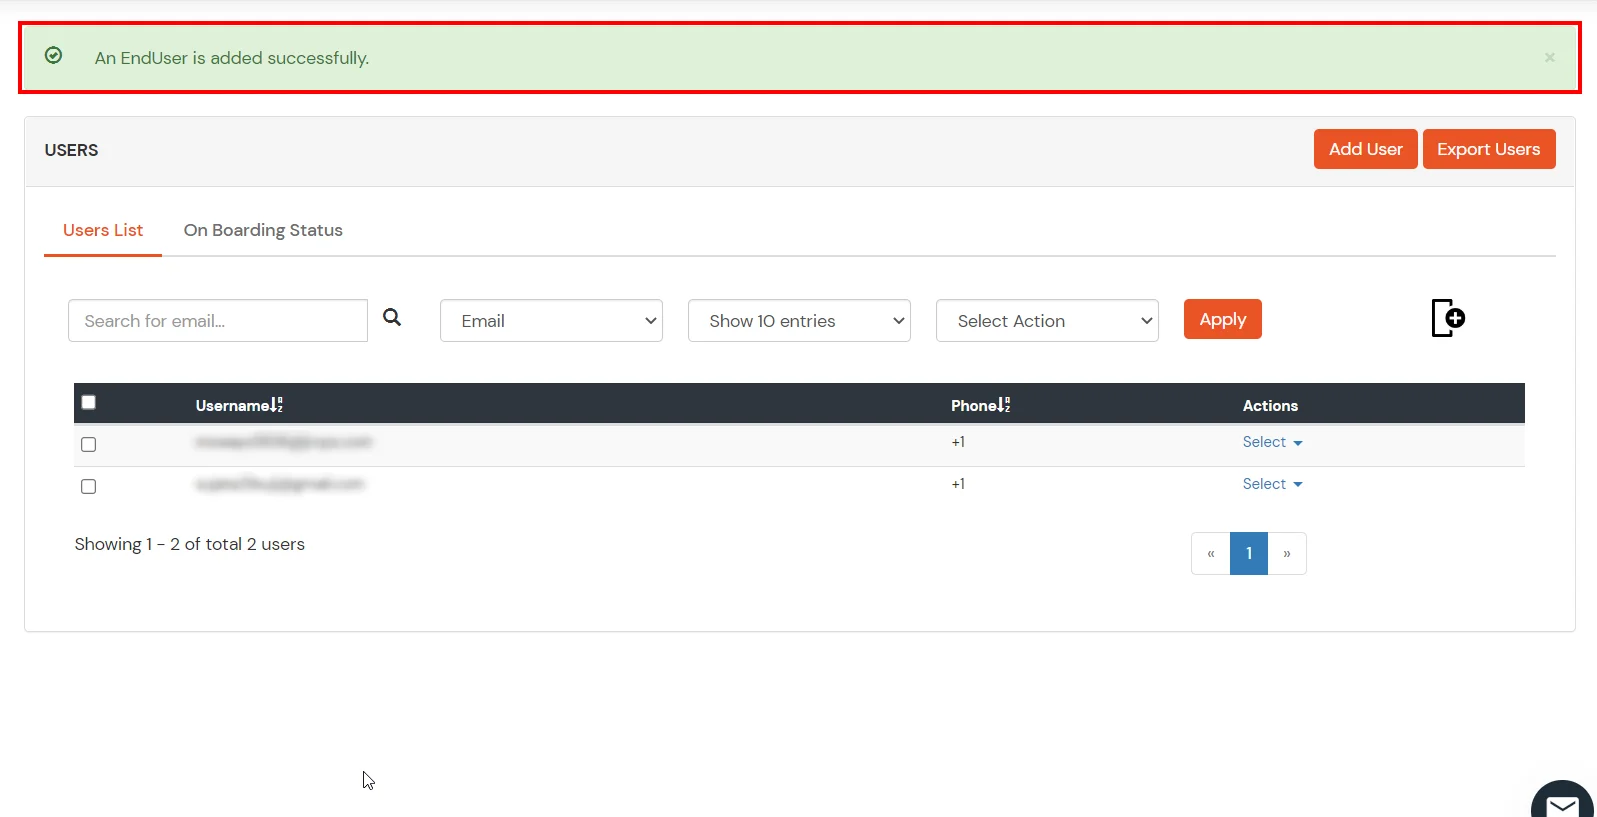
- After successful user creation a notification message "An terminate user is added successfully" volition be displayed at the top of the dashboard.
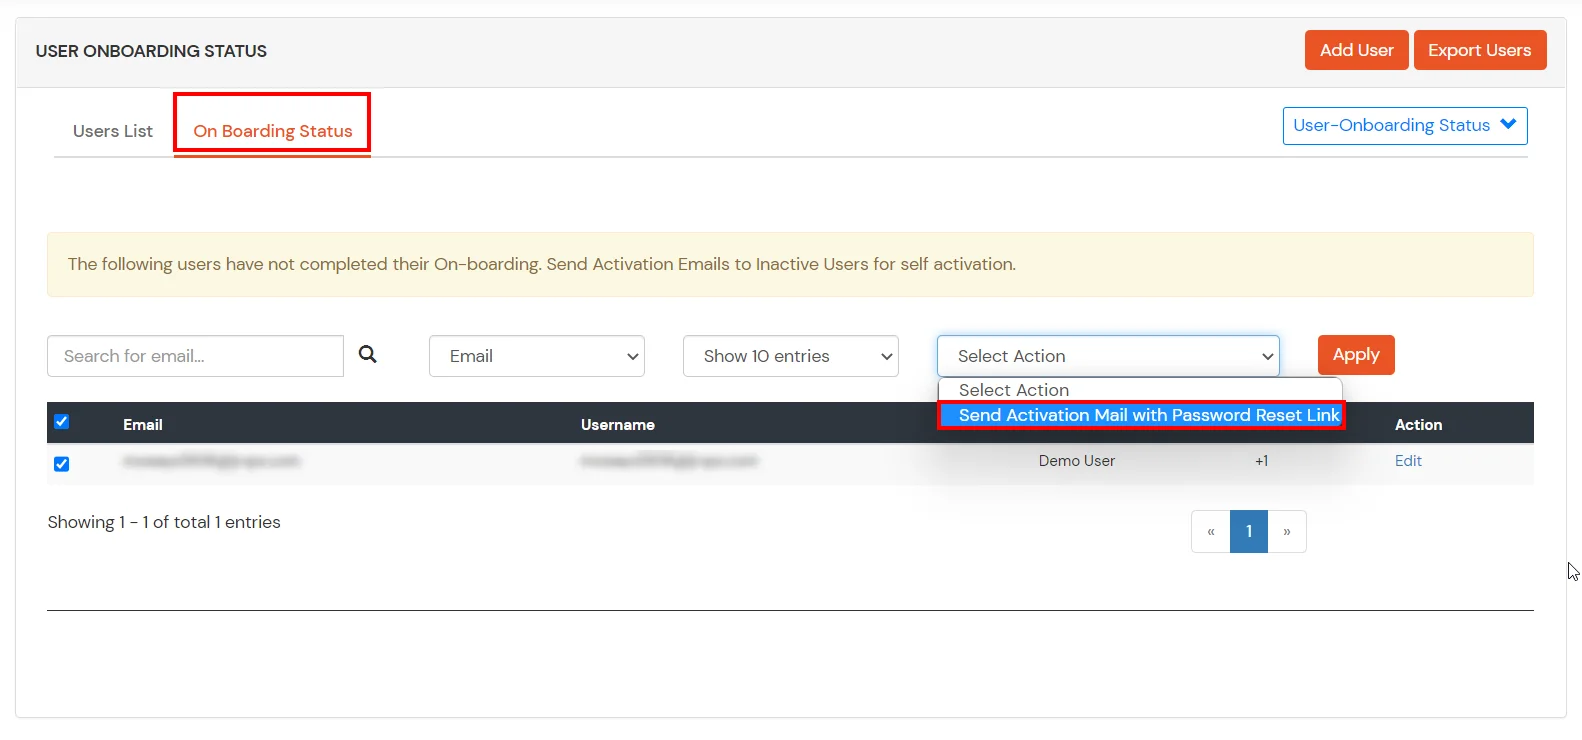
- Click on On Boarding Status tab. Check the email, with the registered e-mail id and select activity Send Activation Mail with Countersign Reset Link from Select Action dropdown list and and so click on Employ push button.
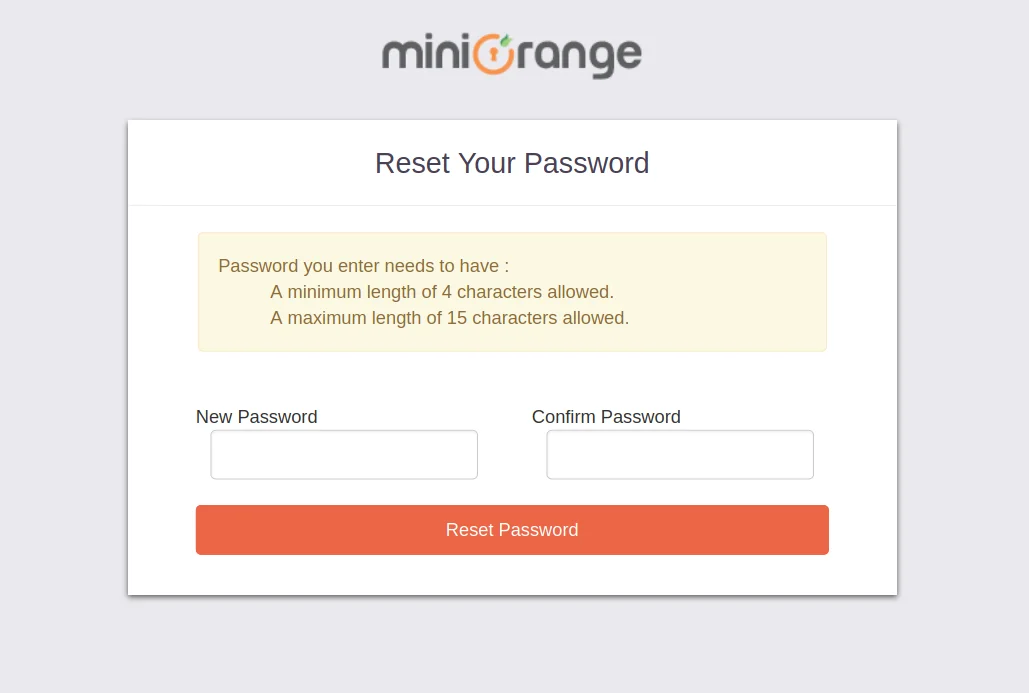
- At present, Open up your electronic mail id. Open up the mail you become from miniOrange and then click on the link to prepare your business relationship countersign.
- On the next screen, enter the password and ostend countersign and then click on the Single Sign-On (SSO) reset password button.
- Now, you can log in into miniOrange account by entering your credentials.
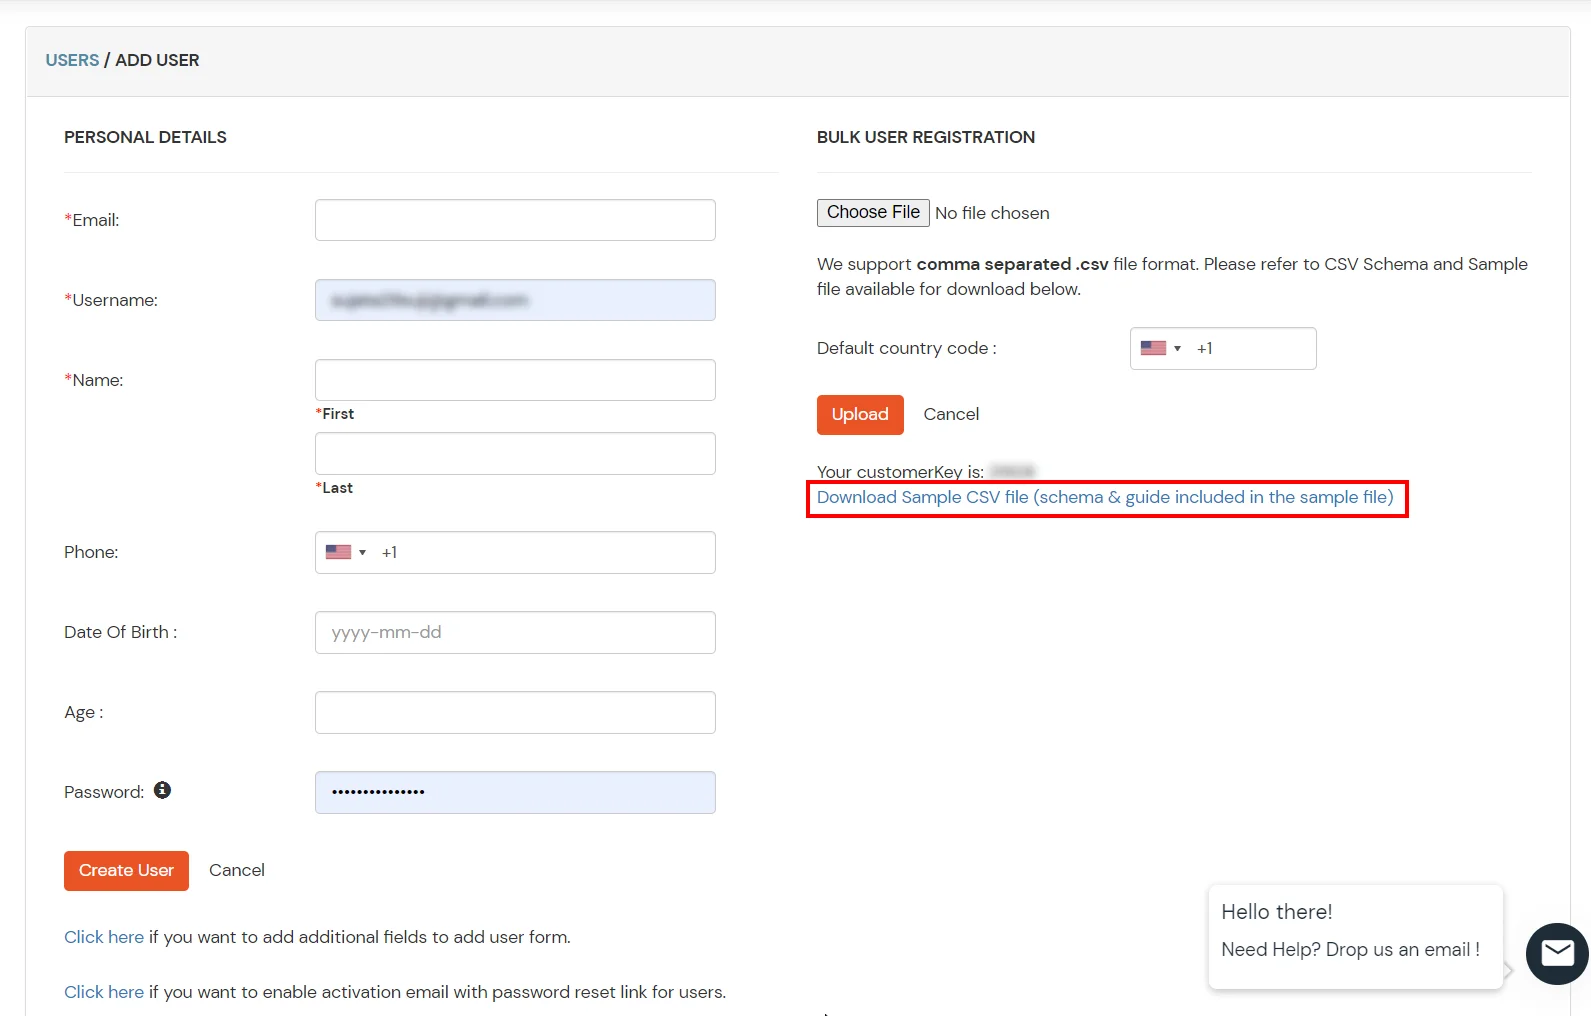
- Navigate to Users >> User List. Click on Add User button.
- In Majority User Registration Download sample csv format from our console and edit this csv file according to the instructions.
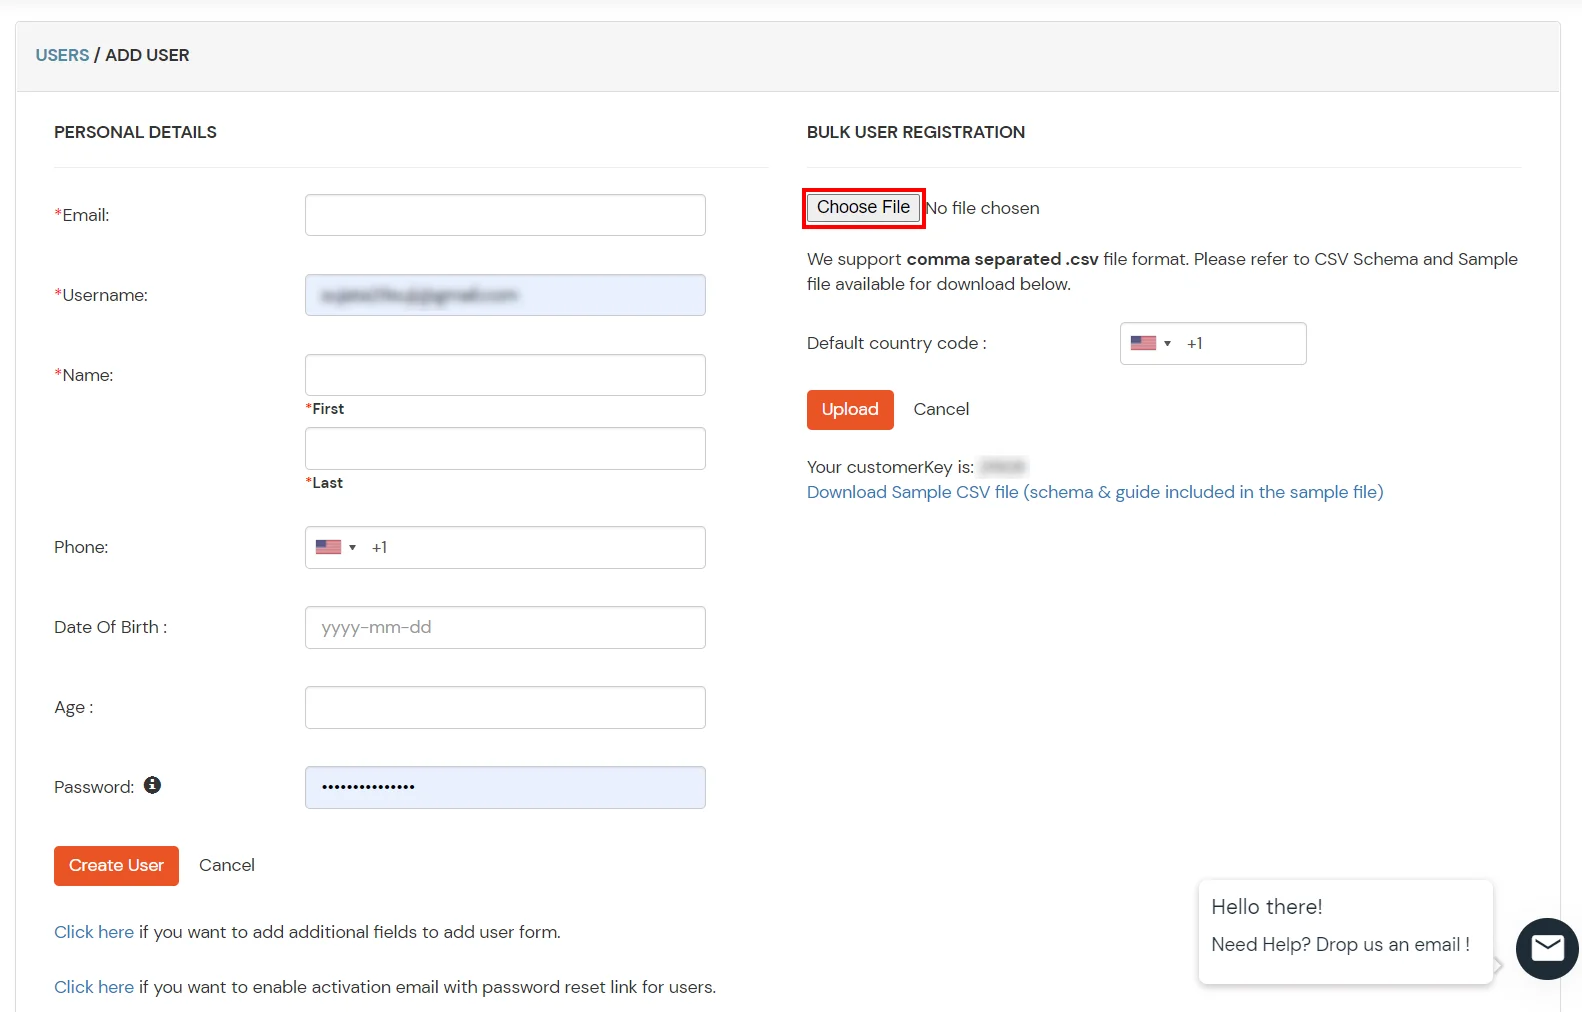
- To bulk upload users, choose the file make sure it is in comma separated .csv file format and then click on Upload.
- After uploading the csv file successfully, you volition see a success message with a link.
- Click on that link you will meet list of users to send activation post. Select users to send activation mail and click on Send Activation Postal service. An activation mail will be sent to the selected users.
1. Create User in miniOrange
ii. Bulk Upload Users
1. Create User in miniOrange
ii. Majority Upload Users in miniOrange via Uploading CSV File.
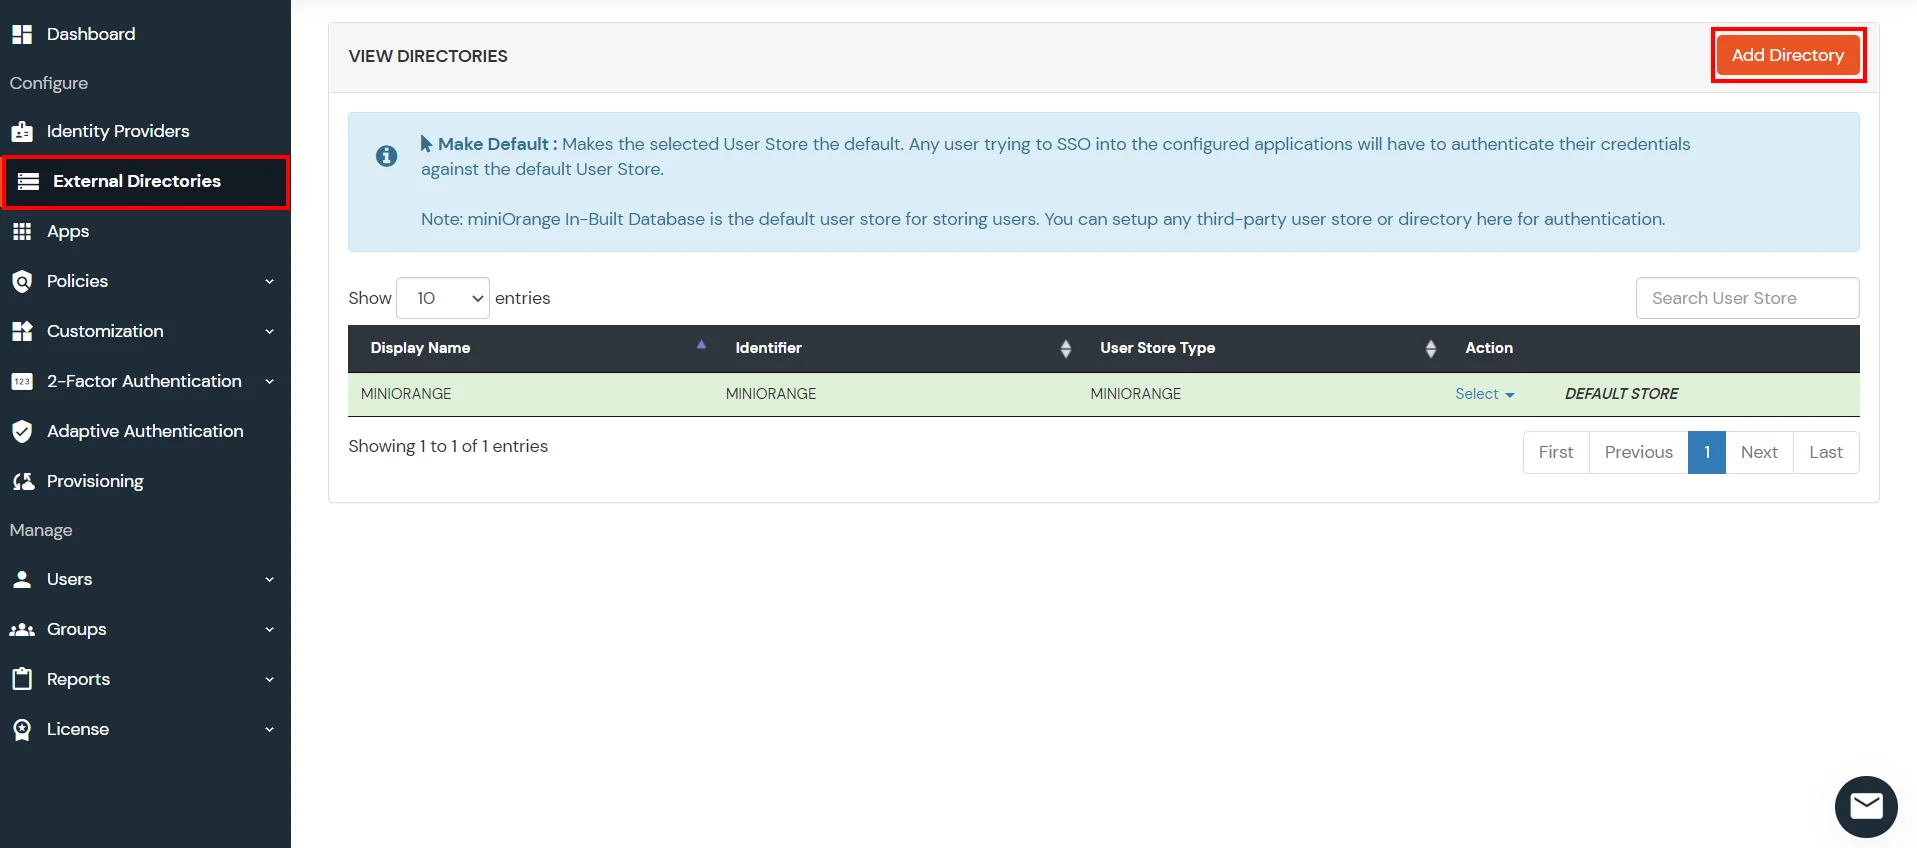
- Click on User Stores >> Add User Store in the left menu of the dashboard.
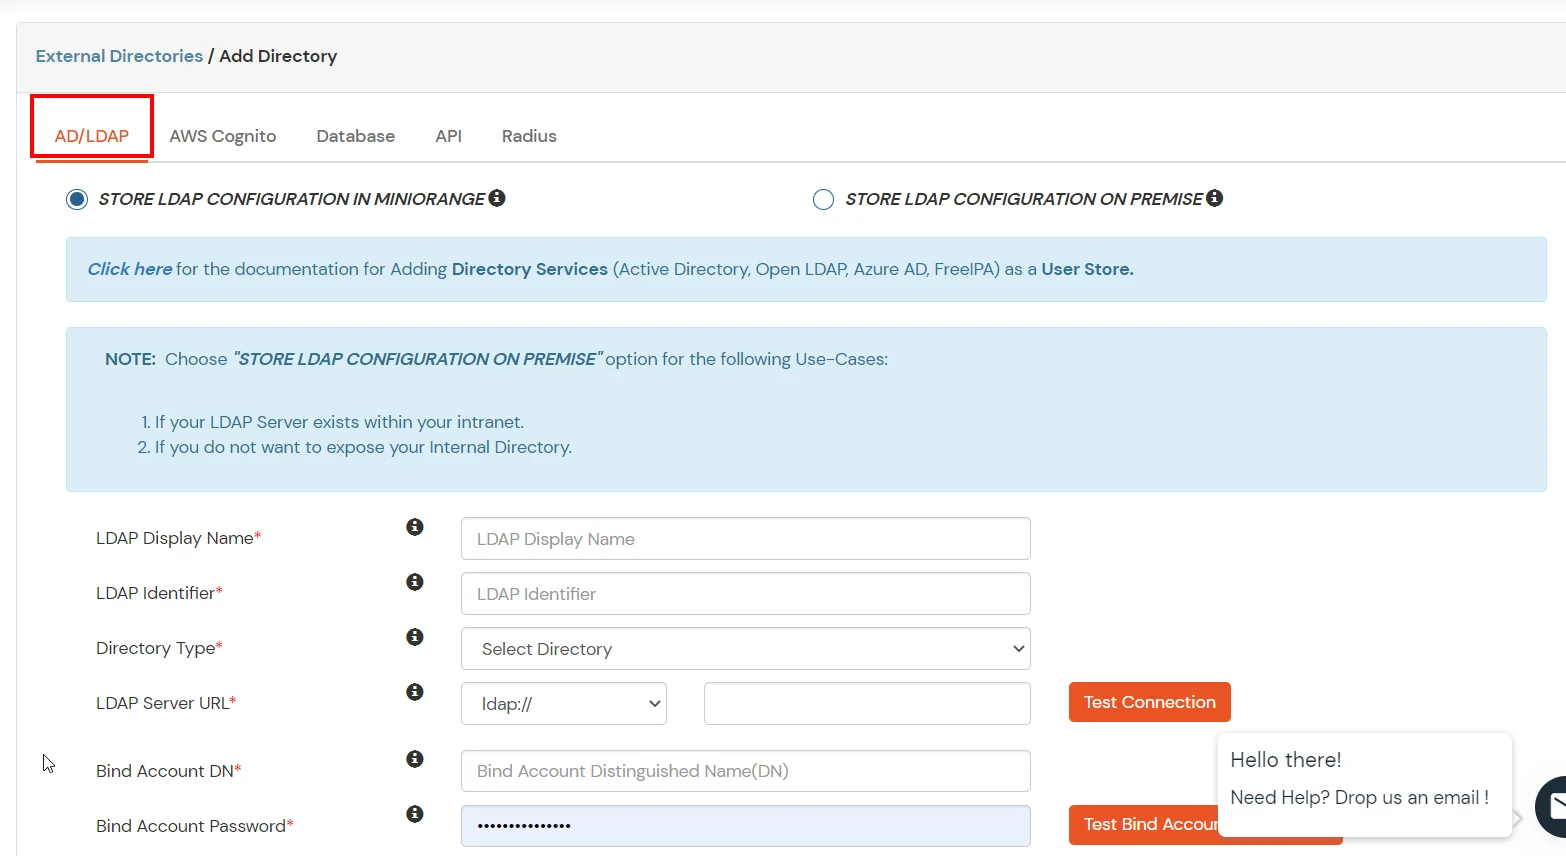
- Select User Store type as AD/LDAP.
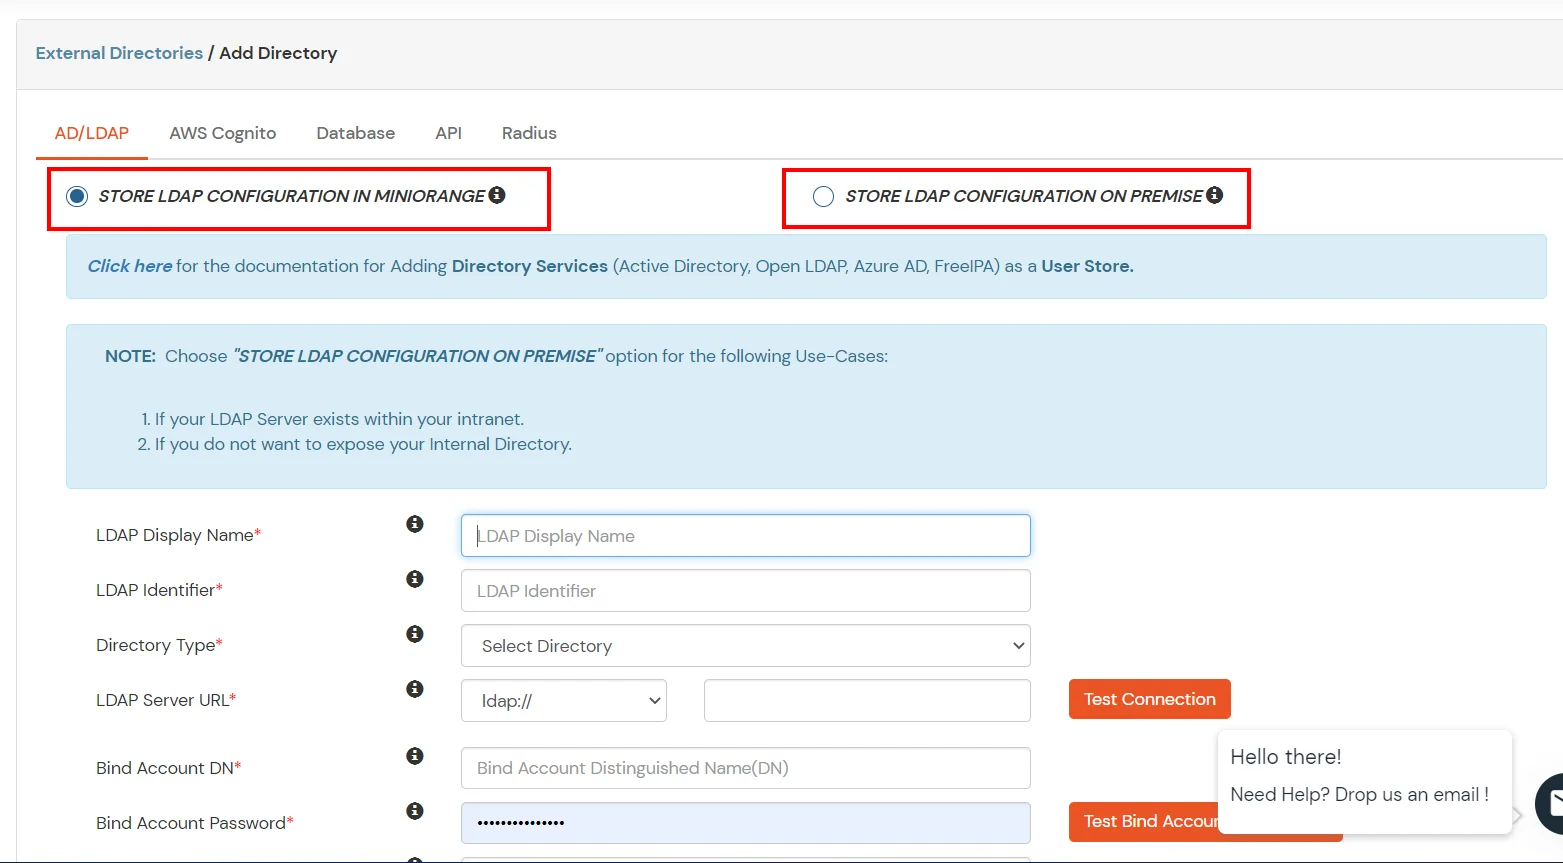
- STORE LDAP CONFIGURATION IN MINIORANGE : Choose this option if y'all want to keep your configuration in miniOrange. If agile directory is backside a firewall, yous will need to open the firewall to allow incoming requests to your Advert.
- STORE LDAP CONFIGURATION ON PREMISE : Cull this selection if you want to keep your configuration in your premise and only allow access to Advertisement inside premises. You will accept to download and install miniOrange gateway in your premise.
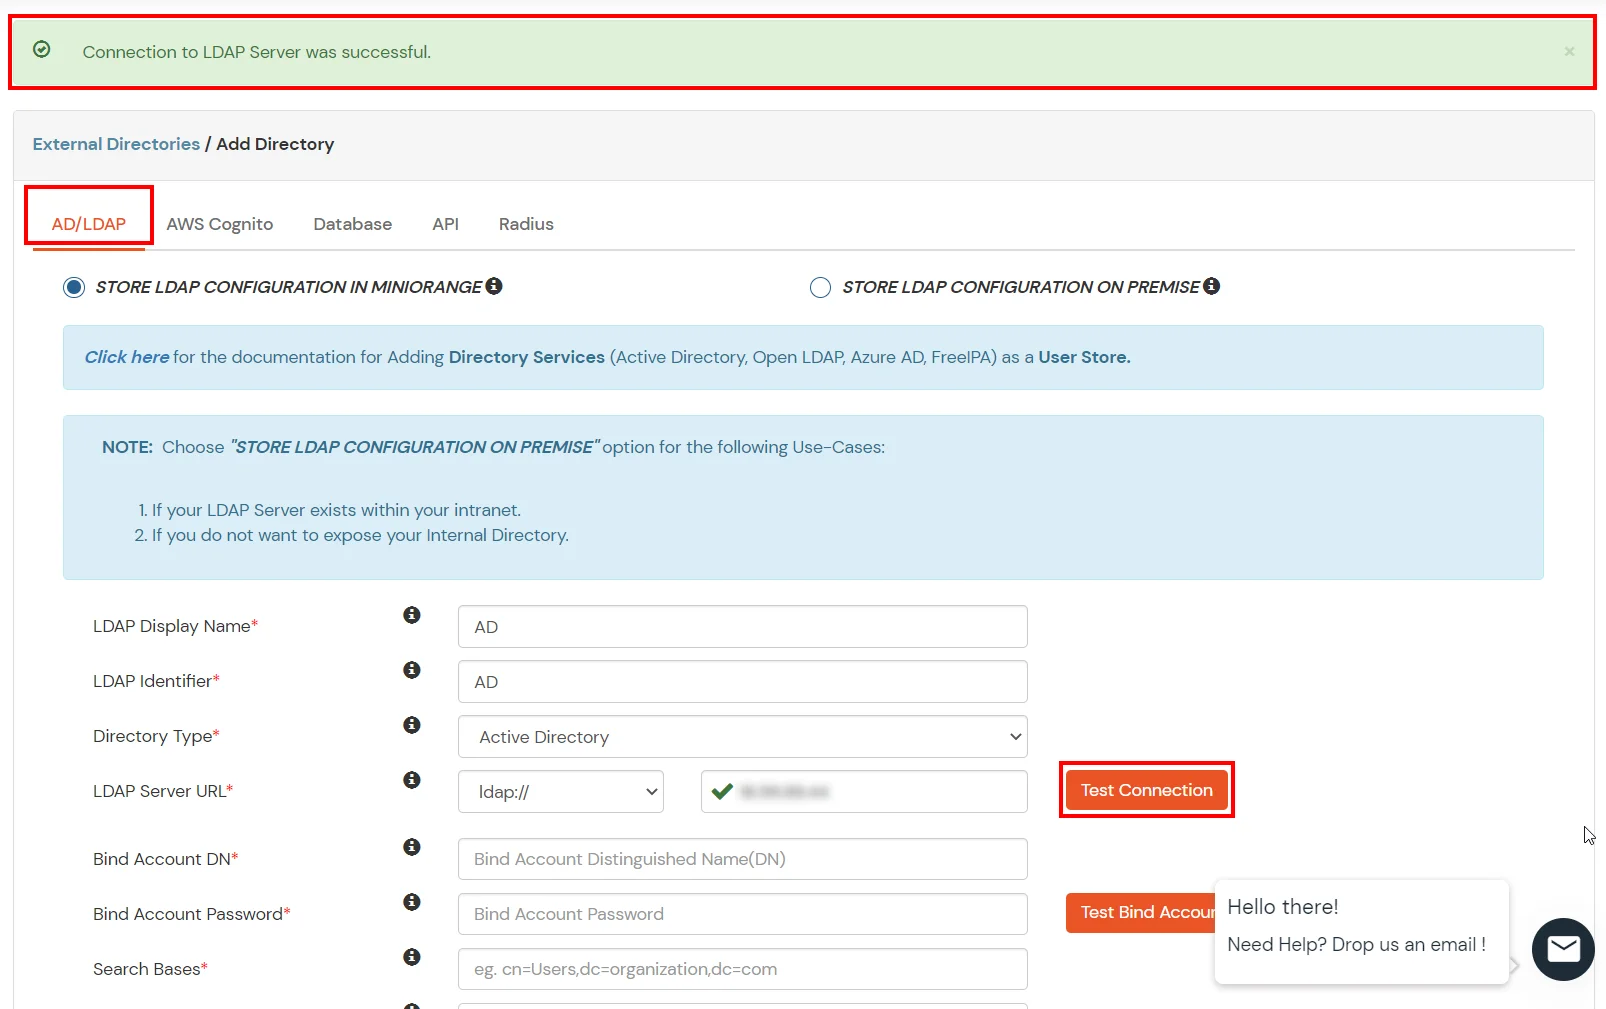
- Enter LDAP Brandish Name and LDAP Identifier proper name.
- Select Directory Type equally Active Directory.
- Enter the LDAP Server URL or IP Address against LDAP Server URL field.
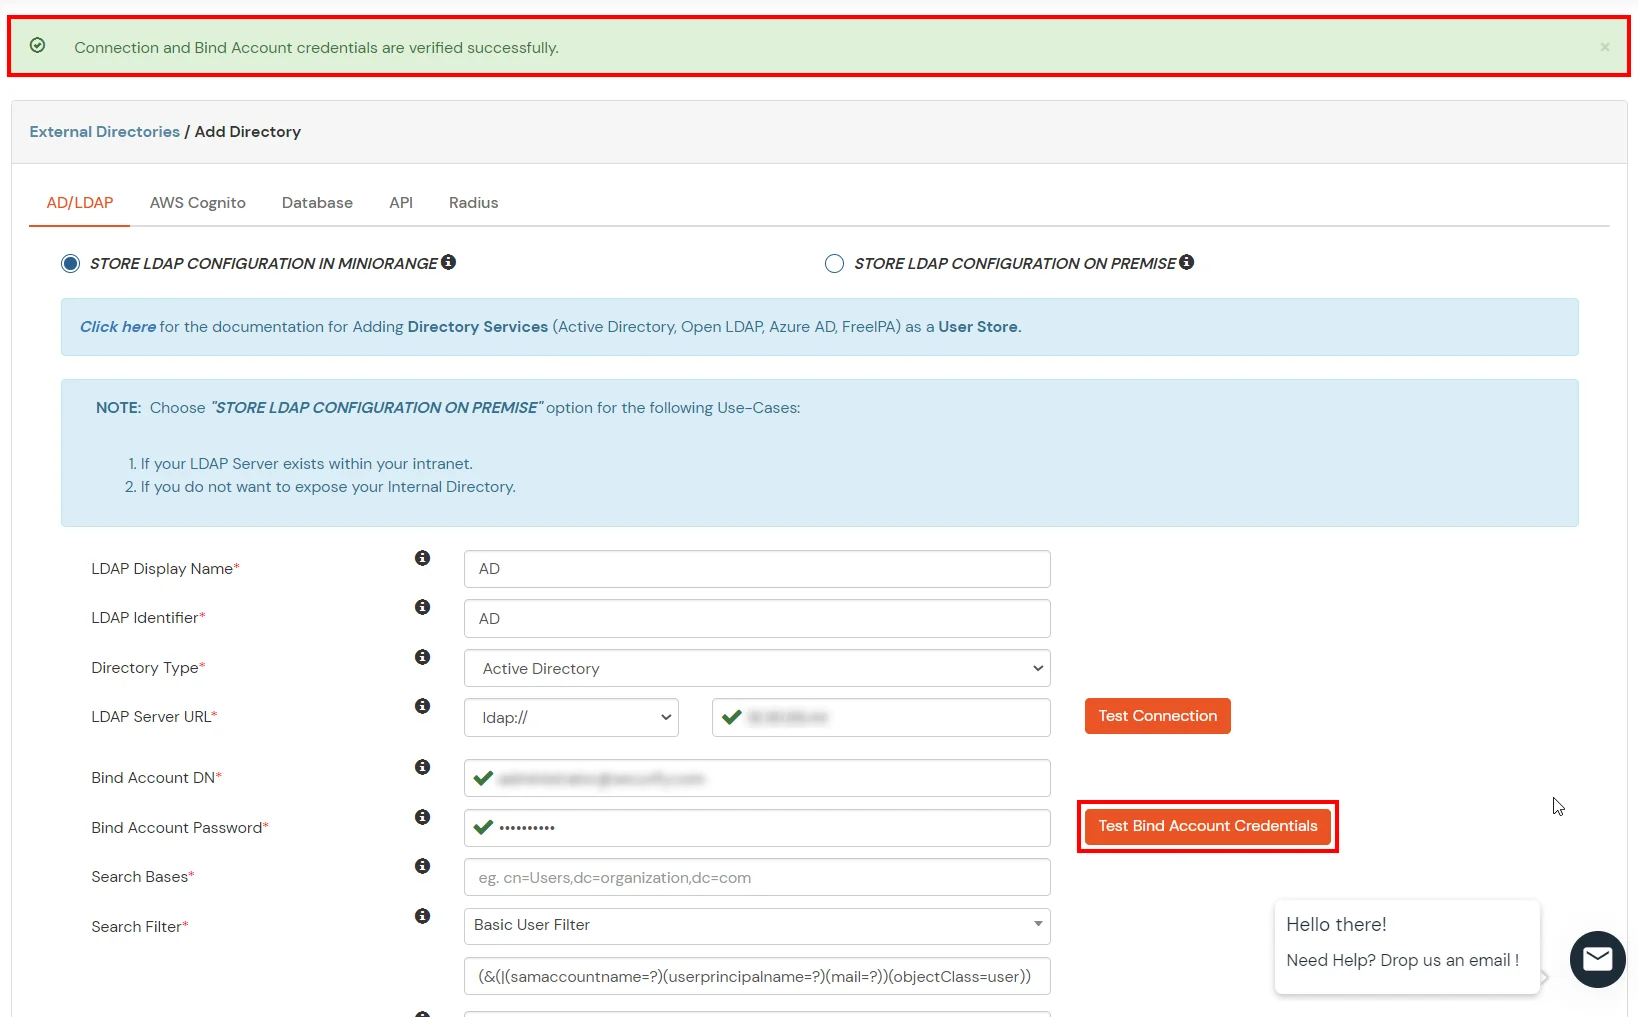
- Click on Examination Connection button to verify if you have made a successful connection with your LDAP server.
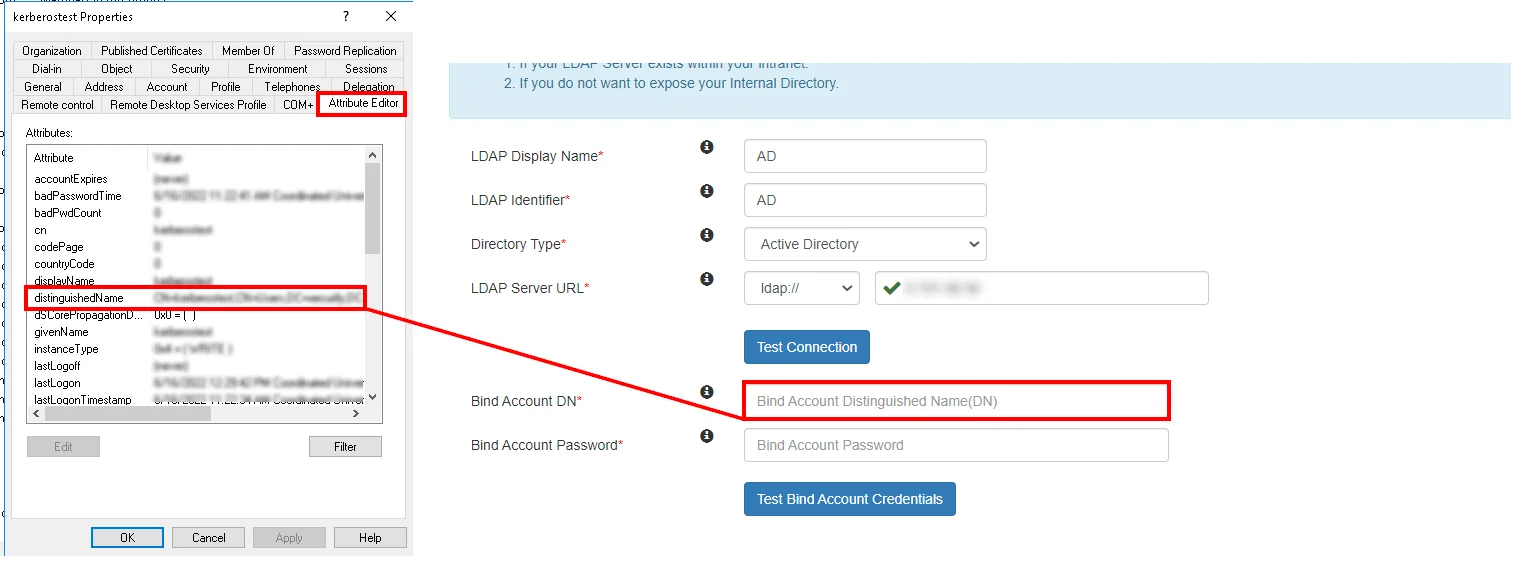
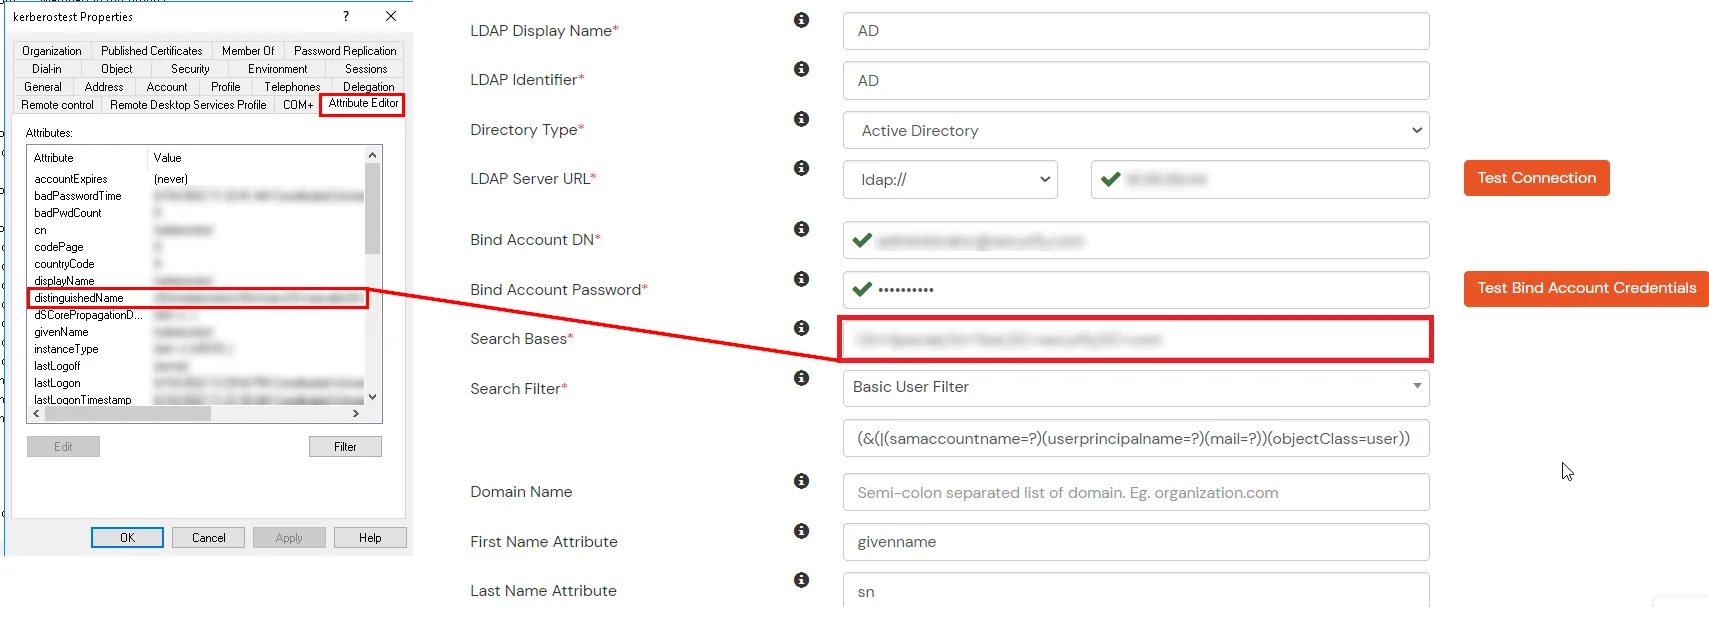
- In Agile Directory, go to the properties of user containers/OU's and search for Distinguished Name attribute.
- Enter the valid Demark account Password.
- Click on Test Demark Account Credentials button to verify your LDAP Demark credentials for LDAP connection.
- Search Base of operations is the location in the directory where the search for a user begins. You will become this from the same place you got your Distinguished proper noun.
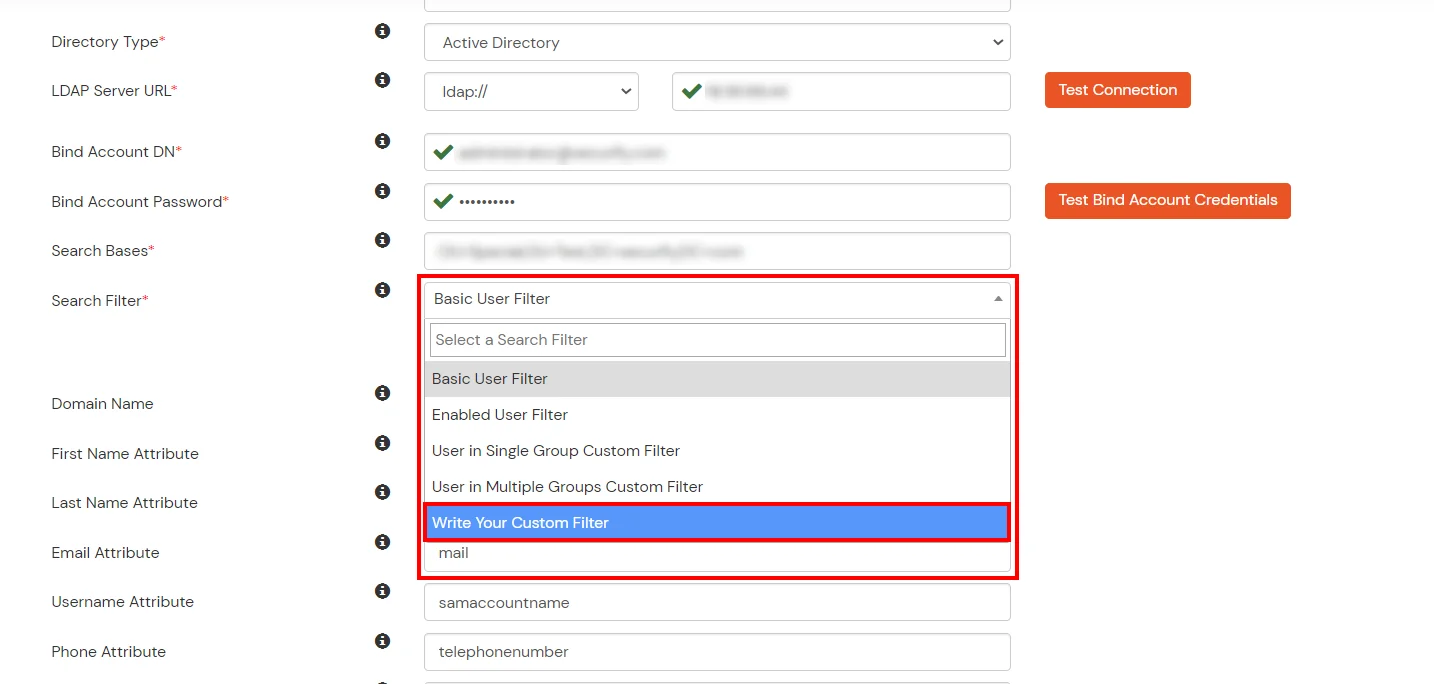
- Select a suitable Search filter from the driblet downward menu. To use custom Search Filter select "Custom Search Filter" option and customize it accordingly.
- Yous can too configure following options while setting up Advertisement. Enable Actuate LDAP in lodge to authenticate users from Advertising/LDAP. Click on the Salvage button to add user store.
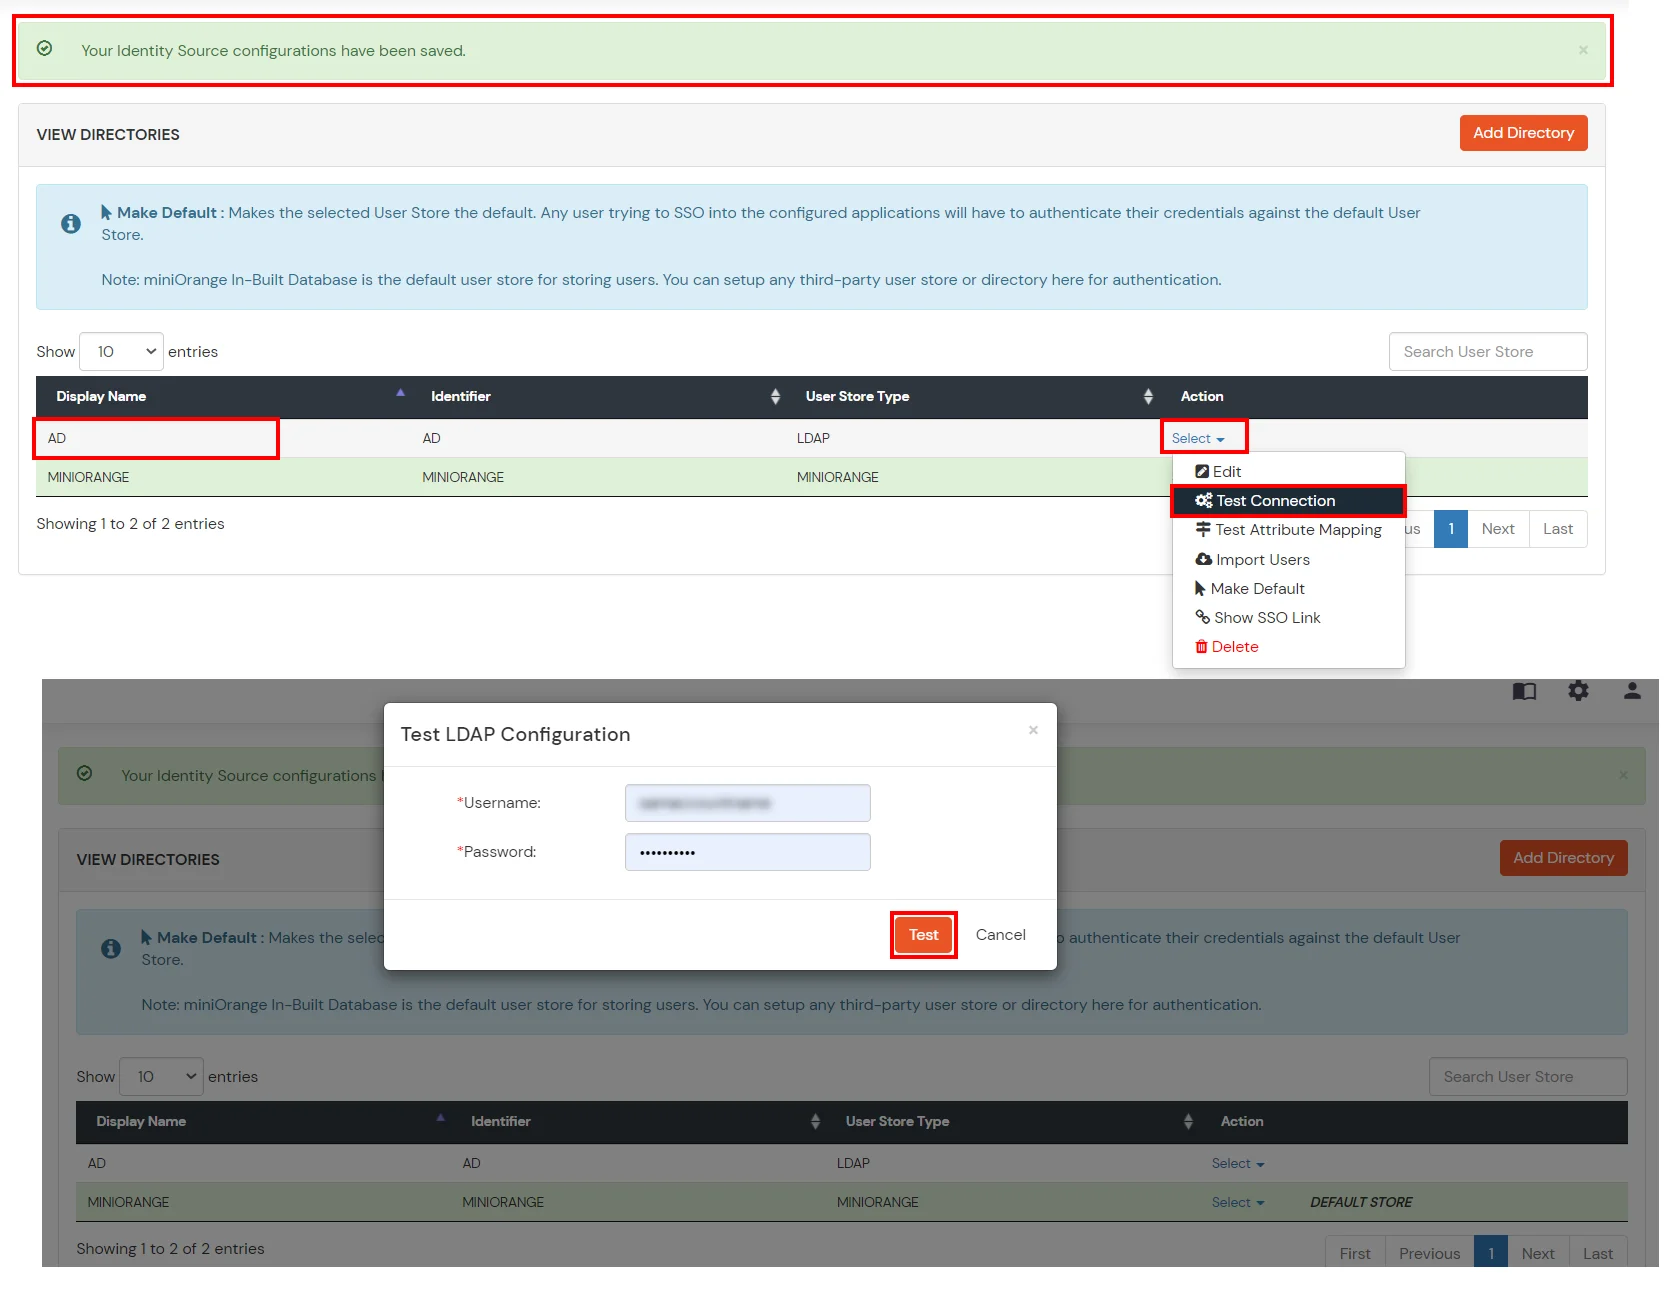
- Click on Save. After this, information technology will prove yous the list of User stores. Click on Test Configuration to check whether you have enter valid details. For that, it will enquire for username and password.
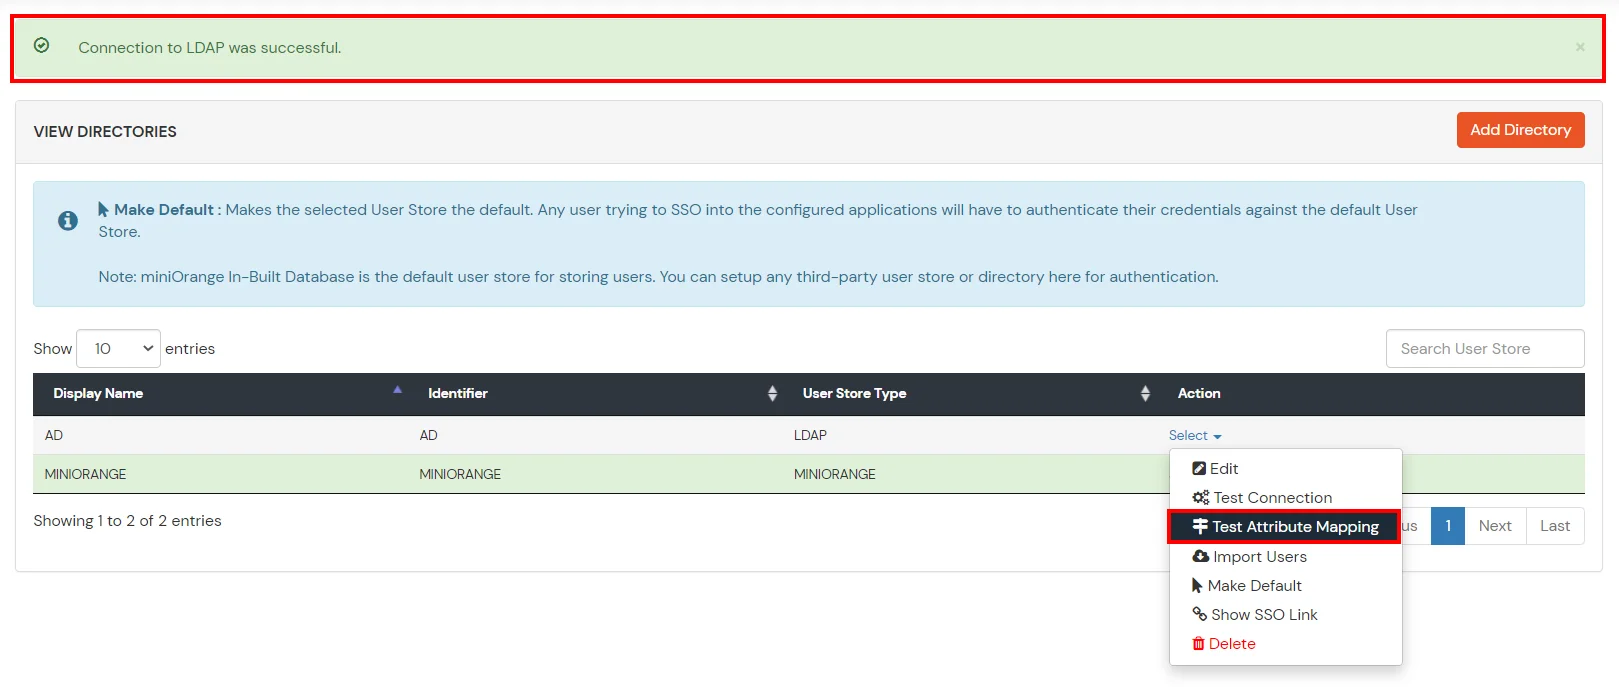
- On Successful connexion with LDAP Server, a success bulletin is shown.
- Click on Exam Attribute Mapping.
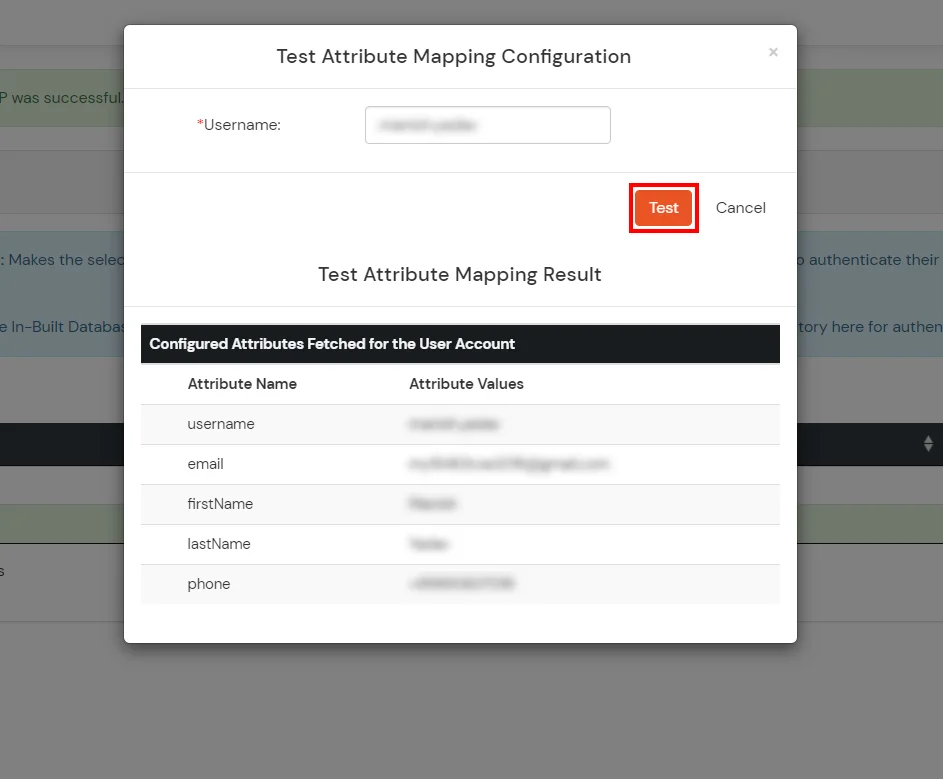
- Enter a valid Username. Then, click on Exam. Mapped Attributes corresponding to the user are fetched.
- Subsequently successful Attribute Mapping Configuration, go back to the ldap configuration and enable Activate LDAP in order to cosign users from AD/LDAP.
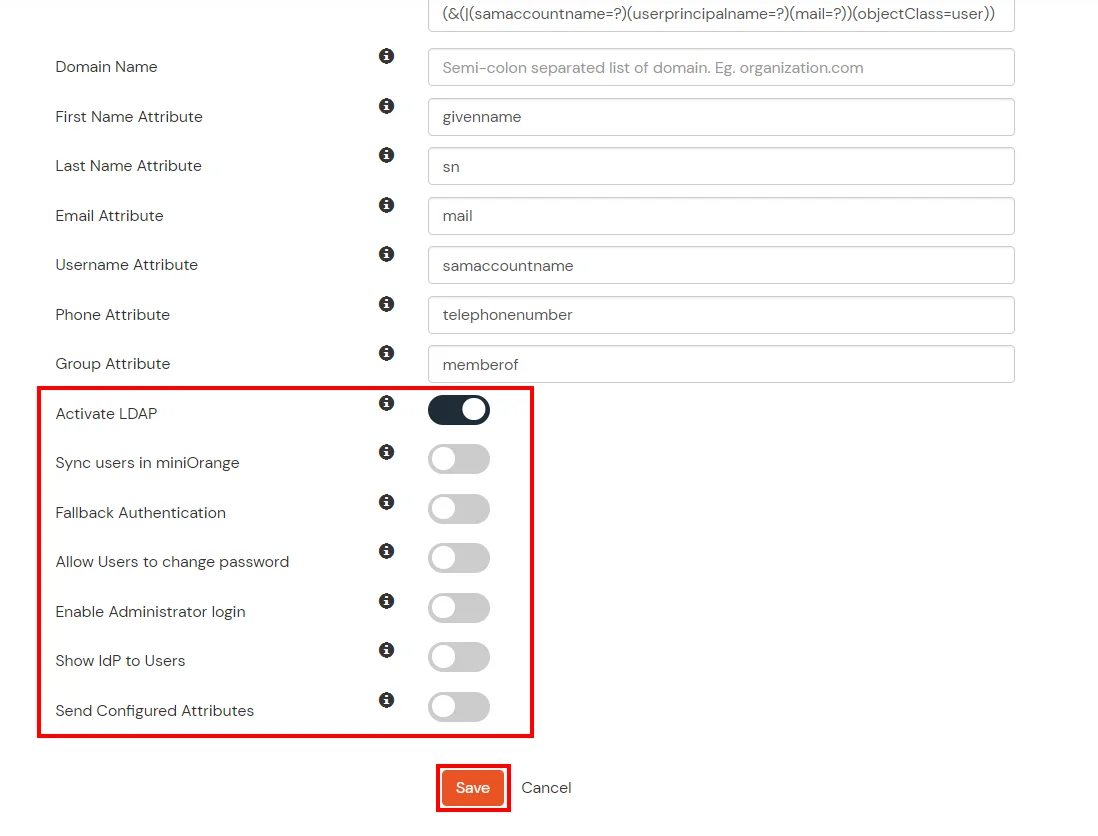
Hither'due south the list of the attributes and what it does when nosotros enable it. You can enable/disable accordingly.
| Attribute | Description |
|---|---|
| Activate LDAP | All user authentications will be done with LDAP credentials if yous Actuate information technology |
| Sync users in miniOrange | Users will be created in miniOrange after hallmark with LDAP |
| Backup Hallmark | If LDAP credentials fail then user will exist authenticated through miniOrange |
| Allow users to change password | This allows your users to change their password. It updates the new credentials in your LDAP server |
| Enable ambassador login | On enabling this, your miniOrange Ambassador login authenticates using your LDAP server |
| Testify IdP to users | If you lot enable this choice, this IdP volition be visible to users |
| Send Configured Attributes | If yous enable this option, then merely the attributes configured below will exist sent in attributes at the time of login |
Refer our guide to setup LDAPS on windows server.
User Import and Provisioning from Advertising
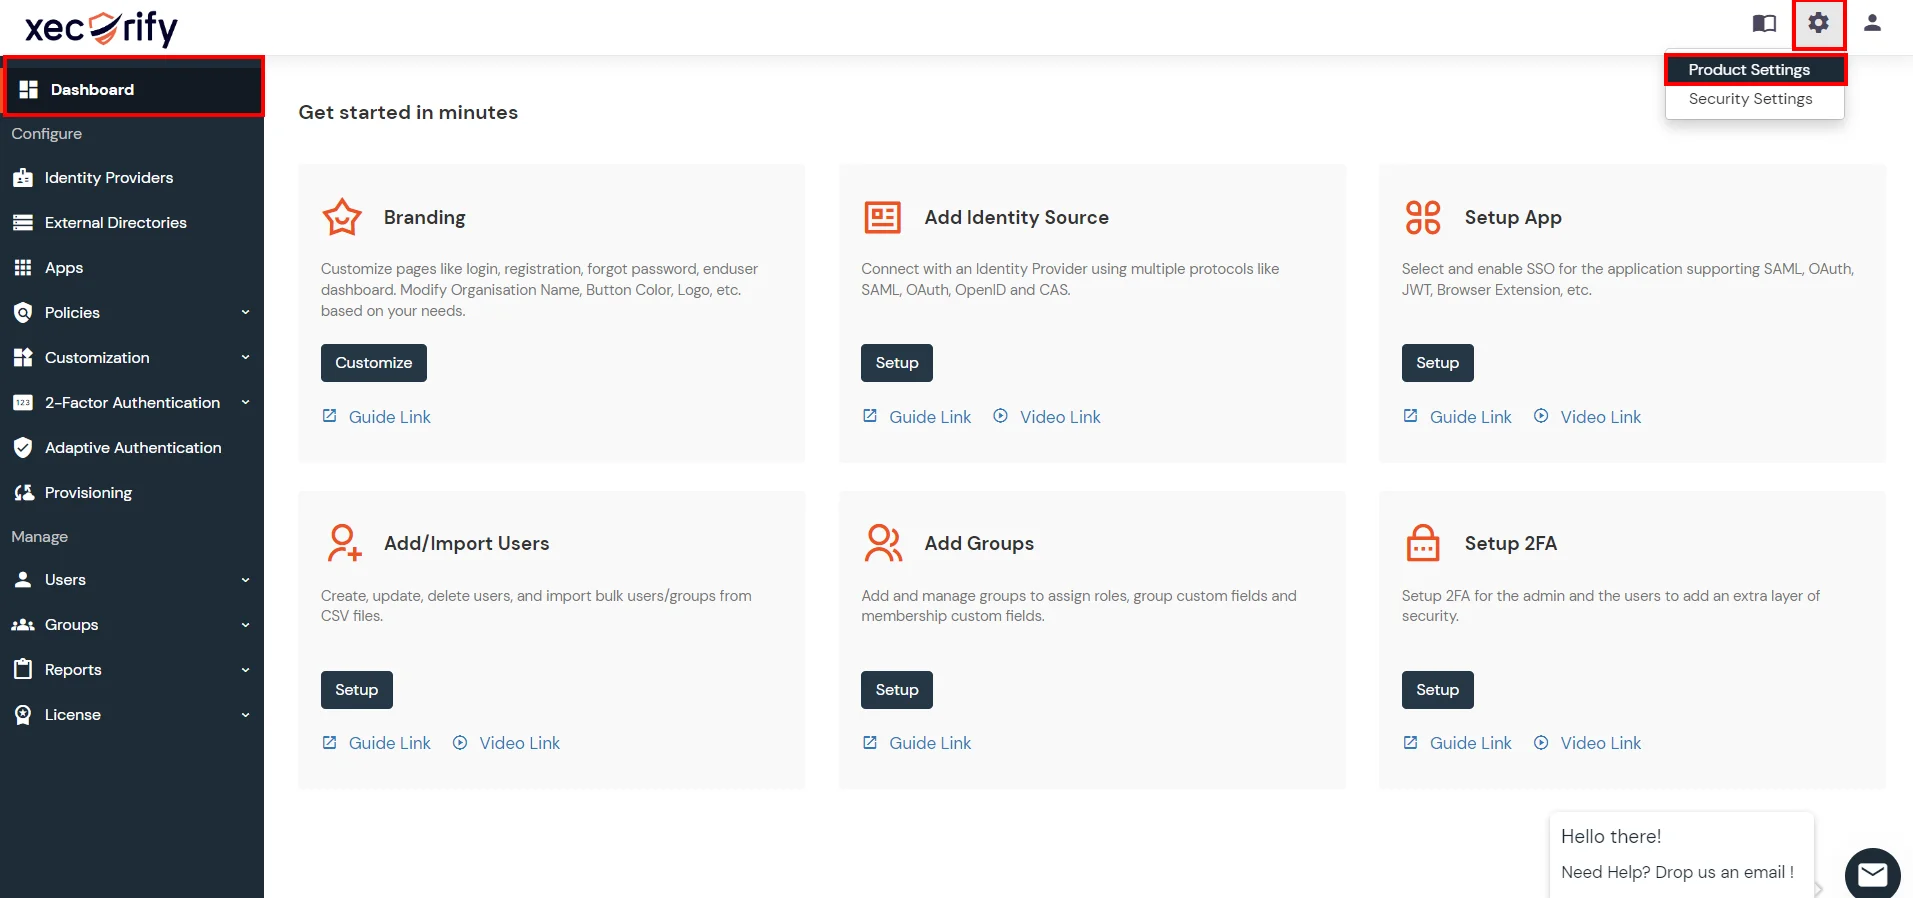
- Go to Settings in the Customer Admin Account.
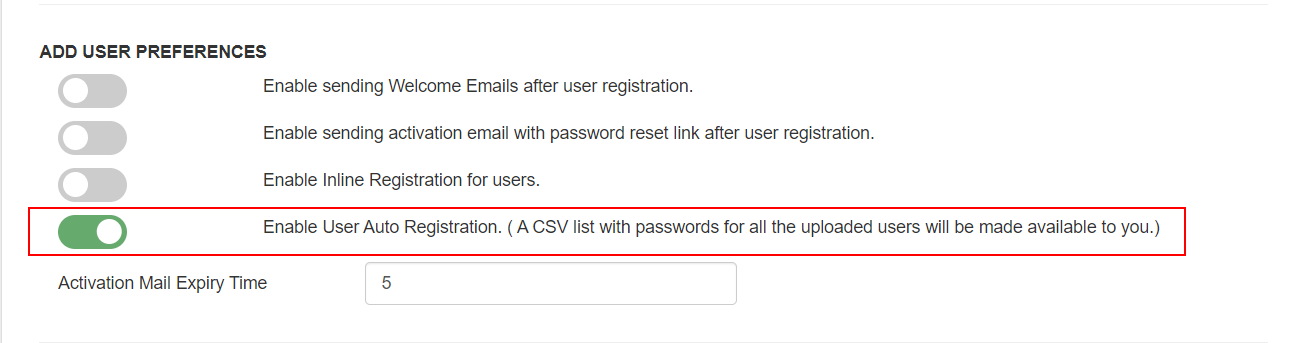
- Enable the "Enable User Machine Registration" pick and click Save.
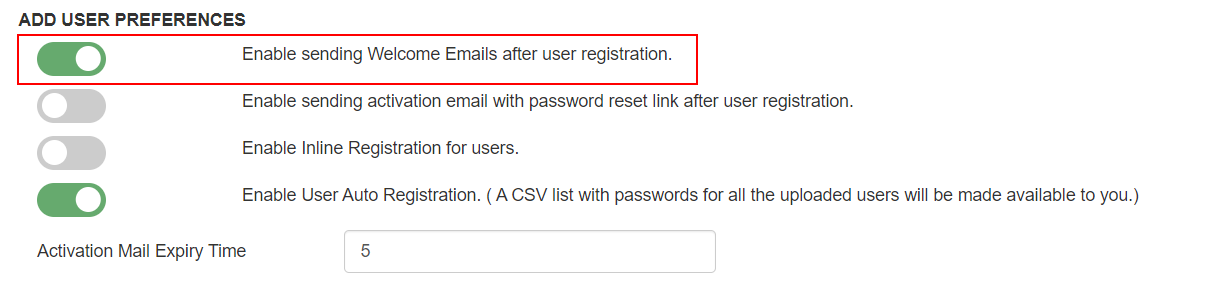
- (Optional) To send a welcome email to all the stop users that will be imported, enable the "Enable sending Welcome Emails after user registration" pick and click Relieve.
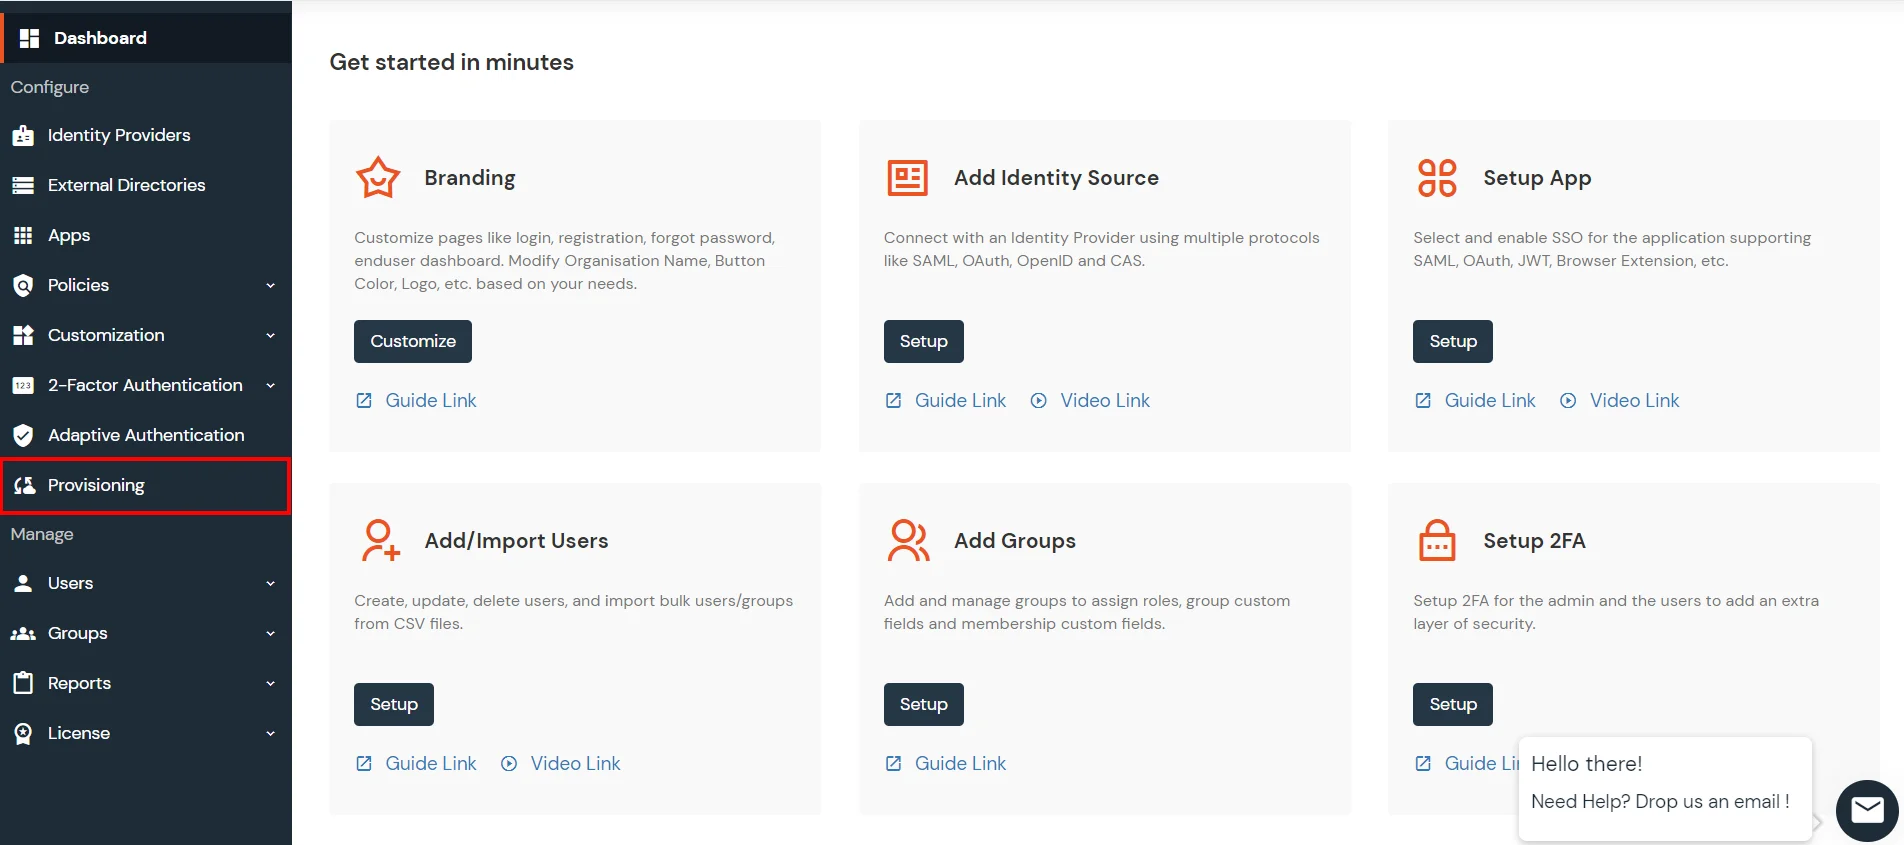
- From the Left-Side carte of the dashboard select Provisioning.
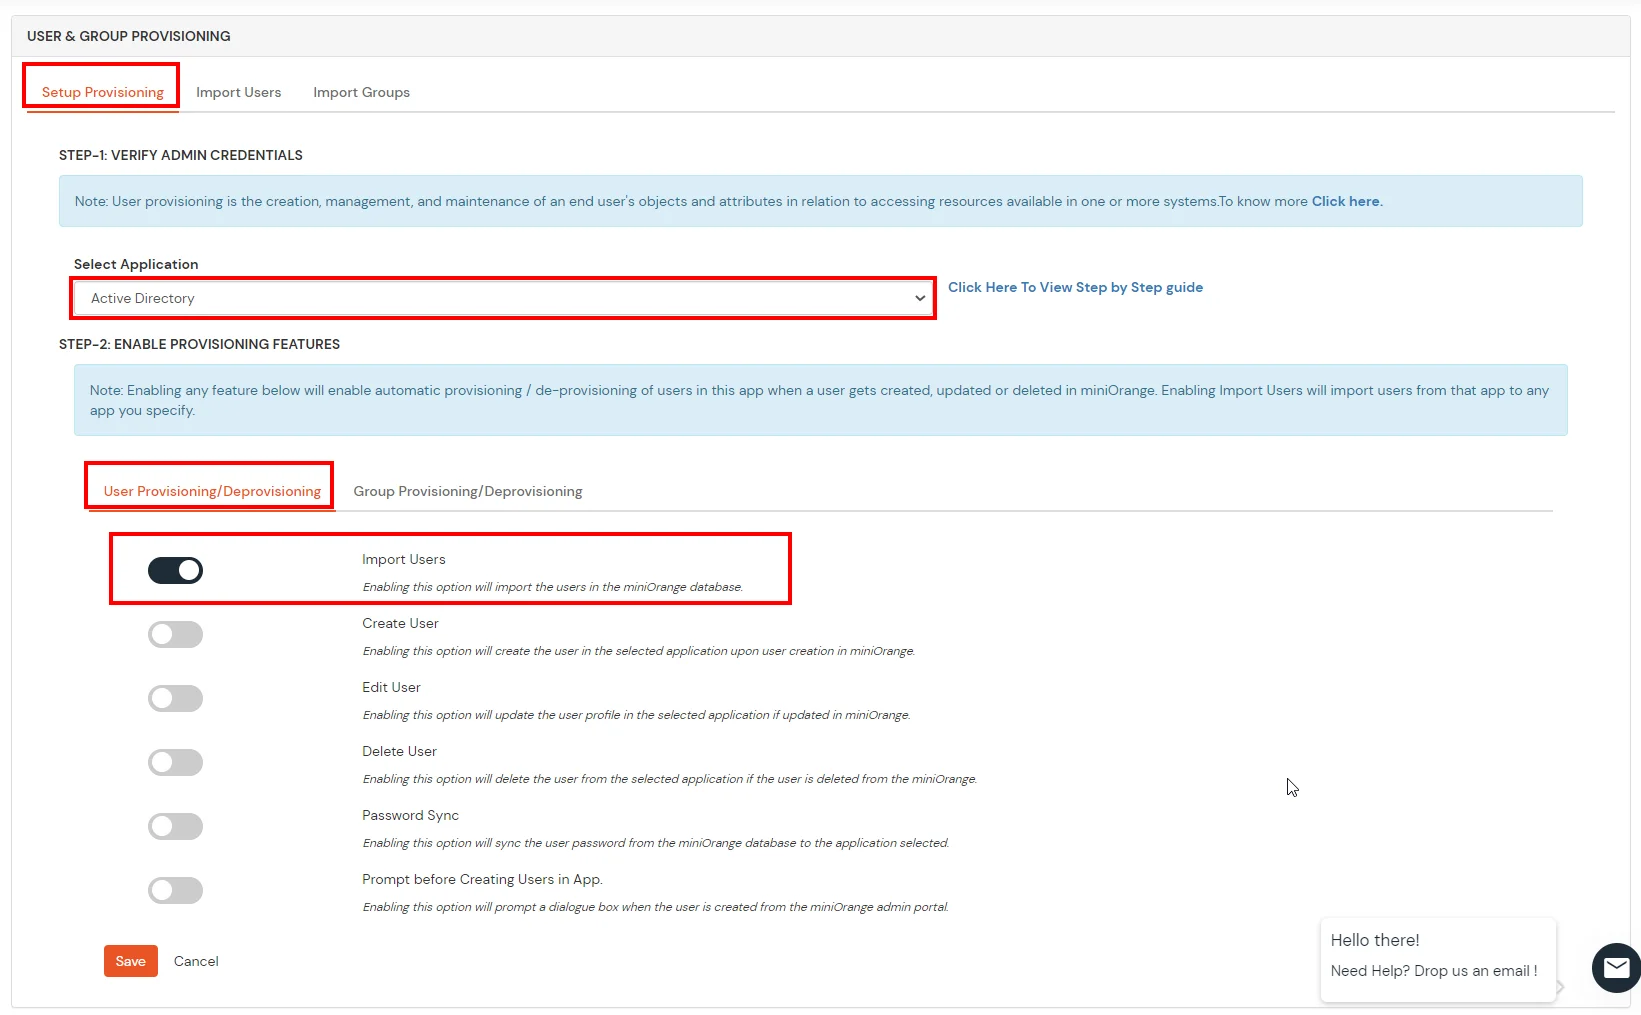
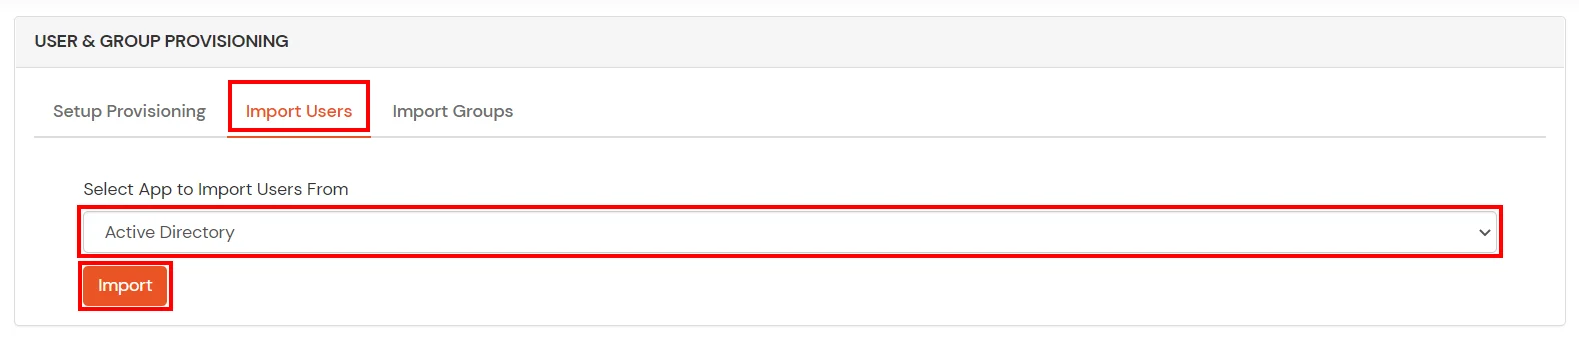
- In Setup Provisioning tab select Agile Directory in the Select Application Drop Down.
- Toggle the Import Users tab, click on Salve button.
- On the aforementioned section, switch to Import Users department.
- Select Agile Directory from the dropdown and click on the Import Users tab, to import all the users from Active Directory to miniOrange.
- You can view all the Users you lot have imports by selecting Users >> User List from Left Panel.
- All the imported users will exist auto registered.
- These groups volition be helpful in calculation multiple 2FA policies on the applications.

miniOrange integrates with diverse external user sources such as directories, identity providers, and etc.
- Okta
- ADFS
- Ping
- AWS Cognito
- Many more
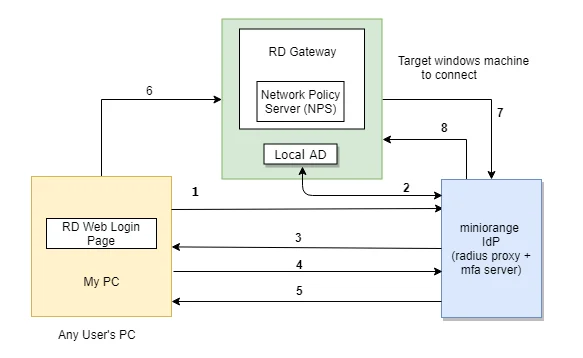
miniOrange Credential Provider for Remote Desktop Service (RDP)
The user initiates the login to Remote Desktop Service either through a Remote Desktop Client or via the RD Spider web login page from his browser, after which the RADIUS request is sent from the miniOrange RD Web component installed on the target machine to the miniOrange RADIUS server, which authenticates the user via Local AD, and after successful authentication, ii-cistron authentication of the user is invoked. Later on the user validates himself, he is granted access to the Remote Desktop Service(RDP).
A user can endeavour to connect to RDS (Remote Desktop Services) via 2 means :
- RDC - Remote Desktop Client: If the RemoteApp is launched through a Remote Desktop client awarding, the users validate their 2-factor hallmark while they enter the Username and Password to get access to the resources. (as this method doesn't support access-claiming response, simply out of ring authentication methods are supported ).
- RD Web Access - RD login page via browser: If the desktop or RemoteApp is launched through a RD Spider web Login folio, the initial user authentication is done from the car's AD, later which miniOrange challenges the user for 2-cistron authentication via a RADIUS claiming request. After the users correctly cosign themselves, they go connected to their resource.
Two-Factor Authentication(2FA/MFA) for RDS via RD Spider web
How it works
- In this case, the user goes to RD Web login page from his browser to connect to the Remote Desktop Service. He enters his Username and Countersign, and on submission, the RADIUS request from RD Web component installed on target machine is sent to the miniOrange RADIUS server which authenticates the user via local AD in the target machine.
- Once authenticated, it sends a RADIUS challenge to RD Web, and the RD Web shows OTP screen on browser now. Once the user enters the One time Passcode, the miniorange IdP verifies it and grants/denies access to the RDS.
- With this, after the user is connected to the Remote Desktop Service, the user can likewise gain admission to published remote app icons on his browser screen, since the session has already been created for the user.
Using Angular for Saml Idp Login Page
DOWNLOAD HERE
Source: https://www.miniorange.com/two-factor-authentication-(2fa)-for-windows-login-and-rdp
Posted by: bradleyhatemselithe.blogspot.com